before & after

Commercial Drone Video before and after asphalt paving in Belen New Mexico

Commercial Drone Video before and after asphalt paving in Belen New Mexico

Before and After Drone Video for Sunland Asphalt in Belen New Mexico

Back flying for Sunland Asphalt, this time in Belen, New Mexico, I made two visits to Vista del Rio for a “before and afterdrone video showing the crew at work putting in the new asphalt, and then the after of the fully repaved community. These types of drone flights are always dynamic and I enjoy the challenge of capturing live action with the drone. Thank you to Jeff of Sunland for continuing to choose me as your drone pilot!

Read More

Paving Parking Lot Commercial Drone Video Before and After for Sunland Asphalt in Rio Rancho

Paving Parking Lot Commercial Drone Video Before and After for Sunland Asphalt in Rio Rancho

Drone video and photography for asphalt marketing content in Rio Rancho

Sunland Asphalt has become a new, and already returning, drone video and photography client where I go out and get “before and after” drone content of huge parking lots they have resurfaced. This time I went to a school in Rio Rancho to get drone video and aerial photos of the crew in action doing the resurfacing. It is always a challenge flying over live action where I do not know what is going to happen next and there are trees and light poles all around. I have to admit, my instincts were uncanny, or I just got super lucky, to often have the drone in the right place at the right time to capture the action just as it happens! The “after” drone content was much easier to get of course, as I just went on an evening near sunset time to get glamour shots of the finished parking lot. I really cannot believe how much of a difference a resurfaced parking lot makes aesthetically! Thank you Sunland for choosing me as your drone pilot and I have a new appreciation for the beauty of the parking lot the crew created.

Read More

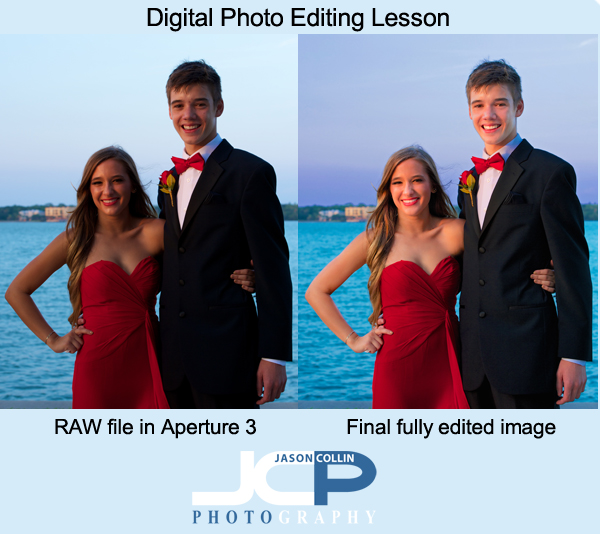
Digital Photo Editing Lesson with Stacy - prom couple before and after

The past few weeks I have been teaching former Morean Arts Center photography student, Stacy, how to develop a Mac digital photo editing workflow.  She is new to Mac as well, so I have been showing her some of my top tips for using OS X as efficiently as possible (hint, use Expose every day).  She also got the same apps I have so she could learn my exact photo editing workflow which starts in Aperture 3, then Color Efex Pro 3, then finally Photoshop CS5.  

Stacy made this photo of her daughter and her boyfriend on their junior prom night.  No flash was used, only natural light.  Here is the process for how the photo was transformed:

Aperture 3 workflow:

  • white balance slider increased toward cooler (blue)
  • shadows slider increased
  • mid-level contrast slider increased
  • dodging brush used on all skin areas

Color Efex Pro 4 (she has 4, I use 3):

  • Polarization filter applied
  • Pro Contrast filter applied

Photoshop CS5 (approximate steps):

  • Quick Select Tool used on all skin areas
  • Dodge Brush used selectively
  • Healing Brush used for blemish removal
  • Clone Stamp Tool used for more complex blemish removal and slight skin softening in general
  • Dodge Brush used in highlights mode to brighten eyes & teeth
  • Clone Stamp Tool used to lighten under the eyes
  • Quick Select Tool used on water
  • Contrast adjustment made selectively to water
  • Quick Select Tool used on sky
  • Highlights adjustment made selectively to sky
  • Saturation adjustment made selectively to sky
  • Unsharp Mask filter applied

None of these individual techniques is advanced.  To a properly trained Photoshop professional they might even seem crude.  However, what each technique lacks in complexity, the complexity comes from knowing when and how to use each one to accomplish a photo retouching goal.  At each stage of editing the photo looked better.  Through experience it can be learned how to keep adding yet another stage to one's editing workflow to make a photograph reach its full potential, or in some cases, save a photo that would otherwise be culled.

How to fix black clouds in HDR images using layer mask

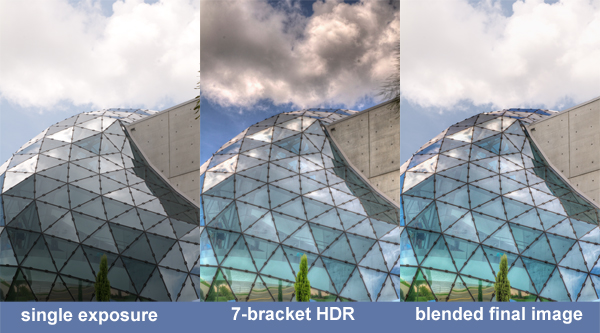
HDR photography and images are very popular right now.  I, myself, have participated in a local exhibition featuring only HDR images.  The thing is, I do not care for 90% of HDR photography I see.  There is a large debate about processing HDR images to look more real or more hyper real.  I am not referencing that debate here.  For me, a simple reason why I do not find a vast majority of HDR images appealing is because they suffer from horrible shadow effects as demonstrated in the black clouds in the center image above.  As you can see with the single exposure photo, the sky looks good, but there is no detail inside the glass.  The 7-bracket HDR image reveals what is under the glass and adds better color, but at the expense of the clouds.  Therefore, the best final results come from blending the single exposure photo with the 7-bracket HDR image.
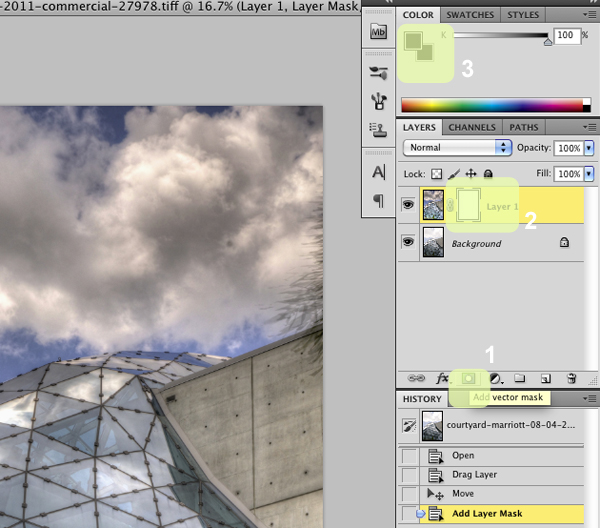
1. click on add layer mask (sorry, shows vector) 2. click on layer 1 3. paint with a black brushBlending two images together is not a difficult time consuming process using Photoshop.  The screenshots in this post are using CS5, but other versions should basically be the same.

First, open the single exposure photo and 7-bracket HDR image in Photoshop.  Drag the 7-bracket HDR image on top of the single exposure photo.  Once you do this you will only see the 7-bracket HDR image.  The single exposure photo is completely hidden underneath.  Our goal is to reveal only the parts of the single exposure photo we want, in this case, the clouds and sky.

After you have dragged the 7-bracket HDR image on top of the single exposure photo, follow the three steps highlighted in the screenshot above: 

  1. Click on "Add layer mask"
  2. Click on "Layer 1"
  3. Select the Brush tool: soft brush setting, black, 60% opacity (or similar, just not 100%) 
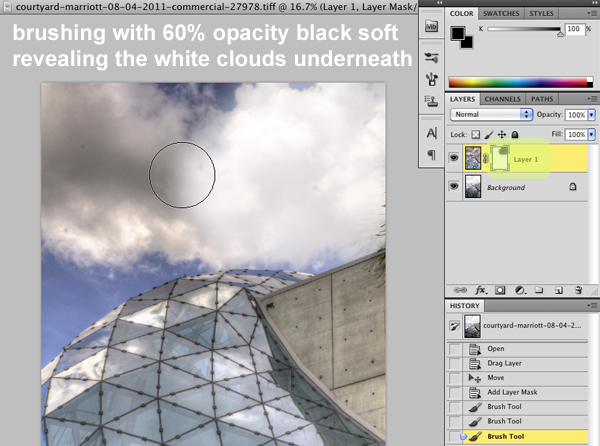
Now using the Brush tool at the settings described above, slowly brush the areas you want to reveal.  The 7-bracket HDR image starts to disappear revealing the single exposure photo below.  In the above screenshot you can see that I already revealed the nice white clouds on the right side.  Here is an extra tip:  I also used the Brush tool on the concrete wall of the building that looked too black & dirty to reveal the cleaner wall from the single exposure photo.  If you make a mistake and reveal something you did not want to, set the Brush color to white and the top image will return.
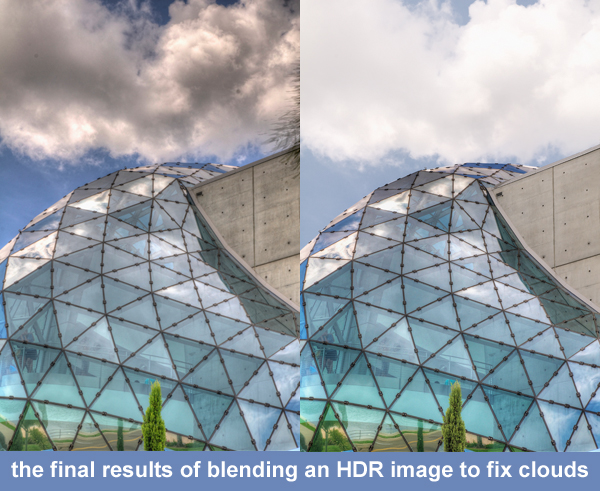
Here again are the before and after results.  By using a layer mask you can create a dynamic hdr image and still maintain the clean look of clouds, walls, etc in the image.  This vector mask technique is great for other photography tricks too.  Want to change the background on a portrait?  You can do that following this same process! (see results here)

Try the vector mask process on some of your images and be sure to post links to the results in the comments below. 

  • Read more photography tips
  • Reserve your own 1-on-1 DSLR Photography Lesson with Jason today!
  • Learn more about the lessons
  • The advantage of using HDR processing in photography

    Over the past few years HDR processing has becoming very popular.  A term has even been coined for photographers who first discover HDR then basically only ever make HDR images from then on, "falling into the HDR hole."  It took me a long time to come around to realizing the benefit of HDR because, frankly, all the HDR images I saw online I thought were horrid, and I still personally do not care for a majority of HDR images I see.  This is of course a heated topic in the photography community.  However, for this photography tip, I just want to demonstrate the power HDR has to produce very detailed & dynamic images.


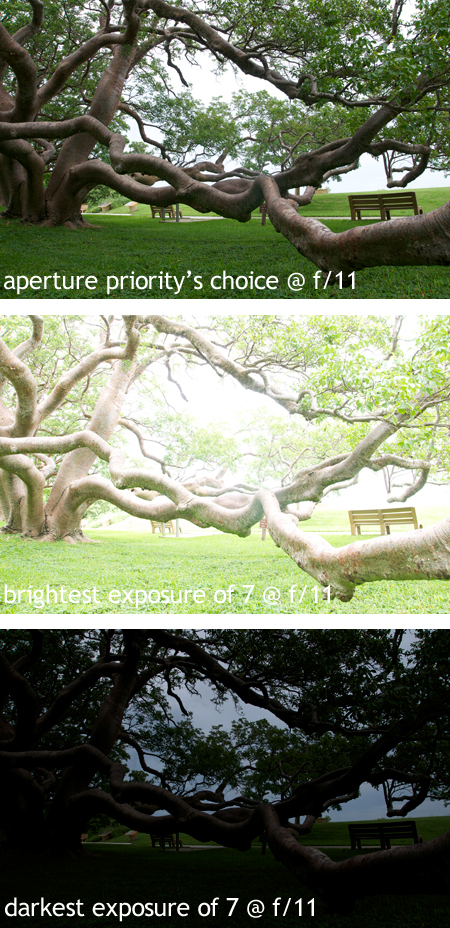
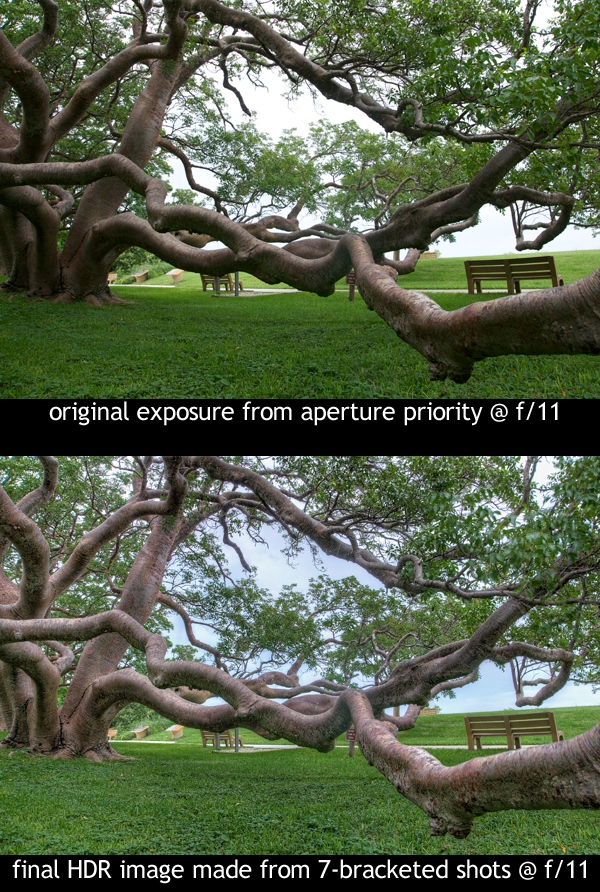
    Many times, using aperture priority mode will result in a very good looking image.  The top photo is the result of setting my Nikon D300 to f/11 in aperture priority mode (A - Nikon, Av - Canon).  Aperture priority produced an ok looking image.  I set my focus point on the middle elbow of the lowest branch using matrix metering mode.  Thus, the priority for the sensor was exposing the tree well.  You can see pretty good detail in all the tree branches, the grass and even the leaves.  However, there is virtually no detail in the sky at all.  Using a single exposure, one has to choose whether to expose for highlights or shadows, and if the highlights are much brighter than the shadows, one of them will have to be sacrificed to a certain degree.  In this case, the sky was sacrificed in order to expose the tree better.

    HDR processing overcomes this by using a series of bracketed shots, some overexposed and some underexposed along with the base image (what aperture priority thinks is best).  For this Gumbo-limbo tree shot, I took 7-bracketed images, of which you can see the brightest (+3 exposure) and the darkest (-3 exposure).  I ommitted the other two exposures for blog post space reasons, but those would just be a little less bright and a little less dark.

    Using Photomatix Pro 3 to combine all seven of those photographs, taking the best exposed parts from each, the final HDR image is able to show the tree in even more detail than the single aperture priority exposure shot and also detail and color in the sky as well.  Therefore, when trying to photography a scene that has a high dynamic range (HDR), taking a bracketed series of shots and combining them into one final HDR image can produce results that no single exposure can.  This is the advantage of HDR processing.

    Digital Photograph Editing Lesson with Chris

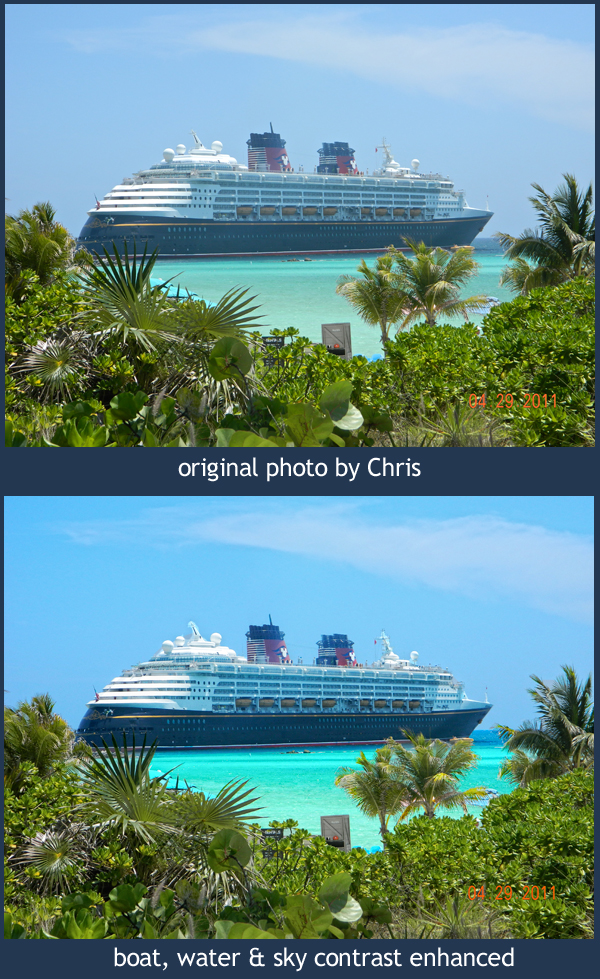
    Selective contrast edits in Photoshop can make a big impact on your photos - image used by permission 

    Chris took his first DSLR Photography Lesson on Tuesday where we went out into the field to practice shooting.  For our second of four lessons Chris wanted to learn digital photograph editing, which I believe is a very wise thing to do (read more here about my feelings on learning shooting & editing at the same time).

    The cruise ship is Chris' own photograph.  The original is well composed with good contrast in the foreground plants.  However, the cruise ship itself appears to be covered in a haze.  I taught Chris the following techniques using Photoshop CS5 to selectively enhance the cruise ship first, then the water, then finally the sky.

    For the Cruise Ship: 

    • Use the Quick Select Tool (W) to select the entire cruise ship
    • Go to Images --> Adjustments --> Brightness/Contrast
    • Increase contrast to your preference 

    For the Water: 

    • Use the Quick Select Tool (W) to select the entire water area
    • Go to Images --> Adjustments --> Brightness/Contrast
    • Increase contrast to your preference
    • Go to Images --> Adjustments --> Color Balance (Command-B)
    • Enhance the color sliders to your preference

    For the Sky: 

    • Use the Quick Select Tool (W) to select the entire sky
    • Go to Images --> Adjustments --> Color Balance
    • Enhance the color sliders to your preference

    The real key to this type of digital photo editing is the use of selected adjustments.  If we had not selected just the cruise ship, and instead universally adjusted the contrast on the entire photograph, then the plants would have suffered from too much contrast in getting the cruise ship right.  Of course making the sky look a deeper blue if done universally would make even the green plants start to look blue.  Therefore, the key is starting with the Quick Select Tool (W) and selecting only the area you want to adjust.  

  • Reserve your own 1-on-1 DSLR Photography Lesson with Jason today!
  • Learn more about the lessons
  • Browse past lessons with all of my students
  •  

    --Professional Model DSLR Photography Lessons now available!