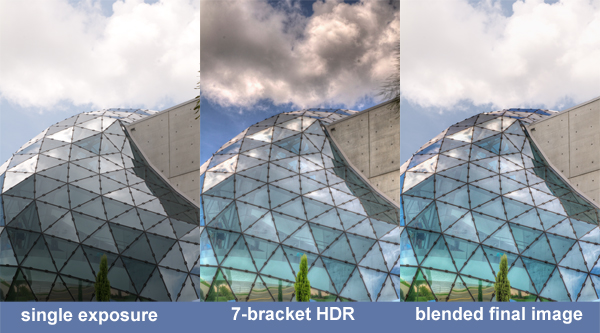
HDR photography and images are very popular right now. I, myself, have participated in a local exhibition featuring only HDR images. The thing is, I do not care for 90% of HDR photography I see. There is a large debate about processing HDR images to look more real or more hyper real. I am not referencing that debate here. For me, a simple reason why I do not find a vast majority of HDR images appealing is because they suffer from horrible shadow effects as demonstrated in the black clouds in the center image above. As you can see with the single exposure photo, the sky looks good, but there is no detail inside the glass. The 7-bracket HDR image reveals what is under the glass and adds better color, but at the expense of the clouds. Therefore, the best final results come from blending the single exposure photo with the 7-bracket HDR image.
 1. click on add layer mask (sorry, shows vector) 2. click on layer 1 3. paint with a black brushBlending two images together is not a difficult time consuming process using Photoshop. The screenshots in this post are using CS5, but other versions should basically be the same.
First, open the single exposure photo and 7-bracket HDR image in Photoshop. Drag the 7-bracket HDR image on top of the single exposure photo. Once you do this you will only see the 7-bracket HDR image. The single exposure photo is completely hidden underneath. Our goal is to reveal only the parts of the single exposure photo we want, in this case, the clouds and sky.
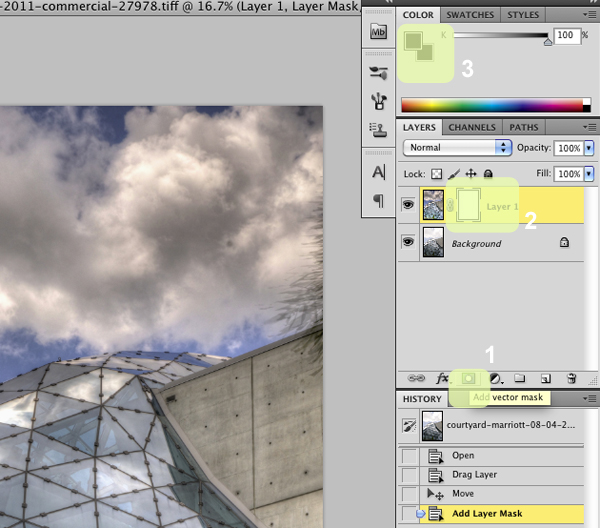
After you have dragged the 7-bracket HDR image on top of the single exposure photo, follow the three steps highlighted in the screenshot above:
- Click on "Add layer mask"
- Click on "Layer 1"
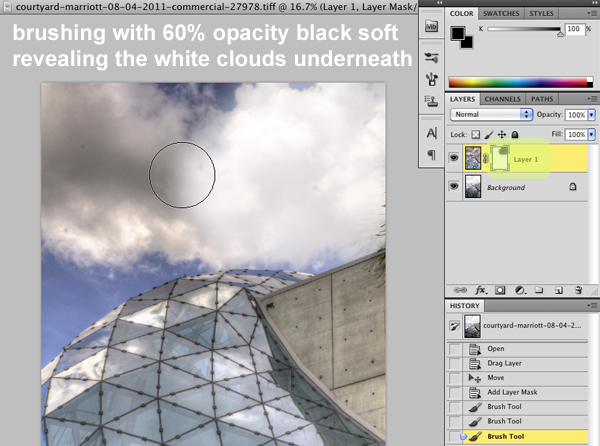
- Select the Brush tool: soft brush setting, black, 60% opacity (or similar, just not 100%)

Now using the Brush tool at the settings described above, slowly brush the areas you want to reveal. The 7-bracket HDR image starts to disappear revealing the single exposure photo below. In the above screenshot you can see that I already revealed the nice white clouds on the right side. Here is an extra tip: I also used the Brush tool on the concrete wall of the building that looked too black & dirty to reveal the cleaner wall from the single exposure photo. If you make a mistake and reveal something you did not want to, set the Brush color to white and the top image will return.

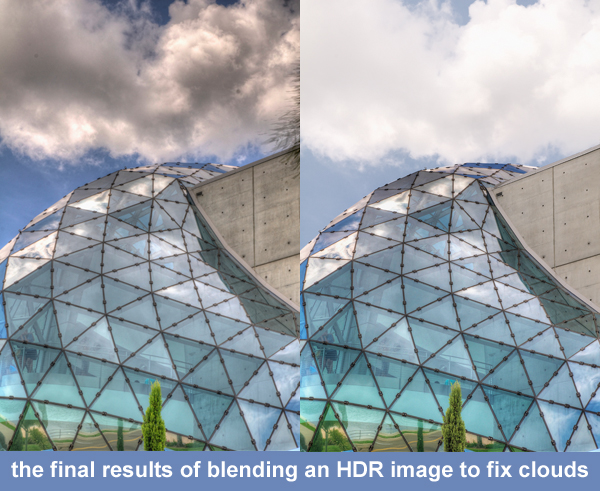
Here again are the before and after results. By using a layer mask you can create a dynamic hdr image and still maintain the clean look of clouds, walls, etc in the image. This vector mask technique is great for other photography tricks too. Want to change the background on a portrait? You can do that following this same process! (see results here)
Try the vector mask process on some of your images and be sure to post links to the results in the comments below.
