layer mask

Professional Commercial Photography of LED Panels in New Mexico for Planar

Professional Commercial Photography of LED Panels in New Mexico for Planar

Composite photos for the best commercial photography

I was contacted by Planar two months ago to make professional commercial photos of their LED panel displays products they installed in a call center in Hobbs, New Mexico. However, Covid-19 soon shut everything down and it took until now for it to be safe to travel to Hobbs and finally make the photos. To make these images I knew the challenge would be how to capture the bright LED displays in a dimly lit space.

Read More

Ft Union Drive In Starry Skies Astrophotography Las Vegas New Mexico

Ft Union Drive In Starry Skies Astrophotography Las Vegas New Mexico

Astrophotography at the Drive In

As best as I can remember, for the first time since I was a kid, I saw a movie at a drive in theater. The experience was great (the movies were not)! This was part of an ultra-rare, full weekend off, out of town, not part of a photo job holiday. It was me and Jessica and our dogs Kiki and Artie all in the M3 with the top down completely under the stars, looking up at the big screen. And the stars! They were so bright and vivid! Not since I spent the night at the bottom of the Grand Canyon did they look as vivid to me.

Read More

McLaren 650S in black multiple strobist blend layer mask photography tip Clearwater Florida Car Photography

What if you want to photograph a large object, especially in a low light situation, but you only have two speedlights, or even only one?  No problem!  Here is how you can do it and what you will need.

Photo gear used to photograph the McLaren 650S indoors:

  • Nikon D300
  • Tamron 17-50mm f/2.8
  • SB-800 & SB-600 Speedlights
  • 2 shoot through umbrellas
  • Yongnuo radio triggers
  • tripod
  • cable release
  • assistant (to help move and hold the lights)
  • Photoshop CS5

A tripod is a must because you will need to take multiple shots from different angles to properly light the subject, in this case the McLaren 650S supercar.  In all I ended up using five photographs to make the one fully lit photograph (below).  I lit the front of the car first, then moved the lights around the car (counterclockwise in this case) taking another photograph each time.  I even had my assistant hold a speedlight over the top of the car (see top most image).  The assistant being in the shot or a lightstand partially being in the shot is no problem at all as the final step takes place at home in Photoshop using layer masks.

In the above photo all 5 shots have been blended together one at a time using layer masks in Photoshop.  I started with the shot of the McLaren 650S lit from the front.  I then dragged it onto the next photo in the series with the driver's side wheels lit up.  I created a layer mask and then revealed the lit wheels photograph underneath, keeping the front lit part from the other photo.  I then flattened all layers and repeated this process using the other three photographs.  You can see shadows from coming from more than two angles in the above shot because effectively ten speedlights were used to light up the car, not just the two in reality I had for the shoot.  

I could have stopped with the 5 shot composite, but I got carried away with removing objects from the background until I finally decided just to remove them all!  I started this edit on Saturday night, and finished it on Monday afternoon it took that long and I kept wanting to do more and more to it.  I did nothing special to remove the background objects, just simply used the Clone Stamp tool on only carefully selected portions of the photo.  Then I removed a lot of the reflections on the car body and cleaned up the floor.  The final result was my most advanced photopraph edit in Photoshop to date!

Give this multiple exposure strobist blend layer mask type image a try and let me know the results in the comments below.

Florida Fine Art Photography - Pelican Texture Composite

This is a composite of two images, with a texture abstract photo blended over a pelican photo.I have a folder of abstract and texture photographs I keep for when I want to make composite images like the one above.  It is fun sometimes to spice up an image by combining two (or more) photographs in a complementary way.  

A blurry photo of a bookshelf was overlayed onto the photo of the pelican in Photoshop.  I just adjusted the opacity of the book case photo down a little and set the blending mode to Overlay.  Then I layer masked a little of the bookshelf image off of the pelican to make the pelican look cleaner.  Digital Photography School has a good tutorial on how to do this if you would like to try it yourself!

Psychedelic Pelican of St. Petersburg Florida

A psychedelic pelican composite image made using a layer mask in PhotoshopI had two images lying around in my random folder for months.  One was a graffiti wall I photographed knowing someday I would use it as a texture background.  Then I had this kind of wide-eyed pelican photo.  This afternoon I thought to combine them for a psychedelic looking fine art photograph.  In Photoshop I placed the graffiti wall image right over the pelican photo.  Then using a layer mask I was able to brush away the wall to reveal the pelican underneath, as well as choosing the blend mode for the overall look.  This is actually a fairly simple Photoshop skill.  To get more of an idea of how the combo process works, check out this blog post.

Jumping Matrix Style with help from layer masks

Yours truly leaping a chasm! This is a blending of 4 different action shots using a simple layer mask technique.In case you missed it last week, I do take time away from being behind the camera to continue my love of rock hopping and leaping objects (see here).  I made the leap over the above chasm-ish span several times each time trying to go further.  I did not actually move fast enough to be seen multiple times in 1/500th of a second.  How I made the above image was to combine four of the shots taken in one burst of shots on my Nikon D300 (capable of 6 frames per second).  Since the DSLR was on a tripod all the background matched up perfectly, as does the exposure since that was set manually.  The only thing moving over the series of shots was me.  Then, it was just a matter of using layer masks in Photoshop to produce the multiple exposure, or Matrix, looking image.

These shots layered on top of each other produced the above shot.Using layer masks to blend multiple images is not a difficult type of digital photography editing.  I have written a tutorial on how to use layer masks here.  Give this photography tip a try and post your results in the comments below!

How to fix black clouds in HDR images using layer mask

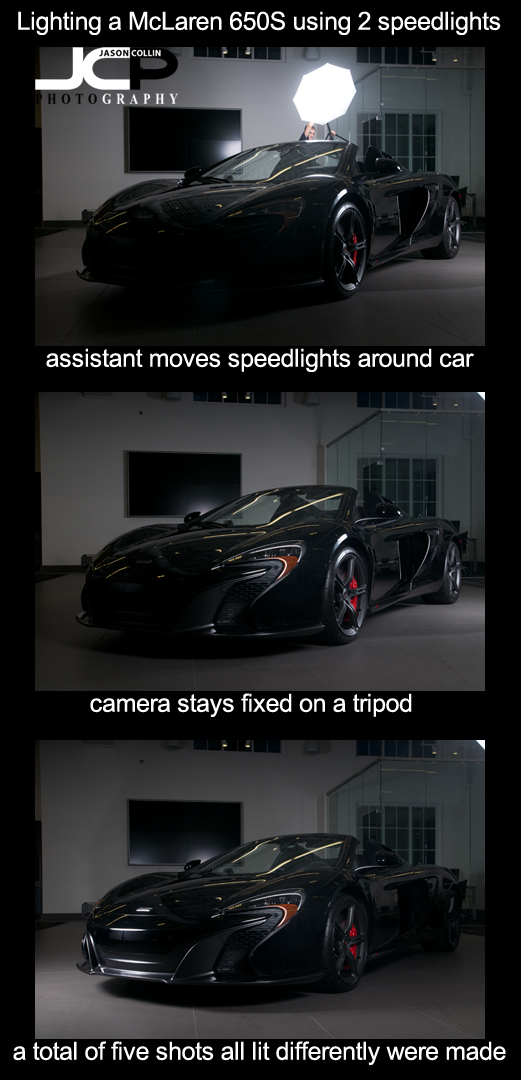
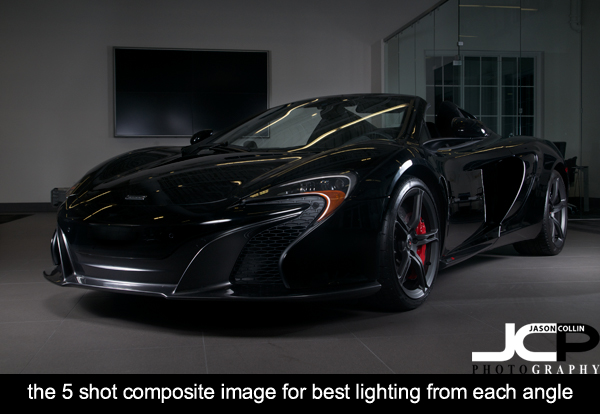
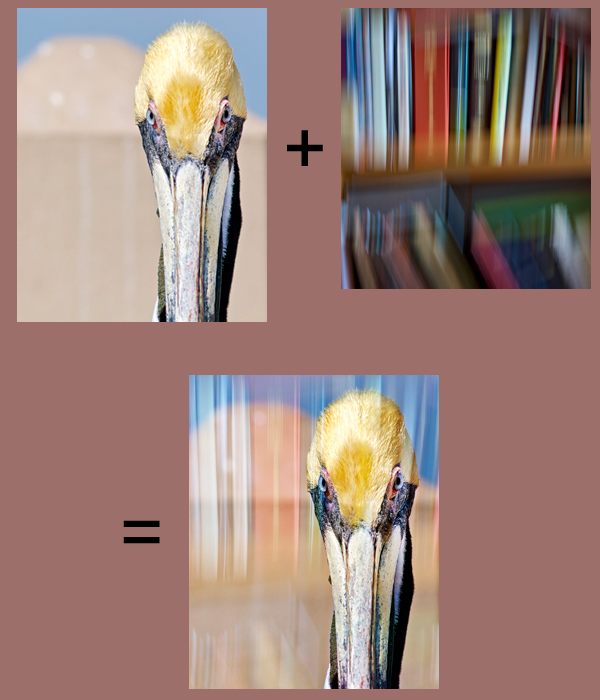
HDR photography and images are very popular right now.  I, myself, have participated in a local exhibition featuring only HDR images.  The thing is, I do not care for 90% of HDR photography I see.  There is a large debate about processing HDR images to look more real or more hyper real.  I am not referencing that debate here.  For me, a simple reason why I do not find a vast majority of HDR images appealing is because they suffer from horrible shadow effects as demonstrated in the black clouds in the center image above.  As you can see with the single exposure photo, the sky looks good, but there is no detail inside the glass.  The 7-bracket HDR image reveals what is under the glass and adds better color, but at the expense of the clouds.  Therefore, the best final results come from blending the single exposure photo with the 7-bracket HDR image.

1. click on add layer mask (sorry, shows vector) 2. click on layer 1 3. paint with a black brushBlending two images together is not a difficult time consuming process using Photoshop.  The screenshots in this post are using CS5, but other versions should basically be the same.

First, open the single exposure photo and 7-bracket HDR image in Photoshop.  Drag the 7-bracket HDR image on top of the single exposure photo.  Once you do this you will only see the 7-bracket HDR image.  The single exposure photo is completely hidden underneath.  Our goal is to reveal only the parts of the single exposure photo we want, in this case, the clouds and sky.

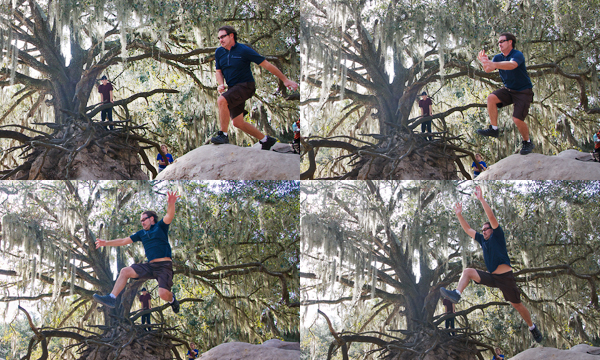
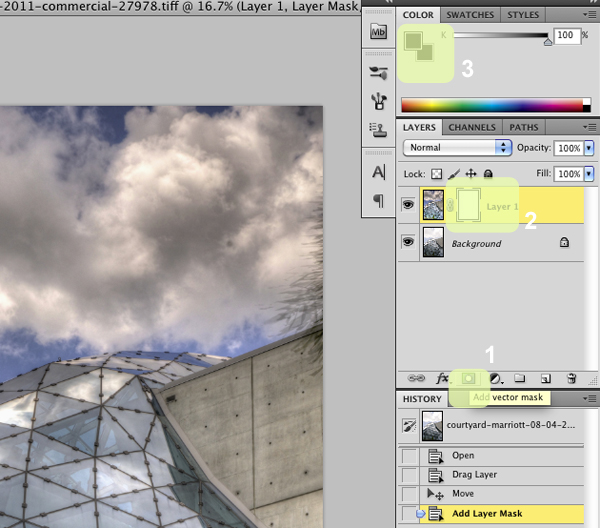
After you have dragged the 7-bracket HDR image on top of the single exposure photo, follow the three steps highlighted in the screenshot above: 

  1. Click on "Add layer mask"
  2. Click on "Layer 1"
  3. Select the Brush tool: soft brush setting, black, 60% opacity (or similar, just not 100%) 

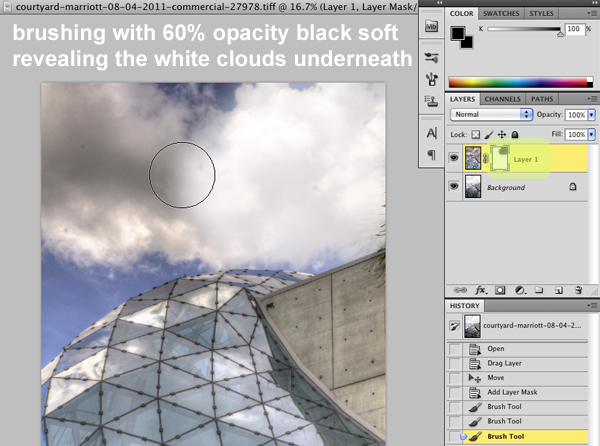
Now using the Brush tool at the settings described above, slowly brush the areas you want to reveal.  The 7-bracket HDR image starts to disappear revealing the single exposure photo below.  In the above screenshot you can see that I already revealed the nice white clouds on the right side.  Here is an extra tip:  I also used the Brush tool on the concrete wall of the building that looked too black & dirty to reveal the cleaner wall from the single exposure photo.  If you make a mistake and reveal something you did not want to, set the Brush color to white and the top image will return.

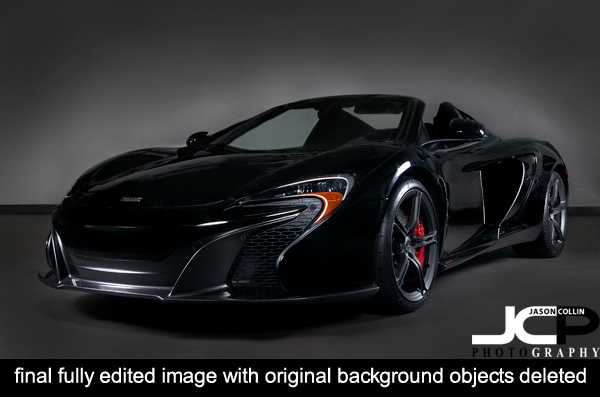
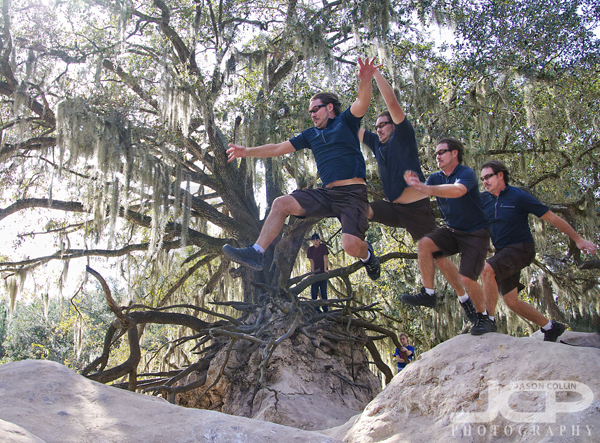
Here again are the before and after results.  By using a layer mask you can create a dynamic hdr image and still maintain the clean look of clouds, walls, etc in the image.  This vector mask technique is great for other photography tricks too.  Want to change the background on a portrait?  You can do that following this same process! (see results here)

Try the vector mask process on some of your images and be sure to post links to the results in the comments below. 

  • Read more photography tips
  • Reserve your own 1-on-1 DSLR Photography Lesson with Jason today!
  • Learn more about the lessons