CS5

Photography Tip use Unsharp Mask for sharpening in Photoshop

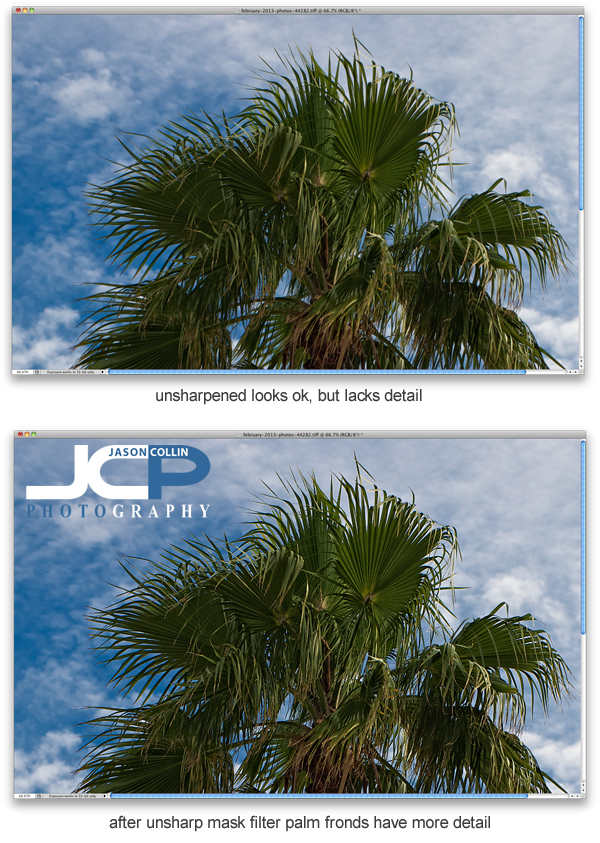
Sharpening is a key part of editing digital photos and perhaps one that goes overlooked due to thinking sharpening is not needed.  On every shot I edit, I use the Unsharp Mask filter in Photoshop (I still use CS5).  In the above example of a cabbage palm tree, I did all my usual editing except sharpening.  The unsharpened image may look fine, but I know it can look better.  In the sharpened version much more detail is visible in the palm fronds, especially on the edges.  Another photography tip within a tip, I did all other editing first because sharpening should be the last thing done when editing an image.
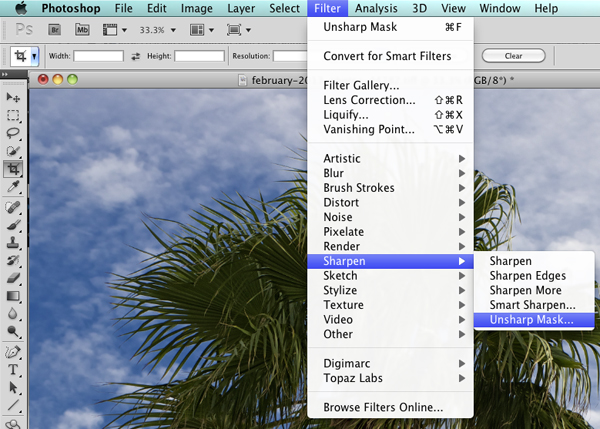
To find Unsharp Mask in Photoshop go into the Filter menu, then Sharpen, and there you will find Unsharp Mask.  I kow it sounds totally crazy to use something called unsharpen to sharpen, but that is just one of the thousands of quirks you either find charming about Photoshop or infuriating!  Note that if you used Unsharp Mask already, on a Mac you can just hit CMD-F to apply the same sharpening to the current photo you are working on.

You can see the settings I use in the Unsharp Mask filter in the above screenshot.  Radius and Threshold never change and are at settings I found I liked, though I learned these from another photographer and fine tuned them a bit.  The only setting of the three I change when applying the Unsharp Mask filter is the Amount percent.  For a very large majority of my photographs, I use 60%.  For portraits (single subject) I may use less.  For HDR shots, I may use more.  Each camera and lens may dictate more or less sharpening to be used.  

Try out the Unsharp Mask filter and let me know what you think in the comments below!

St. Petersburg Florida downtown harbor panorama fine art photograph

Click for 1200px version - St. Petersburg downtown harbor panorama fine art photograph - Nikon D300 Tamron 17-50mm @ f/11 ISO 200 1/400th 4-shot panorama 

If you have Photoshop CS5 or CS6 it is amazingly easy to make a panorama image.  The above panorama of the downtown St. Petersburg, Florida harbor is composed of four shots that I made handheld using only the gridlines in my viewfinder to line up.  Then I loaded those four shots into Photoshop's Photomerge action, led the CPU do a lot of processing, and voila, out came a panorama that I then proceeded to do my usual editing workflow on.  

I am often with my camera near this small harbor as I use this location when teaching my 1-on-1 DSLR Photography Lessons.  It is a very good spot to practice making panorama images, composing with leading lines, S-curves and sometimes even wildlife.

Corvette great subject bad background digital photography editing tip

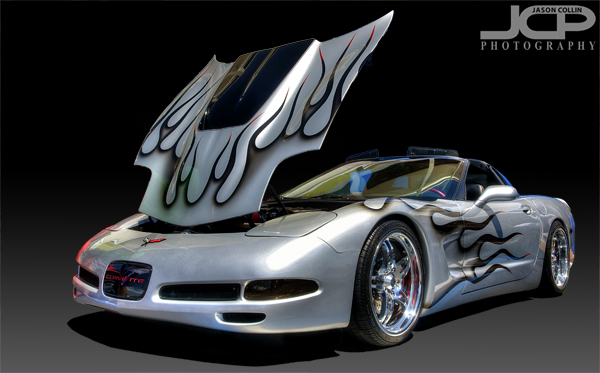
Final fully edited custom silver Corvette - Nikon D300 Tamron 17-50mm @ f/11 ISO 200 5-exposure HDR - black gradient background added digitallyWhat if you have a great subject to photograph, but a terrible background?  I tell my DSLR photography students that assuming you have a good subject, then what makes or breaks a shot, what sets it apart is the light (lighting) and the background.  For this shot the subject is a really cool custom Corvette.  However, the background was horrible and I could not use depth of field techniques to just turn the background into beautiful bokeh because the subject was too close to the background, at least if I wanted to photograph the entire car, which I did.  So, to make the shot usable I opend up my digital photographing editing toolkit.

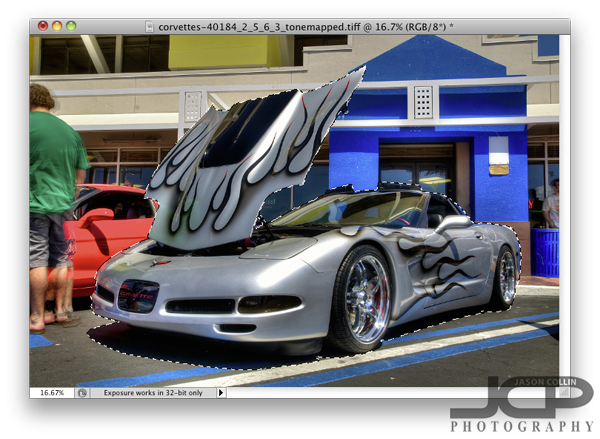
So what did I do first after processing the HDR image and do a few little minor edits?  I loaded the photo in Photoshop (I still use CS5) and chose the Quick Select (W is the keyboard shortcut) tool.  The background looks very busy and it might seem like selecting the Corvette would be difficult, but there are several factors why it was not too tedious.  One is the Corvette is a fairly distinct, blocky object, no lone thin parts or openings.  Second, none of the surrounding colors are similar to the Corvette itself.  The hood did take a little fine tuning to get selected, but other than that it was not too bad.  Notice I selected the naturally existing shadow under the car too.  Once finished I clicked on the Refine Edge option up in the Quick Select menu bar.

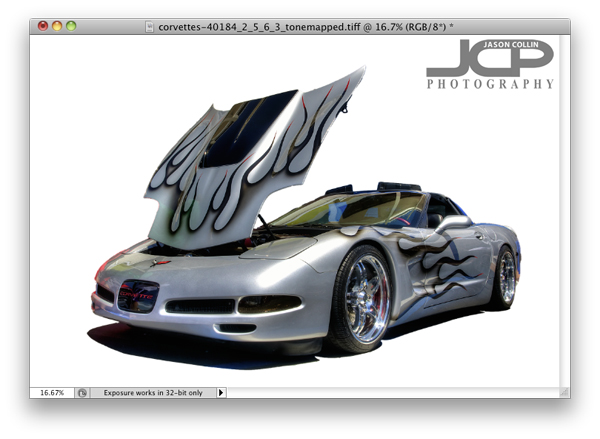
In the Refine Edge window you can clean up the extra bit of edging that you do not want as well as export just the selected subject to a new layer, which is what I always do.  Once that is done, I add a new layer to use as a background that I can paint any color.  I usually choose white first to see how it looks and also to make sure I really cleaned up all the edges.  I liked the white background, so I saved a JPG from the PSD project.

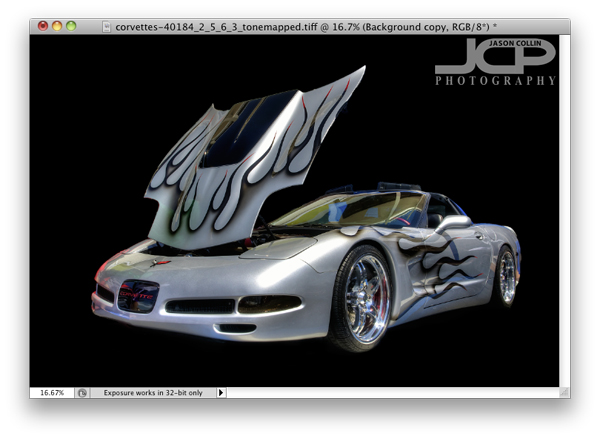
Next I just painted over the white background with the Brush Tool at 100% opacity black.  Right away I liked the black background better as I thought it made the silver Corvette pop out.  The black background caused the shadow to become invisible and kind of made the shot look a little two dimensional, so the final touch was adding a 40% opacity vertical gradient only from the mid-height point of the image.  

This process can of course be used for any subject with a variety of digital or real backgrounds.  So the next time you see a really cool subject, but are disappointed by the background, be sure to still make the shot in the field knowing you can using a few Photoshop techniques to produce a final image you will be happy with.

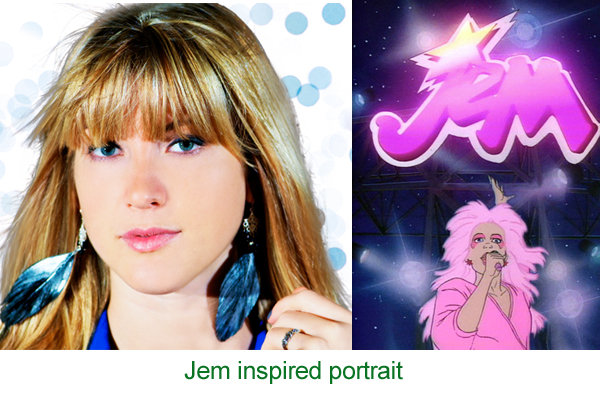
Model headshot edit inspired by Jem the cartoon series

This editing style was inspired by the Jem cartoon series! -- Model: AbbyI was going through Netflix's always woeful list of new releases when I saw that the cartoon series Jem was now available.  I remember watching this cartoon in the 80s because of the vivid pastel colors and style of the animation.  So this afternoon I went about converting one of my own photographs into a Jem-style image.

The above is my final image next to a photo of Jem (source Wikipedia).  Maybe long before I saw Jem in Netflix I had a subconscious thought to convert the shot of model Abby into a Jem-style one as I did not really like how I originally shot the photo, but I kept it lying around for some reason.  

The first thing I did was to load the original image (see above) into Photoshop CS5.  Well, actually before that I did some slight warming to the image in Aperture 3 via Nik Color Efex Pro 3.

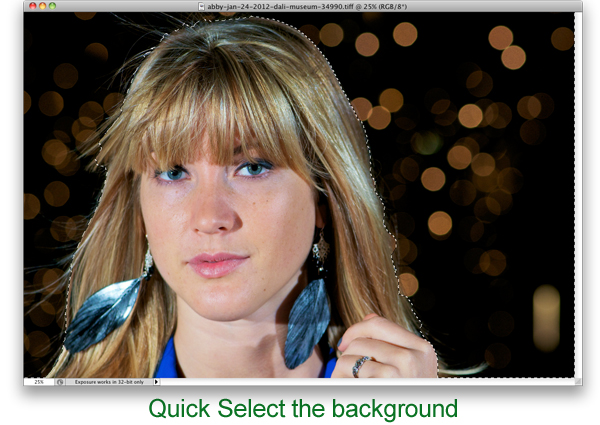
In Photoshop using the Quick Select Tool (W) I selected only the background of the image.  I did then click on Refine Edge to make the border along the hair look more natural and less choppy.

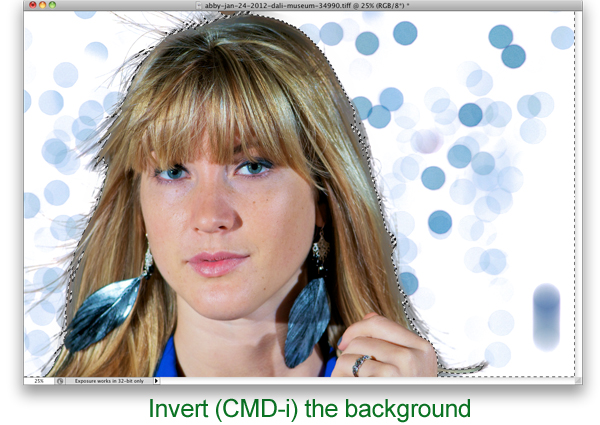
The next step was the key one and really how I thought I would go about making the photograph look more Jem-like and I knew how to do it entirely because of making mistakes in the past with my keyboard shortcut usage.  I always use CMD-SHIFT-I to resize images before I post them on this site and Facebook, etc.  Sometimes I end up hitting just CMD-I which is the Invert command in Photoshop.  Since only the background was selected, only the background became inverted going from black to white and the bokeh from yellow to purple, which to me is much more Jem-like!

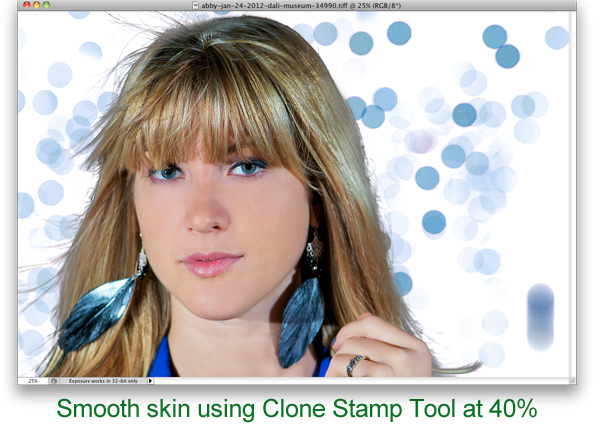
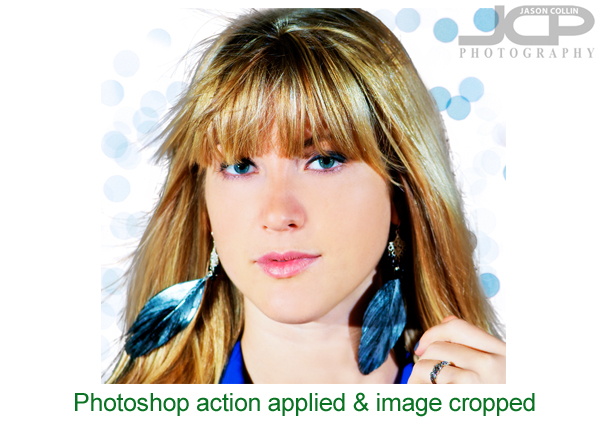
Next to clean up the image and make the model look more like Jem does, I used the Clone Stamp Tool (S) at 40% opacity and just sampled an area then brushed over that same area repeating as skin tone and texture changed for each part of the face.  This is the quickest and easiest way I know of for smoothing skin.  Note, I did not say it was the best, just the quickest and easiest.

To further the smooth and glowing look that Jem has, I used a free Photoshop action available here.  That completed the look.  I did not intend to tightly crop the image, but after all editing was done I thought a tighter crop was a better way to feature the image.  I just hit C in Photoshop to bring up the Crop Tool.  

Try this Jem-style process out on one of your photographs and post a link to the results in the comments below!
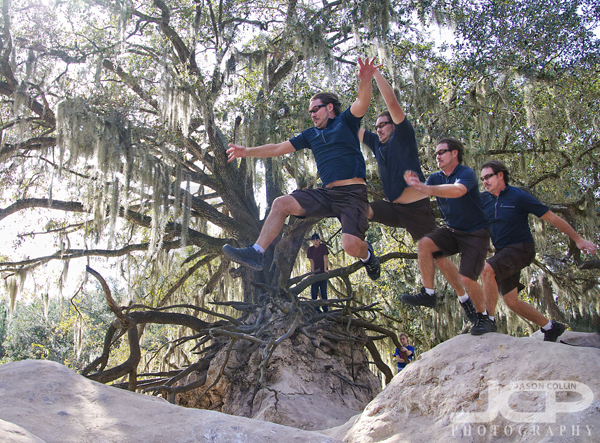
Jumping Matrix Style with help from layer masks

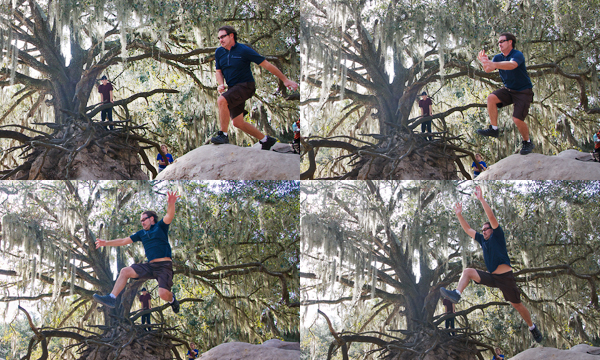
Yours truly leaping a chasm! This is a blending of 4 different action shots using a simple layer mask technique.In case you missed it last week, I do take time away from being behind the camera to continue my love of rock hopping and leaping objects (see here).  I made the leap over the above chasm-ish span several times each time trying to go further.  I did not actually move fast enough to be seen multiple times in 1/500th of a second.  How I made the above image was to combine four of the shots taken in one burst of shots on my Nikon D300 (capable of 6 frames per second).  Since the DSLR was on a tripod all the background matched up perfectly, as does the exposure since that was set manually.  The only thing moving over the series of shots was me.  Then, it was just a matter of using layer masks in Photoshop to produce the multiple exposure, or Matrix, looking image.

These shots layered on top of each other produced the above shot.Using layer masks to blend multiple images is not a difficult type of digital photography editing.  I have written a tutorial on how to use layer masks here.  Give this photography tip a try and post your results in the comments below!
How to fix black clouds in HDR images using layer mask

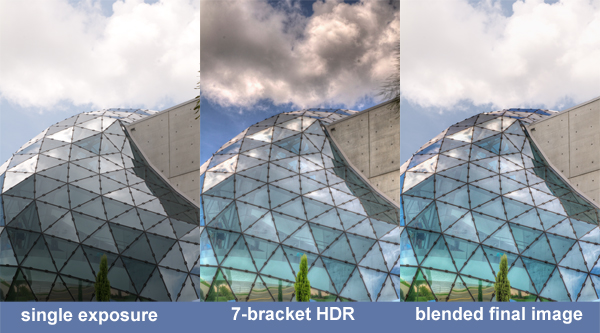
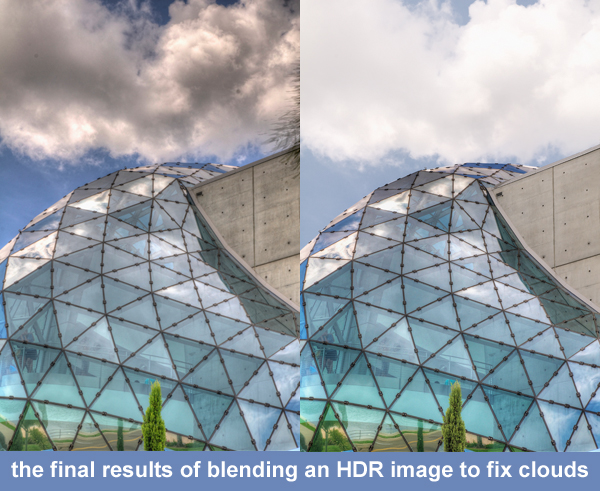
HDR photography and images are very popular right now.  I, myself, have participated in a local exhibition featuring only HDR images.  The thing is, I do not care for 90% of HDR photography I see.  There is a large debate about processing HDR images to look more real or more hyper real.  I am not referencing that debate here.  For me, a simple reason why I do not find a vast majority of HDR images appealing is because they suffer from horrible shadow effects as demonstrated in the black clouds in the center image above.  As you can see with the single exposure photo, the sky looks good, but there is no detail inside the glass.  The 7-bracket HDR image reveals what is under the glass and adds better color, but at the expense of the clouds.  Therefore, the best final results come from blending the single exposure photo with the 7-bracket HDR image.

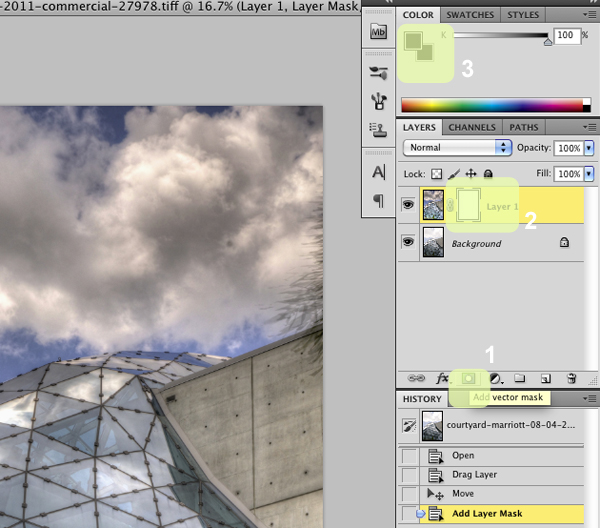
1. click on add layer mask (sorry, shows vector) 2. click on layer 1 3. paint with a black brushBlending two images together is not a difficult time consuming process using Photoshop.  The screenshots in this post are using CS5, but other versions should basically be the same.

First, open the single exposure photo and 7-bracket HDR image in Photoshop.  Drag the 7-bracket HDR image on top of the single exposure photo.  Once you do this you will only see the 7-bracket HDR image.  The single exposure photo is completely hidden underneath.  Our goal is to reveal only the parts of the single exposure photo we want, in this case, the clouds and sky.

After you have dragged the 7-bracket HDR image on top of the single exposure photo, follow the three steps highlighted in the screenshot above: 

  1. Click on "Add layer mask"
  2. Click on "Layer 1"
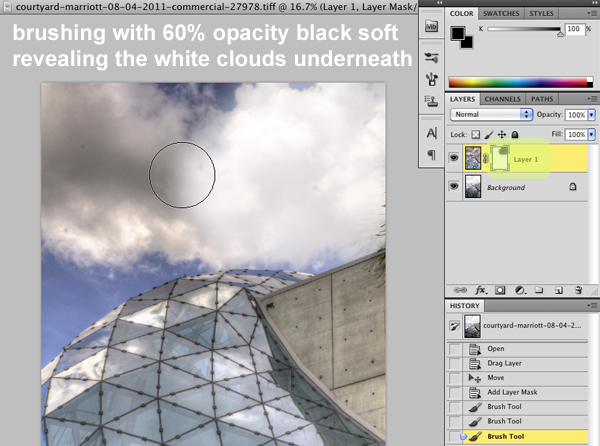
  3. Select the Brush tool: soft brush setting, black, 60% opacity (or similar, just not 100%) 

Now using the Brush tool at the settings described above, slowly brush the areas you want to reveal.  The 7-bracket HDR image starts to disappear revealing the single exposure photo below.  In the above screenshot you can see that I already revealed the nice white clouds on the right side.  Here is an extra tip:  I also used the Brush tool on the concrete wall of the building that looked too black & dirty to reveal the cleaner wall from the single exposure photo.  If you make a mistake and reveal something you did not want to, set the Brush color to white and the top image will return.

Here again are the before and after results.  By using a layer mask you can create a dynamic hdr image and still maintain the clean look of clouds, walls, etc in the image.  This vector mask technique is great for other photography tricks too.  Want to change the background on a portrait?  You can do that following this same process! (see results here)

Try the vector mask process on some of your images and be sure to post links to the results in the comments below. 

  • Read more photography tips
  • Reserve your own 1-on-1 DSLR Photography Lesson with Jason today!
  • Learn more about the lessons
  • Layer Mask Photoshop CS5 Digital Photo Editing Lesson with Ed

    Using a layer mask in Photoshop CS5 to change the background of a portrait - book your lesson today to learn tomorrow!

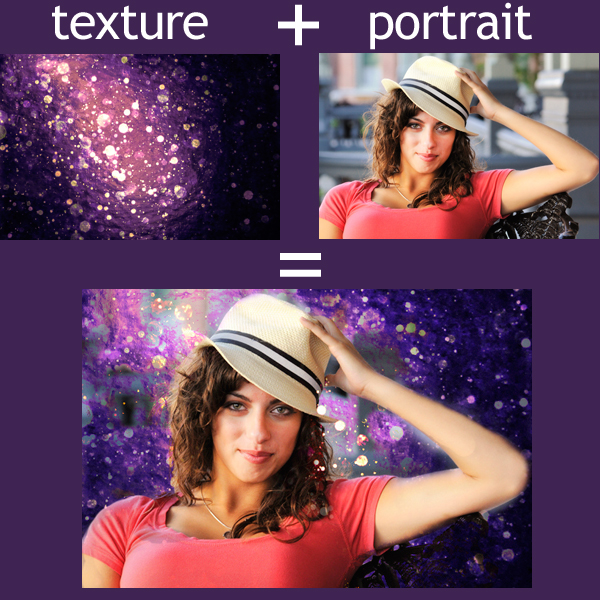
    I met Ed from Jacksonville again this morning for our second of two Photoshop CS5 centered DSLR Photography Lessons.  After giving him a crash course on the basics of using many common Photoshop tools yesterday, today we focused mainly on one thing:  layer masks.  As seen in the image above, if you take a texture, drop it onto a portrait, create a layer mask, then "brush back in" the portrait, you have a very quick and easy way of completely changing the background of a photograph.  You could also keep some of the texture visible over the portrait subject as well to create a different look to the entire frame. 

    This layer mask technique is also very useful for fixing clouds in HDR images, which often turn out too dark.  Using one of my own HDR shots as an example, I showed Ed how you can get the benefit of an HDR image without the drawback (dark clouds) by taking a single frame of the bracketed shots that has very white clouds and using it as a layer mask to blend into the HDR image.  I will be posting this tutorial using the HDR example later this week.

    The four hours (total) I spent showing Ed what I know about Photoshop went by very fast.  We easily could have filled another four.  He took detailed notes so I am confident that with what he learned during our intensive lessons he will be able to apply to his own images and begin teaching himself how to use more features of Photoshop.  

  • Reserve your own 1-on-1 DSLR Photography Lesson (shooting or editing) with Jason today!
  • Learn more about the lessons
  • Browse past lessons with all of my students
  •  

    --Professional Model DSLR Photography Lessons now available!