Photography Tips

BlackRapid RS-Sport Camera Strap Gear Review

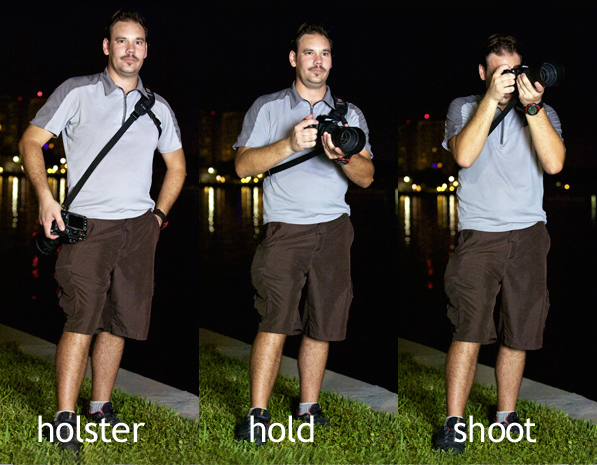
Gunslinger hip to eye shooting style demonstration using the BlackRapid RS-Sport strap system with a Nikon D300 & Nikkor 80-200mm f/2.8D - photo by PedroLet me start by just saying that the BlackRapid RS-Sport strap has made me excited about using my DSLR again because of just how cool it feels to slide the camera up and down the strap.  Readers of my movie reviews will know I am a big western fan, and I definitely feel like an old gunslinger when using my BlackRapid RS-Sport.  So this is the emotional part of the review, which is mostly what determines buying a certain product or not.  I decided to buy one even before I knew it would make me feel like a gunslinger.  Just trying a photo student's RS-7 strap for a few seconds instantly convinced me to free my neck from its burden and get a sane camera carrying system.

For the ergonomics and practicality part of the review, the BlackRapid RS-Sport strap still gets a very positive gear report from me.  I have only had the RS-Sport for exactly two weeks, but I have already put it through many different shooting situations and it has performed great in all of them.  On a 2-day event shoot (5pm-8pm Friday; 9am-12am [yes 15 hours] Saturday) I got home early Sunday morning with zero shoulder pain.  Normally after only a few hours using my old Nikon Professional branded Optitech neck strap, I would have lingering sourness after a job.

The effectiveness of the BlackRapid strap system comes from taking the weight off your neck because when do you ever carry anything around your neck ever besides for some reason a heavy DSLR?  Instead, the BlackRapid strap system puts the weight on your left shoulder like any other style of bag one carries.  It has to be your left shoulder too.  If you are left-handed like me and concerned because you usually carry everything on your right shoulder so your left hand has easy access to the bag, it immediately felt normal to me to have the BlackRapid strap on my left shoulder because you grab a DSLR with your right hand first anyway.  The grip on the DSLR body is designed for the right hand so do not be concerned about having to use it on your left shoulder, even if your are left-handed.
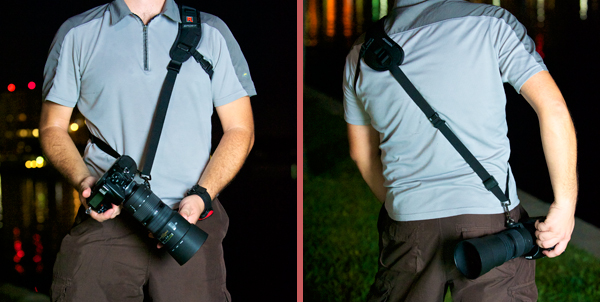
Your camera on a BlackRapid strap can hide behind your hip in tight spots or can easily be held in front to squeeze through places.

I chose the RS-Sport model for the extra bit of strap that goes under the armpit area for extra stability.  I have to admit I did think at first that this is not comfortable and maybe I should have just gotten the RS-7 which is similar to the RS-Sport but minus the underarm strapping.  However, in real world use and not hyper nitpicking when trying it on in one's house, I am definitely glad I got the RS-Sport because the main shoulder pad is more ergonomically tapered and the underarm strapping is not noticable to me anymore.  

How anybody can use the first party straps that come with a DSLR is beyond me.  I immediately got a cushier Optitech neck strap, which sells for about $24.  Now I wish I had gotten a BlackRapid strap long ago.  The RS-Sport sells for $69.95 and the standard RS-7 for just $58.95.  There are several other styles, including a dual strap system for carrying two cameras!

Take a 1-on-1 DSLR Photography Lesson with me and I will let you try out my RS-Sport strap for yourself! 

--thanks to Pedro for taking these shots of me

Photography Tip - creating motion blur for car photography

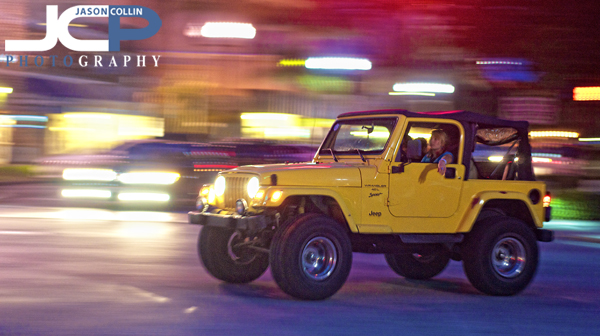
Example of motion blue with main subject frozon - SETUP: Nikon D300 with Nikkor AF 50mm f/1.8D @ f/2.8 ISO 800 1/10thIf you have never manually controlled the shutter speed on your DSLR to create motion blur, then you are missing out on a lot of fun!  Using a slow shutter speed and a steady panning technique can transform a mundane photo of a car driving down a road into an image showing a vehicle seemingly cruising at warp speed.  

SETUP FOR THE ABOVE NIGHT SHOT: 

  • Nikon D300
  • Nikkor AF 50mm f/1.8D
  • manual exposure mode
  • f/2.8  ISO 800  1/10th  AF-C (AI Servo)  single focus point 

TECHNIQUE FOR CREATING MOTION BLUR: 

  • find a car driving towards you (driving away just produces a rear end shot)
  • start tracking it through your view finder while it is still some distance away
  • twist your body at the hips panning at the exact same speed as the vehicle
  • wait for the vehicle to pass in front of a background with the most lights possible
  • press the shutter all the way, but still keep panning (like follow through in a tennis swing) 

If you can maintain a focus lock and match the car's speed with your panning speed the car will appear sharp while the background elements will all be blurred.  The shutter speed needed will depend on the time of day and ambient light.  The suggested settings above can be a starting point for night shots.  

DSLR Photography Tripod & Editing Lesson with Sarina and her Nikon D90

Photo by Sarina with editing in Color Efex Pro by Jason - before & after maternity portraitIncreasingly, the DSLR Photography Lessons I teach invovle digital photo editing practice as well.  Each one of Sarina's four lessons have been a split between shooting the first hour and editing the second hour.  If one's goal is to produce pro or as close to pro looking photographs, I cannot stress enough how one must work on shooting and editing skills simultaneously.  In Sarina's photo above, it took shooting skills to setup the strobist portrait and to pose the couple accordling and frame them well on the rocks and include the water.  The exposure is off some and that could have been improved in the field with better settings, but as Sarina realized when you have a client making constant requests, and you are standing in ankle deep water with waves coming in, and you have to keep track of a light stand as well as your camera, it can be a lot to keep track of and missing the exposure by a little bit for a portrait photographer just starting out can be forgiven.  

So without any digital photo editing skills one would be left with the image on the left.  Nicely composed, but nonetheless flawed.  However, if you do about 4-minutes worth of editing the results, by evidince of the image on the right, can be dramatically improved.  During my photography lessons, if you have Color Efex Pro, I can teach you how to transform your photos like this in minutes.  Sarina will be purchasing the full suite of Nik apps including the aforementioned Color Efex Pro and Silver Efex Pro too, which she tells me is on sale now.  

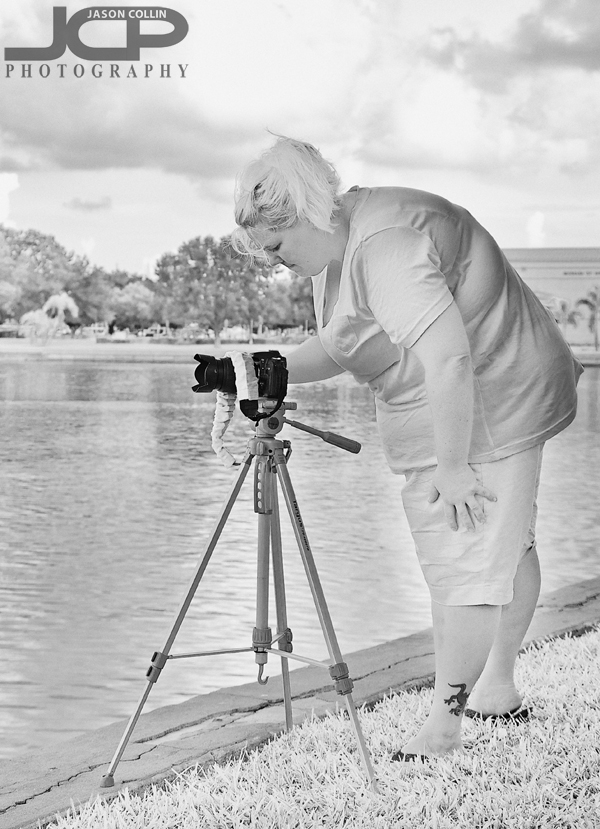
Sarina using her Nikon D90 on a tripod to produce a level landscape shot of Tampa BayWe started out the fourth of four lessons by getting in some tripod practice.  The first tip I gave Sarina was to always make sure the front of the lens points out directly over a leg of the tripod (see above).  This adds stability.  One can almost always use the smallest ISO when using a tripod since camera shake is not an issue when having to use a longer exposure to compensate for lack of light.  Plus, using a tripod just slows ones shooting down to a nice pace.  When I use a tripod I really feel like I am crafting a shot much more than one I handhold my Nikon D300.

I look forward to following Sarina's burgeoning portrait photography career and I think I will see her again in the not too distant future for some more advanced lessons.  

  • Reserve your own 1-on-1 DSLR Photography Lesson with Jason today!
  • Learn more about the lessons
  • Browse past lessons with all of my students
  •  

    --Professional Model DSLR Photography Lessons now available!

    Digital Photograph Editing Lesson with Sarina - the power of cropping

    Photo by Sarina used with permission; cropping by Jason

    For our second DSLR Photography Lesson, Sarina and I once again split the lesson time between (first) shooting and then editing.  She had the chance to photograph a dancer (see photo above) since we last met so for the shooting portion of the lesson I gave her feedback and demonstrated more ideal settings she could have used for those shots.  

    Then in the editing digital photos half of the lesson I really emphasized how cropping can make a tremendous difference on the overall impact of a photograph.  Plus, cropping is the easiest edit to do on a digital photograph.  Therefore, a photography tip for you is to start your editing process by cropping.  That is what I do.  Many times I do frame the shot in the field exactly how I want, but sometimes once viewing the image on my 24" monitor at home I see the potential for an even better composition.  Or, I decide I want the focus of the image to be on something other than what I originally intended.  

    There seems to be hesitation in new photographers to crop off the top of someone's head.  Do not be afraid, it will not hurt them and it will often help your image!  If you are an experienced photographer now, go back and look at your early work.  I bet you will see a progression of always trying to include the entire body or upper half of a person in a portrait to not being afraid to make radical crops that remove large sections of the subject's head.

    Cropping in closer creates a stronger connection between viewer and photograph.  In the above example which one of the two feels more personal?  For me, it is the tightly cropped image.

  • Reserve your own 1-on-1 DSLR Photography Lesson with Jason today!
  • Learn more about the lessons
  • Browse past lessons with all of my students
  •  

    --Professional Model DSLR Photography Lessons now available!

    Digital Photograph Editing Lesson with Chris

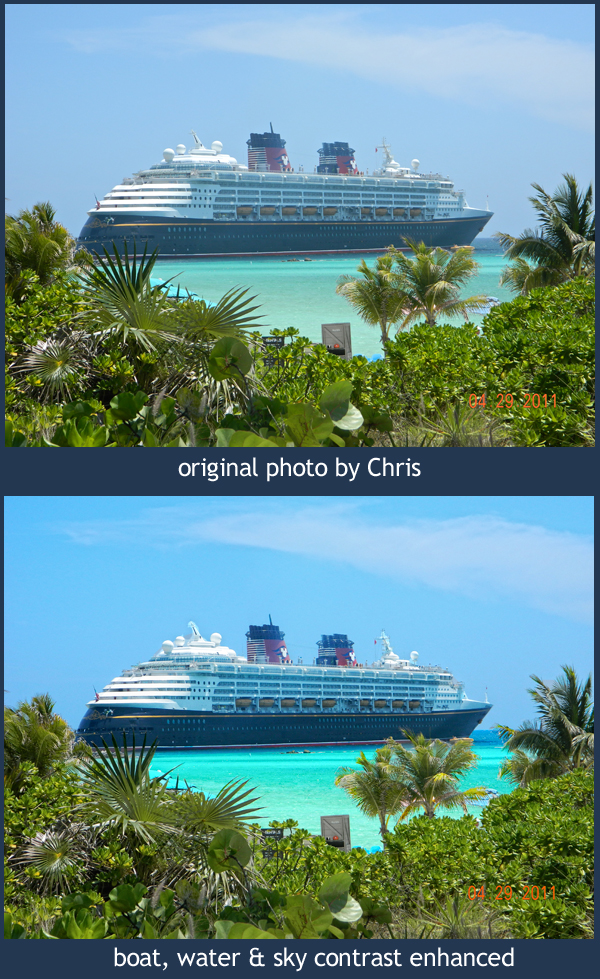
    Selective contrast edits in Photoshop can make a big impact on your photos - image used by permission 

    Chris took his first DSLR Photography Lesson on Tuesday where we went out into the field to practice shooting.  For our second of four lessons Chris wanted to learn digital photograph editing, which I believe is a very wise thing to do (read more here about my feelings on learning shooting & editing at the same time).

    The cruise ship is Chris' own photograph.  The original is well composed with good contrast in the foreground plants.  However, the cruise ship itself appears to be covered in a haze.  I taught Chris the following techniques using Photoshop CS5 to selectively enhance the cruise ship first, then the water, then finally the sky.

    For the Cruise Ship: 

    • Use the Quick Select Tool (W) to select the entire cruise ship
    • Go to Images --> Adjustments --> Brightness/Contrast
    • Increase contrast to your preference 

    For the Water: 

    • Use the Quick Select Tool (W) to select the entire water area
    • Go to Images --> Adjustments --> Brightness/Contrast
    • Increase contrast to your preference
    • Go to Images --> Adjustments --> Color Balance (Command-B)
    • Enhance the color sliders to your preference

    For the Sky: 

    • Use the Quick Select Tool (W) to select the entire sky
    • Go to Images --> Adjustments --> Color Balance
    • Enhance the color sliders to your preference

    The real key to this type of digital photo editing is the use of selected adjustments.  If we had not selected just the cruise ship, and instead universally adjusted the contrast on the entire photograph, then the plants would have suffered from too much contrast in getting the cruise ship right.  Of course making the sky look a deeper blue if done universally would make even the green plants start to look blue.  Therefore, the key is starting with the Quick Select Tool (W) and selecting only the area you want to adjust.  

  • Reserve your own 1-on-1 DSLR Photography Lesson with Jason today!
  • Learn more about the lessons
  • Browse past lessons with all of my students
  •  

    --Professional Model DSLR Photography Lessons now available!

    St. Petersburg Florida Downtown Sunset Panorama High Detail

    Click image for LARGE 5000px detailed version - 14-shot panorama of downtown St. Petersburg Florida at sunsetWhat you see above, if you can see anything, is a 14-shot panorama photograph of the downtown St. Petersburg, Florida skyline at sunset.  The panorama image was made by using Photomerge in Photoshop CS5.  

    This type of image is incredibly easy to make: 

    • just take consecutive, level, same exposure shots
    • overlap the final third of each shot
    • put all the photos into a single folder
    • open up Photoshop CS5
    • in the Automate menu choose Photomerge
    • sit back and let your computer's CPU do some serious processing

    in a few minutes you will have created your own panorama image! 

    --inquire about licensing this image or ordering prints for your office or home

    Photography Tip - use portrait orientation for long tall subjects like a great egret

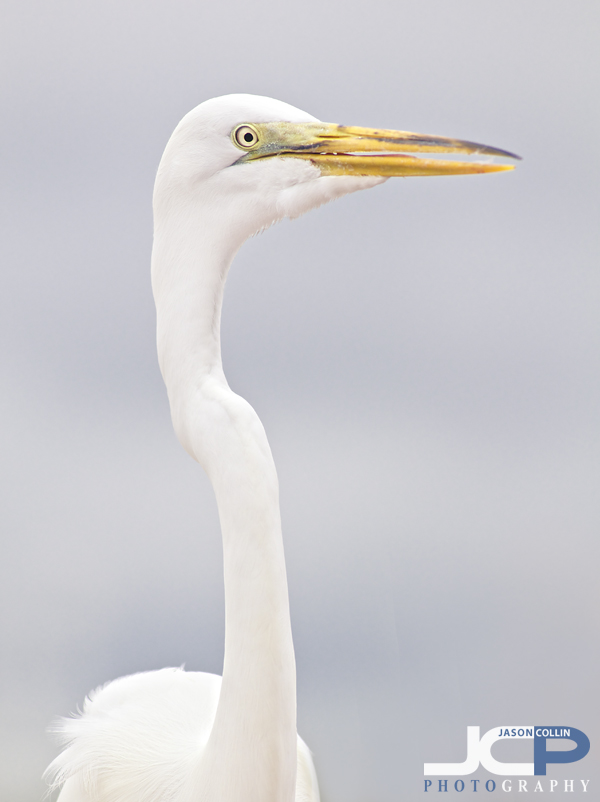
    Photography Tip - portrait orientation allows the great egret to fill the frame - The Pier, St. Petersburg, Florida

    • Setup:  Nikon D300 Nikkor 80-20mm f/2.8D @ f/4 ISO 200 1/2000th 

    Getting into a fixed routine of using landscape orientation with your DSLR is easy.  After all, the DSLR seems to be designed to be held horizontally.  However, only using landscape orientation eliminates 50%+ of composition possibilities!  Not to mention it makes it extremely awkward to photograph long, tall subjects like the above great egret.  Perhaps the best criticism I was every given about my photography was there there were not enough portrait orientation shots (thanks Jeff!).  I was told that over two years ago.  Ever since then every time I shoot I am mindful of using an appropriate amount of landscape and portrait orientation shots.  Maybe now you will be too.

    When shooting in portrait orientation, I like to hold the grip part of the DSLR up, which allows me to still wedge my left elbow into my body creating a stable shooting position.  The highest end DSLRs (i.e. $5000+) come with a vertical grip built in.  However, many other DSLRs do have vertical grip accessories available for them made by the manufacturer.  Another benefit of using a vertical grip is that it houses more batteries so you can shoot longer.  

    This great egret photograph is available for commercial license and fine art print