Photography Tips

Photography Tip - Use Photoshop Clone Stamp Tool to clean backgrounds

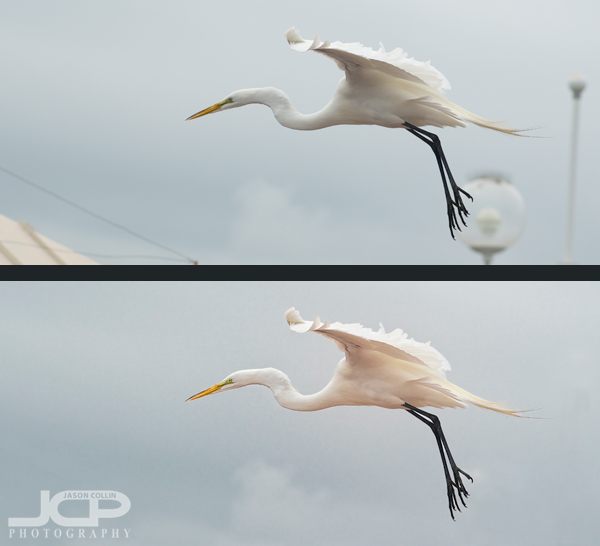
Top: the original RAW image Bottom: after using clone stamp tool to clean background

When I go around saying digital photography editing skills are 50% of what you need to produce a satisfactory final image, I really mean it even though every other photographer around would probably disagree with that.  I invite you to look at the above before and after shots and tell me in the comments below what percent digital editing had in helping the final image be all it could be.  

For this photography tip I will just concentrate on: 

  • how I used the clone stamp tool in Photoshop CS5 to clean up the background, i.e. removing the light posts and wires 

When I first pulled up this photo in Aperture 3, I really liked the bird in flight action.  The great egret was caught in an unusual mid-flap wing position.  However, the background was not clean and the egret's feet were overlapping a light post.  Then there was the corner of a roof intruding in the lower left of the frame.  Finally, there was a single tall light post on the right of the frame that was another distraction.  

To me the two things that really make a photograph of a common subject matter standout are light and background.  You need good light for a flattering exposure and a clean background to let the subject stand out.  While it is entirely possibly to be at a location where one can get both of these things just right, I, myself, do not want to be limited to just those exact right circumstances.  Hence, I have worked on my clone stamp skills with earnest.  
Now, if you have used the clone stamp tool in Photoshop you know it kind of has a mind of its own.  It almost never works like you want it too, especially if you use it in broad strokes.  First, in order to be able to use the clone stamp tool, you must have a source area in your photo you can sample from.  In the great egret shot, I have plenty of other gray clouds to sample to later stamp onto the light posts.  Really this is an ideal shot for using the clone stamp tool to fix because of the ample source cloning material, the relatively small amount of area that needs to be stamped on, and the fact that the subject does not much overlap any of the background distractions (just a bit of feet do).  

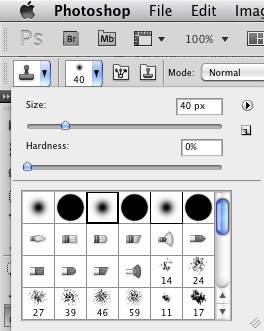
The shortcut for selecting the clone stamp tool is "S" and the key to using Photoshop efficiently is learning as many keyboard shortcuts as you can.  To change the size of the brush use the bracket keys:  ] and [   To sample an area hold the Option key (on a Mac) then click on the desired spot.  I very rarely use the clone stamp at 100% as that makes is hard to control and often artifacts are introduced.  For this shot I mostly used 80% opacity.  Once I sampled a cloud I stamped in ver short strokes, never more than one or two at a time.  Then I would go back and sample the same or another area.  Also, I almost always use a soft brush (see screenshot).  

So to summarize how I use the clone stamp tool in Photoshop CS5: 

  • "S" to select it
  • [ ] to change brush size
  • type 8 to change opacity to 80%, etc
  • Option-click to sample an area
  • Use short strokes
  • Resample every one or two strokes as needed 

Try this clone stamping technique on one of your photos and post a link in the comments below to a before and after shot, or e-mail the shot to me and I will include it in this post.

Great Egret flying in St. Petersburg Florida - bird photography tips

Great Egret in flight - St Petersburg Florida - Nikon D300 Nikkor 80-200mm f/2.8D @ f/4 ISO 200 1/2500thContinuing with the bird trending blog posts, I had the opportunity to photograph a great egret up close and in flight.  As you can see I did not have to use a 600mm lens to get this tight of a shot of the great egret.  Nor was I in an airplane.  The secret to being able to get a shot like this without spending $10,000 is to . . . go to The Pier in downtown St. Petersburg!  Even the base of The Pier itself is rather high off the water often putting you at eye level to passing and even incoming birds.

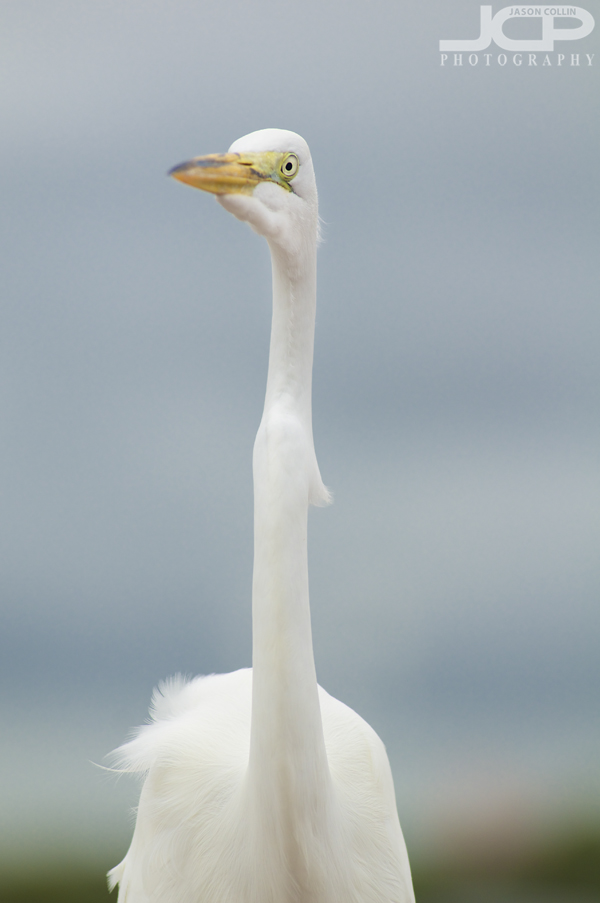
great egret - The Pier in St Petersburg Florida - Nikon D300 Nikkor 80-200mm f/2.8D @ f/4 ISO 200 1/2000thThis afternoon was a rare very overcast Florida day.  That meant I did not have to worry about getting my back to the sun or anything like that.  In fact, shooting a white bird like this great egret is best done on an overcast day I think, not counting sunrise or sunset time of course.  So, without having to worry about the light because the light was the same from any direction, the last location factor to be mindful of was:  background.  I often say bird shots are make or break first because of the light, and second because of the background.  Without a fantastically clean background, your shot will just not stand out from the other thousand great egret shots taken every day in Florida.  Of course one of the ways to reduce the impact of the background is to just make it all creamy bokeh.  Still, color of the bokeh does come into play.  Do you think the transition of brown at the base of the above photo works, or would it be better all blue-gray?  I thought it added another point of interest in the frame myself.  Let me know in the comments if you agree or disagree.  One last thing about the photo, looking at a bird like a great egret is strange and reminds of the rare times Beavis every looked straight ahead.  There is just something off about it!  Ah, and notice how I set the focus on the bird's eye.  Without the eye in focus, the shot would have been a fail, or I would have had to pass it off as "artistic style" of some sort!

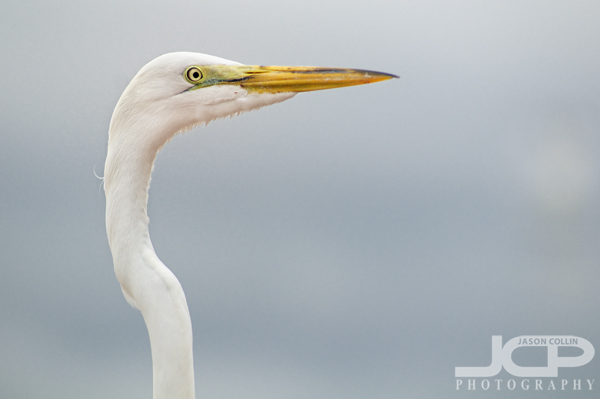
Great Egret beak - The Pier St Petersburg Florida - Nikon D300 Nikkor 80-200mm f/2.8D @ f/4 ISO 200 1/2000thOne last tip on photographing long-necked birds:  they are an awkward shaped creature, and it is often not the most flattering to include their entire body in the shot, especially when standing, and doubly especially when they are standing on a concrete wall!  Nothing takes the nature out of your shot like a human-made structure!  

Hence, in the above shot I focused on framing only a part of the great egret.  I used the rule of thirds and placed the eye in the upper left most third.  I had the bird looking into the empty space of the frame.  I of course also made sure the background was clean and the bokeh color complementary to the white of the egret.  Plus, I just think it looks cool to see this long neck protruding from the bottom of the frame.

Please share any of your Florida bird photography tips and links to your own shots in the comments below.

Photography Tip - Previsualization of bleach bypass

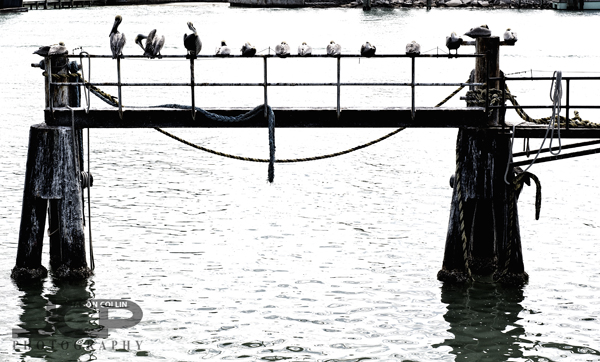
Previsualized for bleach bypass filter - Nikon D300 Nikkor 50mm f/1.8D @ f/11 ISO 200 1/400thOne photography tip to keep in mind as you start to progress as a photographer is previsualization.  This is the process by which you see the final photograph before you even put the camera up to your eye.  I was teaching a 1-on-1 DSLR Photography Lesson at John's Pass Village recently in very poor, harsh mid-afternoon Florida light.  This meant there was no reason for me to look for shots that would produce great color or exposure.  So I did not.  Instead, I switched my mind to looking for possible black & white or similar photo opportunities.  

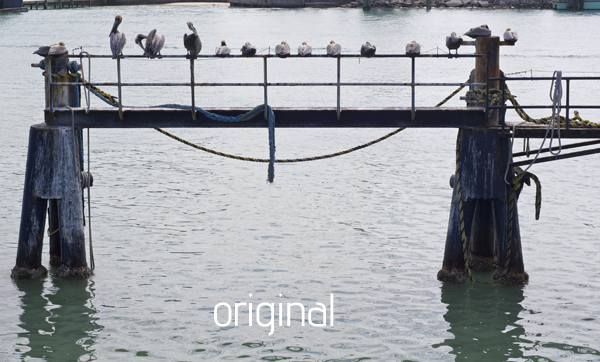
As soon as I saw all these birds sitting in a neat row on the railing of a pier this popped into my head:  use the rectangular shape to frame the shot, post-process using a bleach bypass filter (found in Color Efex Pro).  How was this able to instantly come to my mind?  Because I had already started the previsualization process when I accessed the natural light situation.  I gave myself a very specific type of shot to focus on looking for, so once a possibility was seen, I knew right away how I wanted to photograph it.

This is what the above scene looked like to the naked eye:

Being able to see the potential for a shot is KEY to producing consistently satisfying imagesThe next time you set out with your DSLR, try to previsualize shots before you even think about pushing the shutter.  This will not only likely help you produce better photographs, it will cut down on the number of shots you just immediately delete when you get home.

Post a link to your previsualization results in the comments below . . .

Photography Tip - change dimensions with a tripod and slow shutter speed

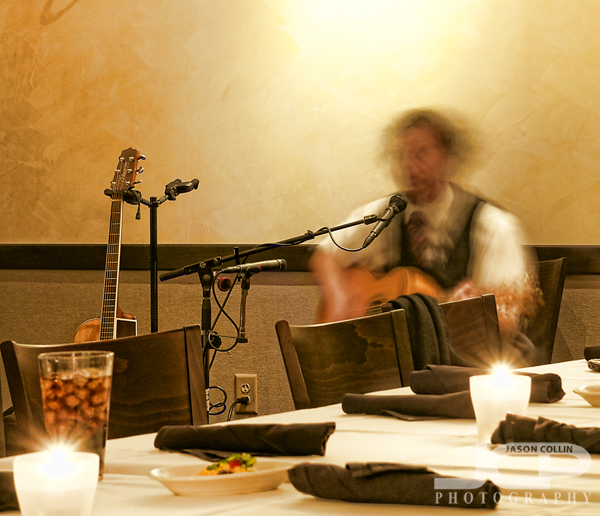
Pane Rustica restaurant - Nikon D300 Tamron 17-50mm f/2.8 @ f/8 ISO 200 10 sec tripod mounted & cable releaseThe above shot was not an accident, but one I made on purpose.  The birthday party I was hired to photograph had not started in earnest yet.  The room was mostly empty, but the guitarist was already playing.  My DSLR was already mounted to my tripod for some wide shots of the party space, so since I had the time and opportunity . . .

The room was crazy dark, so I knew I could keep the shutter open a good long time (10 seconds) without overexposing everything.  The guitarist was not exactly rocking out, but even with his slight moving and strumming over 10 seconds it was enough to make him look unrecognizable.  Of course everything else remained still in the frame creating what I call an "out of phase" look for the subject (the guitarist).  

A lifetime ago I was studying computer engineering at USF, and even before that getting my first taste of physics in high school.  I became and have remained fascinated by how vibrations basically keep us in this dimension.  If we could engage a phase shift, then could crossing dimensions be possible?  In my imagination at the time of making this shot, the guitarist was going through just such a phase shift.  

Thus, tripods and cable releases are not just for taking landscape photos.  They are great fun to experiment with and possibly reveal other dimensions.

freeFall theatre company ribbon cutting St. Petersburg Florida

St. Petersburg Mayor Bill Foster helps Eric Davis of freeFall theatre company do the ribbon cutting in St. PetersburgOn a bright and sunny Tuesday morning the new freeFall theatre company of St. Petersburg, Florida had its ribbon cutting on the front lawn with assistance from St. Petersburg Mayor Bill Foster.  As you can see by the direction of the shadows, I had to shoot almost directly into the sun, which of course meant having to definitely use manual settings to insure the exposure was long enough to be able to see some details amongst the group and try not to just totally blow out the sky.  Using my Nikon SB-800 Speedlight as fill flash, I was able to produces a satisfactory exposure.  

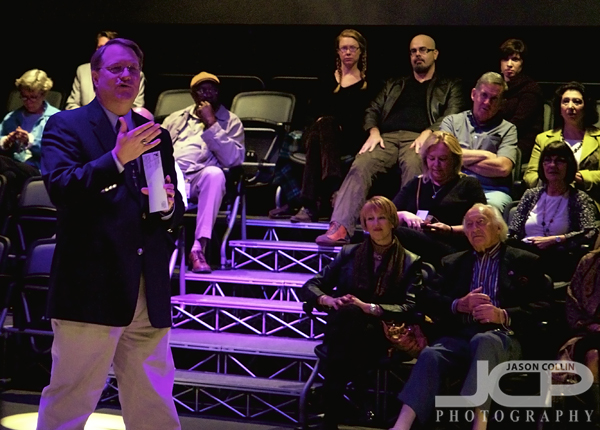
St. Petersburg Mayor Bill Foster addresses a packed freeFall theatre before the ribbon cutting.Before having to deal with too much light, I had to deal with far too little light inside the darkened theatre itself.  The purple hues are due to the colored lights being used to light Mayor Bill Foster and the packed stands of attendees.  This was not a situation where flash was allowed so that meant cranking the ISO up to 1600, setting the aperture to f/2.8 and using a steady a shooting stance as I could in the crowded conditions as I let shutter speeds dip to as low as 1/40th of a second making sure to shoot when the mayor froze his stance, otherwise even just a slow walk would lead to a blurred image at 1/40th of a second.

freeFall theatre company interior "Frogs" set - f/2.8 ISO 1600 1/40th handheld no flashSeveral people spoke and had the crowd quite energized.  I was ready to see a full performance!  We were treated to a small performance showcasing the current, impressive cast of The Frogs.  Long ago when I was a USF student there was a brief period where I frequented a number of Tampa playhouses.  I would like to again, but it seems ticket prices have gone up significantly since the 90s!

freeFall theatre company Eric Davis shakes hands after the ribbon cutting ceremonyIt is certainly not often one shoots in such extremely different light conditions in a span of five minutes.  That is just part of being a professional photographer, being able to adapt to wildly varying shooting environments in minimal time with the ability to produce consistent results regardless.  Lots of shooting experience in lots of situations gives one the confidence necessary to do this.

Photography Tip - shutter speed should be double your focal length

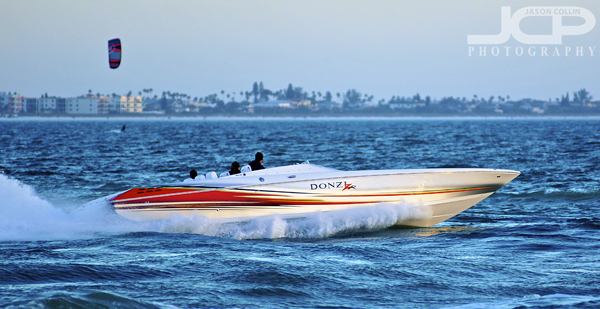
Donzi speedboat Treasure Island, Florida - Nikon D300 Nikkor 80-200mm f/2.8D @ f/2.8 ISO 400 1/1250th 200mmOne of the most common difficulties when first entering the DSLR world is to produce sharp action photographs.  This Donzi speedboat was cruising into the Gulf of Mexico near Treasure Island, St. Petersburg, Florida just after 6pm in February 2009.  The sun was already getting close to the horizon.  The Donzi was going fast.  This added up to a photography scene with very little room for margin of error.  It required pretty exact settings to produce an acceptable image.  

I always keep in mind one basic axiom about shutter speed

  • the shutter speed should be at least double the focal length 

Since I was shooting at 200mm with my trusty Nikkor AF ED 80-200mm f/2.8D lens, according to that axiom I needed a shutter speed of at least 1/400th of a second.  However, that shutter speed is really just a theoretical minimum.  One then has to take into consideration the speed of the subject and the available light.  If I had set my shutter speed to 1/400th you would be looking at a white blur.  In general I never shoot any moving subject at less than 1/500th no matter the focal length used.  

For something moving really fast I keep in mind that it will probably take 1/1000th to freeze its motion.  So since I made the Donzi shot with a shutter speed of 1/1250th, I was able to produce a tack sharp image.  

So the first thing to check if you are having a hard time photographing moving subjects is to check your shutter speed.  Is it at least double your focal length?  For anything moving as fast or faster than a child running around, is your shutter speed over 1/500th or greater?  If the answer to these questions is no, then you know at least the first step you then need to take to start producing sharp action shots.

Photography Tip - use filters when editing for great quick results

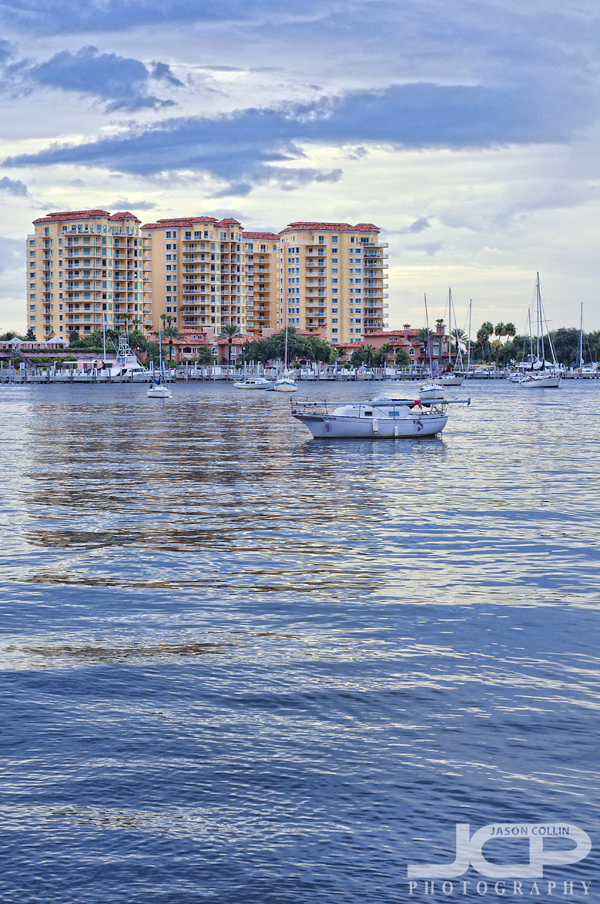
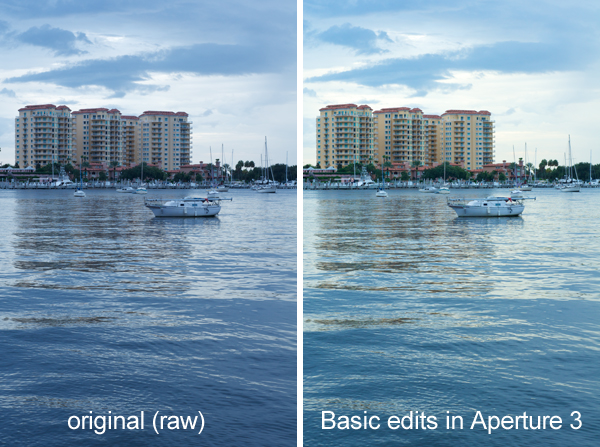
Nikon D300 Nikkor AF 50mm f/1.8D ISO 400 1/60th - sailboats of St. Petersburg HarborFor this digital photography editing tip I am using a photograph that was made in an unusual way and breaks a few rules.  Typically for a landscape, fine art type photograph I would of course mount my DSLR on a tripod and probably use a cable release and wide angle lens too.  For this photograph I was shooting handheld with a 50mm prime lens, and in portrait orientation to boot.  At the time I was teaching a DSLR photography lesson to a student preparing for a trip to Costa Rica and he would not be bringing a tripod.

This photograph had been lying around unedited for five months, which means I did not love it, but something about it made me want to not just delete it right away.  Maybe it is the completely empty foreground and the use of portrait orientation, or because of the sailboat with a lowered mast in the middle.  Either way, I will in the following describe my simple and fast editing method of using filters.

The first step was importing the RAW file into Aperture 3.  If you use an app like Aperture 3, then shooting in RAW requires no extra work over just shooting in jpg.  So you get all the benefits of shooting in RAW, with no big work required on your part because Aperture 3 upon file import applies a RAW processing profile based on your specific DSLR right to the file.  No mess no fuss.  So there is absolutely no excuse not to shoot in RAW.  The myth of RAW being extra work is gone!  

Here are the next steps I took in Aperture 3

  • straighten the horizon (right side was low)
  • adjust exposure and vibrance sliders
  • use the temperature slider to add warmth (image was too blue) 

After doing super easy and basic slider adjustments in Aperture 3, I then launch Color Efex Pro 3 which is a plugin I have right inside Aperture 3.


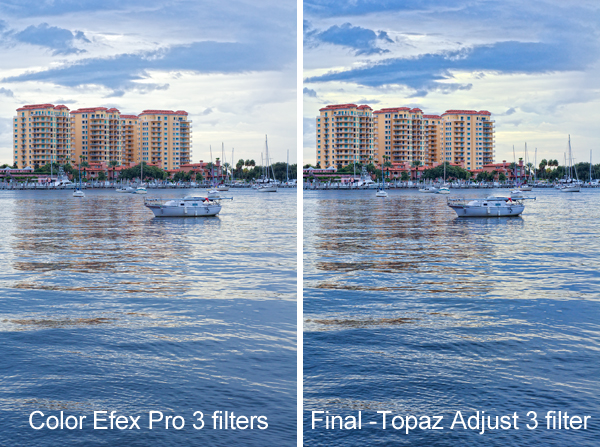
The filters I used in order in Color Efex Pro 3

  • Polarization
  • Remove Color Cast
  • Tonal Contrast 

After finishing things up in Color Efex Pro 3, I export the image as a TIFF right into Photoshop CS5 where I applied a 60% unsharp mask filter.  Then from right within Photoshop CS5 I launched Topaz Adjust 3 and applied the "Photo Pop" filter.  The last little thing I did to the image was use the dodge brush in CS5 set for midtones at 20% to brighten up the condos a little more, and the shoreline too.

This is basically the editing process I do on every single photograph I edit, save for using Topaz Adjust which is only used once in a great while.  One or two of the filters may change in Color Efex Pro, and I may adjust different sliders in Aperture 3, but I think this is a streamlined, easy and effective editing process.  

Please try this editing process out on one of your own images and post a link to the results in the comments below.