Aperture 3

Photography Tip - adjust highlights slider to recover detail

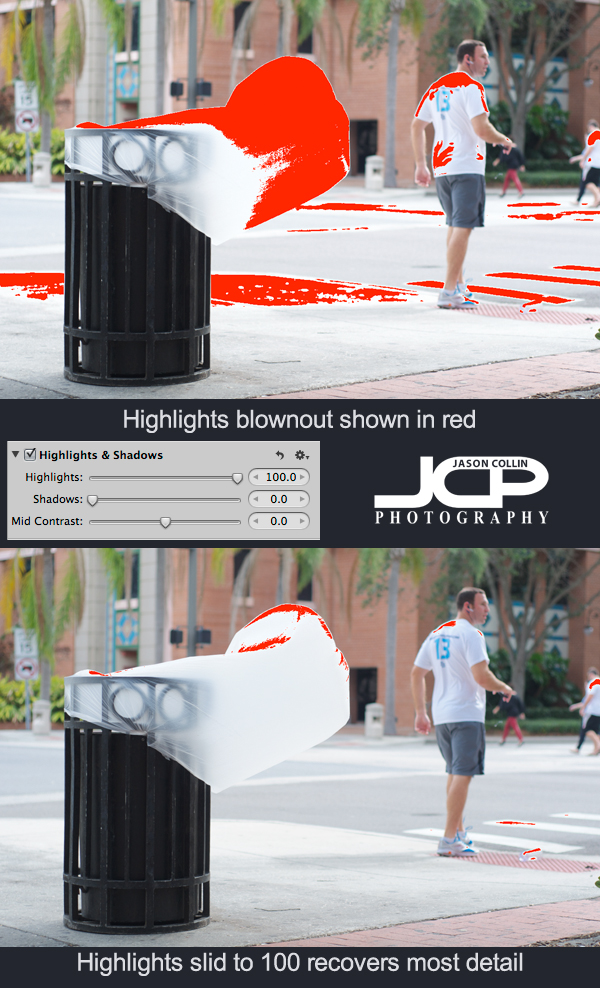
When shooting outdoors in the harsh Florida sun, it is not uncommon to blowout the highlights in a photograph, especially if there are any white colors in the shot or there are reflective surfaces.  In the above example you can see one thing that fascinates me about St. Petersburg - its trash cans.  On windy days when the trash cans are empty, the trash bag itself gets kind of turned inside out and blows out like a tongue.  These wave and thrash in the wind and it amuses me to see this phenomenon.  

In the shot, the trash bag is the lightest thing in the whole frame.  Most of the shot looks exposed correctly, but the white trash bag is catching a lot of light and that results in it looking blownout.  Using Aperture 3 I turned on the show Highlights/Shadows view which paints red over the parts of an image that are overexposed (blownout).  Sometimes detail can be recovered in blown highlights and it is very simple to do.  

---> Just use the Highlights slider to get back details 

In this case it had to go all the way to 100%, but usually less is needed.  In the second screenshot after the Highlights slider has been adjusted, there is much less red visible.
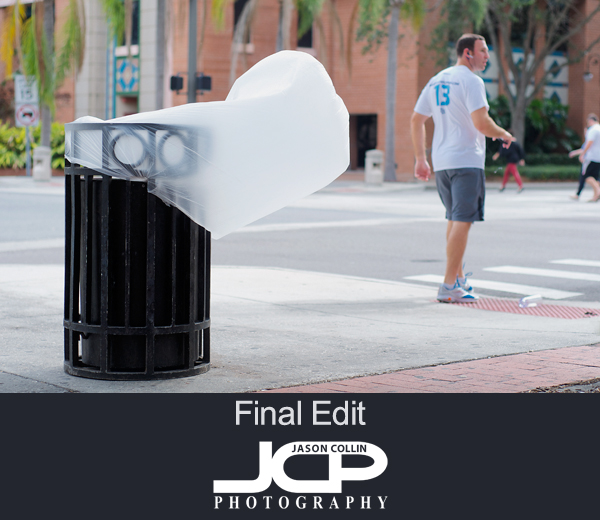
After doing all my usual editing to a photoggraph, the results allow the viewer to see the trash bag as more than just a pure white cylinder.  Try adjusting the Highlights slider when editing your photographs to recover as much details as possible, especially when shooting out in bright sunny conditions.

Aperture 3 Workflow Digital Photography Lesson on MacBook Pro St. Petersburg Florida

Bill learning my Aperture 3 workflow right from my desk also getting emotional support from Kiki!Last week Bill came over to my apartment for a digital photography workflow lesson based on Aperture 3.  This was my sixth time meeting up with Bill, but the first to focus on the part of digital photography that happens after you return from shooting, which is just as important as learning how to shoot out in the field.  Once you start taking 200, 300, 400+ photos on any given outing with your DSLR then workflow and photo management becomes critical in making sure you showcase your best images and can find them one year down the road.  

After Kiki gave Bill an enthusiastic greeting, we opened up our MacBook Pros at my desk and I went step-by-step with Bill first getting my preferred Aperture 3 settings into his version, and then showing him what you do once you insert a memory card into the SD slot on the side.  Upon photo import in Aperture 3 you can imprint a lot of very useful metadata, as well as rename the files (so all your shots are not _DCC457) and put them into a new project to start off your workflow with good orginization.

Bill had photos from his daughter's prom night pre-dance getogether at his own home for us to use.  I showed him my culling process for picking the best shot out of 3-4 similar shots.  This involves a star-rating system and then a side-by-side full-screen comparison of shots.  We finished the lesson with using some of the handy sliders and brushes in Aperture 3 to make the first round of edits on a given digital photograph.  

Aperture 3 & Photoshop CS5 Digital Photography Editing lesson with Kamila

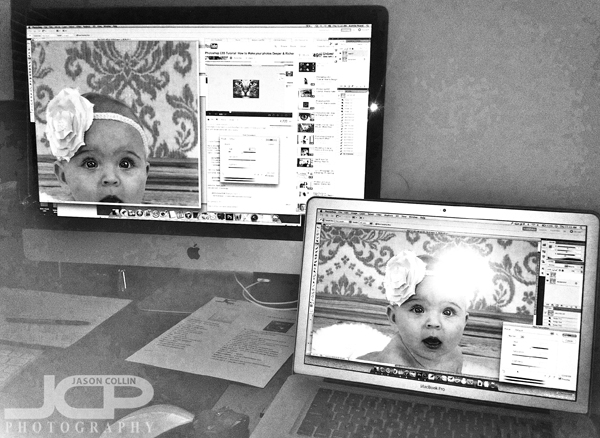
Editing one of Kamila's baby portraits using Aperture 3 and Photoshop CS5 - this photo made by iPhone 4It has been almost a year now since I met Kamila for our first 1-on-1 DSLR Photography Lesson in downtown St. Petersburg.  It has been good to see her increase her photography shooting skills.  As such, our last two lessons have focused on editing digital photos.  Since that last editing lesson she has also greatly upgraded her workstation with a 27" iMac!  As I recommended she got Aperture 3 to use as her photo management system and initial editing app.  We began the lesson with getting her RAW workflow as streamlined as mine is on Aperture 3, which mainly involved getting the import presets & meta data all set up.  

From there I showed her my usual first editing steps in Aperture 3:  straightening, cropping, and exposure tweaks, all only if necessary.  We set up Photoshop CS5 to be the external editor for photos in the Aperture 3 library allowing us to actually work in Photoshop, but still all saves change the file within Aperture 3.

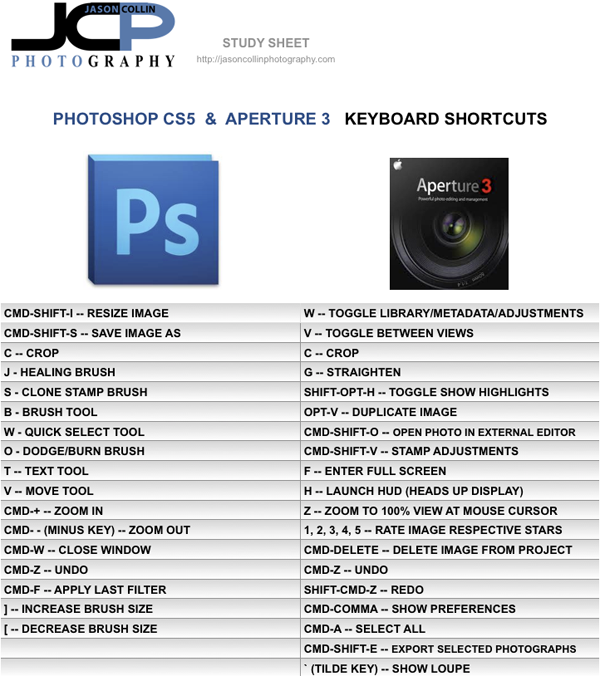
I am a big proponent of keyboard shortcuts, and before the lesson I sent Kamila my PDF of Aperture 3 and Photoshop most used keyboard shortcuts (get it here yourself!).  Kamila took further handwritten notes to try and remember as much as I could teach her in our 2-hour lesson.  I am confident that Kamila will get faster and faster at editing using the tips I gave her today and as she memorizes more of the keyboard shortcuts.  For our next lesson we will move on to more advanced editing including selective edits, object extraction and lens distortion correction.

DSLR Photography Lesson #2 with John & his wife in Oldsmar

John & Lisa photographing the lake behind their home in Oldsmar during our DSLR Photography LessonJohn has been very prolific in adding to his already substantial photography gear list since our last DSLR Photography Lesson at John's Pass village just two weeks ago.  For our second lesson, but first for his wife Lisa joining us, I ventured out to their home in Oldsmar by special request.  I knew they lived on a lake, but I did not know they had five dogs!  This was a pleasant surprise.

John already had a Nikon D300s and the awesome Nikkor AF-S 105mm VR micro f/2.8G lens, to that he added another D300s for Lisa and the Nikkor AF-S 17-55mm f/2.8G wide angle lens!  On top of that he has boosted his software for editing digital photographs as well with the both Lightroom for his PC and Aperture 3 for Lisa's Mac!

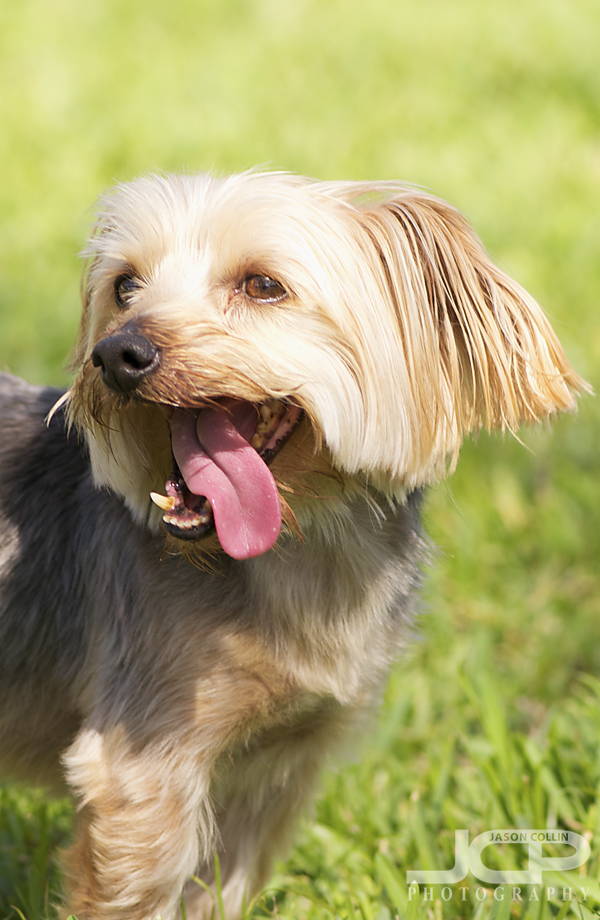
One of their four Yorkshire Terriers and one of their five dogs total! They were very friendly.We started out wide shooting landscapes by the lake where I showed them how you can spice up an oft photographed scene by getting really low to the ground.  John was not afraid to get dirty at all and lied down right on his stomach (recommended).  To Lisa I suggested tilting the horizontal axis to add a dimension of interest.

After a quick retreat from the sun we were back outside to photograph a different subject matter entirely, dogs!  After setting up their D300s's with the best manual settings for the harsh afternoon sunlight I led the dogs on several romps around their backyard as John and Lisa shot away from as close to eye level as they could get to their small dogs.  It did not take long for them to realize that the percentage of in focus shots when photographing running dogs is not high at all.  It is definitely a type of photography that takes practice, the right gear, and then more practice!

We ended up back inside starting to edit some of the photos they took in Lightroom and Aperture.  I showed Lisa the PDF of shortcuts I made specifically for Aperture 3 that will help her get efficient when using the app.

It was a very different type of lesson for me on a number of accounts and also a lot of fun.  Thanks to John and Lisa for their generous support of my lessons. 

  • Reserve your own 1-on-1 DSLR Photography Lesson with Jason today!
  • Learn more about the lessons
  • Browse past lessons with all of my students 
  • Photography Tip - use filters when editing for great quick results

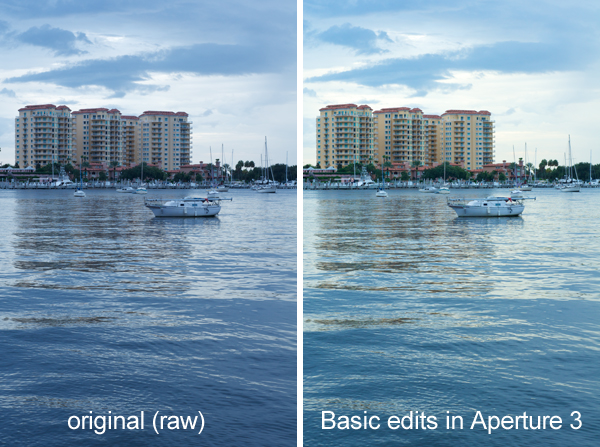
    Nikon D300 Nikkor AF 50mm f/1.8D ISO 400 1/60th - sailboats of St. Petersburg HarborFor this digital photography editing tip I am using a photograph that was made in an unusual way and breaks a few rules.  Typically for a landscape, fine art type photograph I would of course mount my DSLR on a tripod and probably use a cable release and wide angle lens too.  For this photograph I was shooting handheld with a 50mm prime lens, and in portrait orientation to boot.  At the time I was teaching a DSLR photography lesson to a student preparing for a trip to Costa Rica and he would not be bringing a tripod.

    This photograph had been lying around unedited for five months, which means I did not love it, but something about it made me want to not just delete it right away.  Maybe it is the completely empty foreground and the use of portrait orientation, or because of the sailboat with a lowered mast in the middle.  Either way, I will in the following describe my simple and fast editing method of using filters.

    The first step was importing the RAW file into Aperture 3.  If you use an app like Aperture 3, then shooting in RAW requires no extra work over just shooting in jpg.  So you get all the benefits of shooting in RAW, with no big work required on your part because Aperture 3 upon file import applies a RAW processing profile based on your specific DSLR right to the file.  No mess no fuss.  So there is absolutely no excuse not to shoot in RAW.  The myth of RAW being extra work is gone!  

    Here are the next steps I took in Aperture 3

    • straighten the horizon (right side was low)
    • adjust exposure and vibrance sliders
    • use the temperature slider to add warmth (image was too blue) 

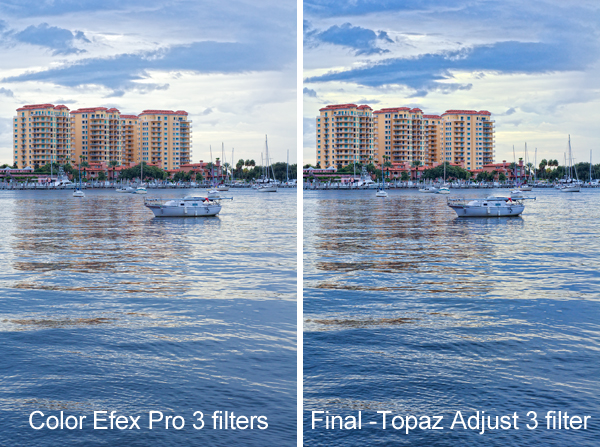
    After doing super easy and basic slider adjustments in Aperture 3, I then launch Color Efex Pro 3 which is a plugin I have right inside Aperture 3.


    The filters I used in order in Color Efex Pro 3

    • Polarization
    • Remove Color Cast
    • Tonal Contrast 

    After finishing things up in Color Efex Pro 3, I export the image as a TIFF right into Photoshop CS5 where I applied a 60% unsharp mask filter.  Then from right within Photoshop CS5 I launched Topaz Adjust 3 and applied the "Photo Pop" filter.  The last little thing I did to the image was use the dodge brush in CS5 set for midtones at 20% to brighten up the condos a little more, and the shoreline too.

    This is basically the editing process I do on every single photograph I edit, save for using Topaz Adjust which is only used once in a great while.  One or two of the filters may change in Color Efex Pro, and I may adjust different sliders in Aperture 3, but I think this is a streamlined, easy and effective editing process.  

    Please try this editing process out on one of your own images and post a link to the results in the comments below.

    Digital Photograph Editing Lesson with Eric

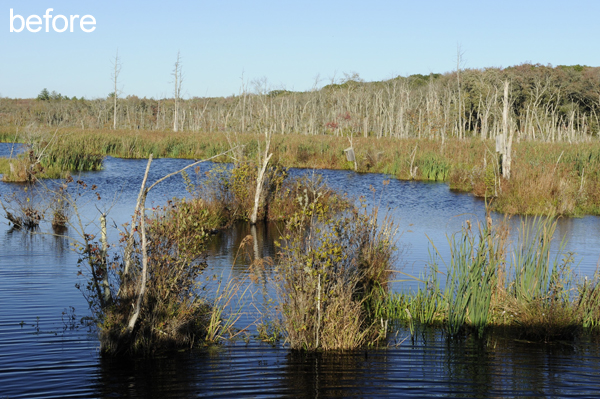
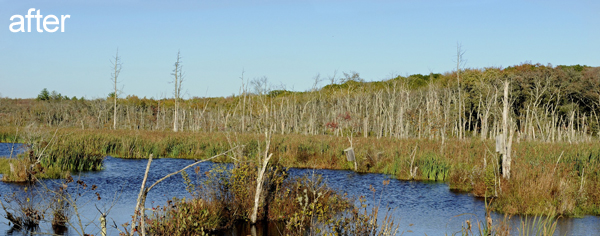
    A New England wetlands scene edited using Aperture 3 - photo by Eric used with permissionFor Eric's second DSLR photography lesson (first), he brought some photos of his recent visit to various New England areas with him on his laptop.  We found a spot at an outdoor downtown St. Petersburg cafe and starting going through his shots made using his Nikon D300s.  The one featured above was taken when Eric hopped off his bike (bicycle) because he wanted to remember the beautiful scenery he was riding through.  Upon first look at the shot, I liked the sine wave shape of the treeline, but thought the foreground was dominating the image too much and not the best feature to focus one's eye on.

    So we began by making the panoramic crop you see above, that eliminated many of the distracting foreground elements, and also made a shot that was not taken at a wide angle appear to be of a much wider landscape.  Adjusting various filters added some contrast and tones to the marsh grass.  Painting with the polarizing brush in Aperture 3 brought back some blue to the sky.  

    This is another example of why I highly suggest that one learn how to shoot well and how to edit well simultaneously.  Eric cannot easily return to that marshland to frame the shot in a different way, but with editing skills he can improve a shot and make it look more like what he initially envisioned.

    For more on learning editing and shooting simultaneously check out this blog post featuring my own photo example.

    I look forward to seeing how Eric puts these editing skills to use in future shots. 

  • Reserve your own 1-on-1 DSLR Photography Lesson with Jason today!
  • Learn more about the lessons
  • Browse past lessons with all of my students 
  • Aperture 3 and Photoshop CS5 Keyboard Shortcuts Quick Guide

    DOWNLOAD PDF version

    Aperture 3 and Photoshop CS5 are two key applications in my digital photo editing workflow.  I have been increasingly teaching my DSLR photography students my post processing workflow, in addition to in the field making photograph lessons.  I rely heavily on keyboard shortcuts for greatly speeding up my editing, which is necessary when I have to deliver hundreds of images to clients in a short period of time.  

    So I put together a quick guide of the keyboard shortcuts I most commonly use in Aperture 3 and Photoshop CS5.  Most of these keyboard shortcuts should also work in older versions.  I learned them by looking through the menus and seeing the shortcut letter, by accident and by reading other photography websites.  

    Let me know any additional keyboard shortcuts you use in the comments below. 

  • More photography tips
  • Reserve your own 1-on-1 DSLR Photography Lesson with Jason today!
  • Learn more about DSLR photography lessons
  • Browse past lessons with all of my students