Topaz Adjust

Photography Tip - use filters when editing for great quick results

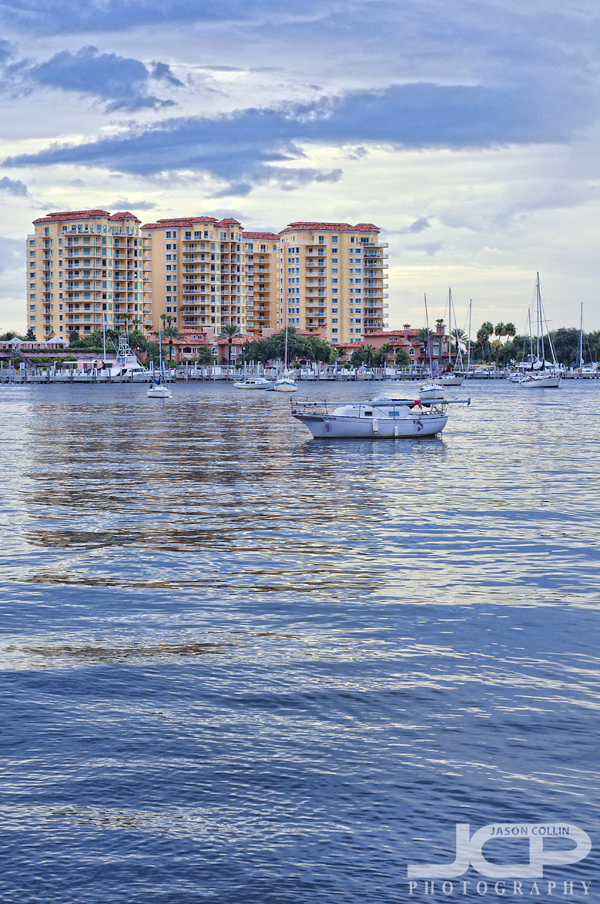
Nikon D300 Nikkor AF 50mm f/1.8D ISO 400 1/60th - sailboats of St. Petersburg HarborFor this digital photography editing tip I am using a photograph that was made in an unusual way and breaks a few rules.  Typically for a landscape, fine art type photograph I would of course mount my DSLR on a tripod and probably use a cable release and wide angle lens too.  For this photograph I was shooting handheld with a 50mm prime lens, and in portrait orientation to boot.  At the time I was teaching a DSLR photography lesson to a student preparing for a trip to Costa Rica and he would not be bringing a tripod.

This photograph had been lying around unedited for five months, which means I did not love it, but something about it made me want to not just delete it right away.  Maybe it is the completely empty foreground and the use of portrait orientation, or because of the sailboat with a lowered mast in the middle.  Either way, I will in the following describe my simple and fast editing method of using filters.

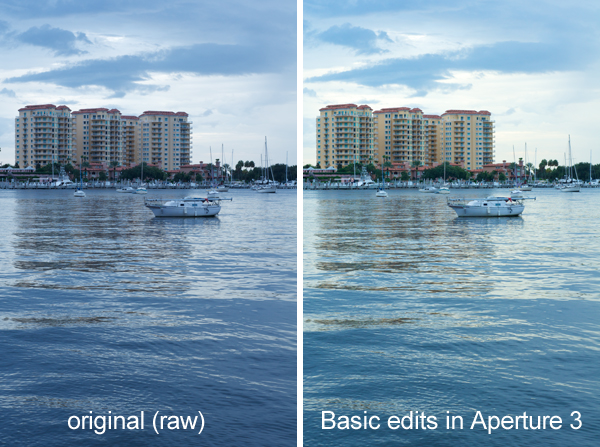
The first step was importing the RAW file into Aperture 3.  If you use an app like Aperture 3, then shooting in RAW requires no extra work over just shooting in jpg.  So you get all the benefits of shooting in RAW, with no big work required on your part because Aperture 3 upon file import applies a RAW processing profile based on your specific DSLR right to the file.  No mess no fuss.  So there is absolutely no excuse not to shoot in RAW.  The myth of RAW being extra work is gone!  

Here are the next steps I took in Aperture 3

  • straighten the horizon (right side was low)
  • adjust exposure and vibrance sliders
  • use the temperature slider to add warmth (image was too blue) 

After doing super easy and basic slider adjustments in Aperture 3, I then launch Color Efex Pro 3 which is a plugin I have right inside Aperture 3.


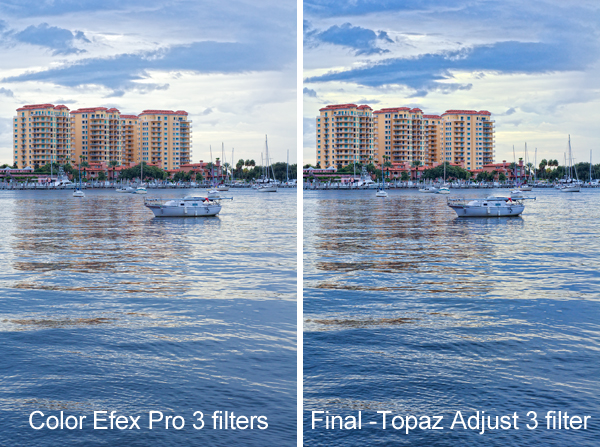
The filters I used in order in Color Efex Pro 3

  • Polarization
  • Remove Color Cast
  • Tonal Contrast 

After finishing things up in Color Efex Pro 3, I export the image as a TIFF right into Photoshop CS5 where I applied a 60% unsharp mask filter.  Then from right within Photoshop CS5 I launched Topaz Adjust 3 and applied the "Photo Pop" filter.  The last little thing I did to the image was use the dodge brush in CS5 set for midtones at 20% to brighten up the condos a little more, and the shoreline too.

This is basically the editing process I do on every single photograph I edit, save for using Topaz Adjust which is only used once in a great while.  One or two of the filters may change in Color Efex Pro, and I may adjust different sliders in Aperture 3, but I think this is a streamlined, easy and effective editing process.  

Please try this editing process out on one of your own images and post a link to the results in the comments below.

Work on digital photography shooting & editing skills simultaneously

Nikon D300 Nikkor AF ED 80-200mm f/2.8D lens @ f/4 ISO 200 1/5000th processed in Aperture 3, Photoshop CS5, Nik Color Efex Pro 3, Topaz Adjust 3

It is a source of pride still among pro, serious amateur, hobbyist and beginner photographers alike to get it right in camera.  By that they mean one should not need to do that much editing to images to produce a great finished shot if only the settings in the camera were optimal to begin with.  I used to think like that.  I still do not shoot lazily thinking I can fix this or that in Photoshop as much as I possibly can, the biggest exception being I know I will have to edit out my light stand's shadow in some backlit portrait shots.  However, I find myself more and more realizing having strong editing skills can mine gold from, well, a bland river (pun intended).

The above shot was made while teaching a photography lesson to a student.  My full attention was not put into photographing the subject matter as best as possible as I was of course focused on helping my student make the best possible image she could.  Still, there was something about the shot I liked, mostly the one guy sitting down facing the opposite way, as well as the graffiti and color reflected in the Hillsborough River.  Basically, I saw the potential the image had.

So I opened up my digital darkroom as Rick Sammon likes to call it, and mined a final shot that though technically not perfect (focus slightly behind rowers, etc.), has some pop to it due to the color Topaz Adjust and Color Efex Pro were able to bring out from the RAW file.  I then applied selective contrast adjustments to the wall and the water.  

Therefore, I recommend working on your editing skills just as hard as you work on your in the field shooting skills.  Develop them simultaneously.  If I combined my shooting skills today, with my editing skills of even just one year ago, I would not be able to produce as many images that pop as I can now.  This is especially true for when shooting during non-golden-hour times.   

One day soon I will return to this location to do a photo series of crew rowers, as I find it is a subject matter and location I am drawn too.  I made this photograph from the University of Tampa campus side of the river.  It was about 3pm on a weekday afternoon.

Just the basic processed RAW file, as "straight out of the camera" a photo made in RAW can get

  • Read more photography tips
  • Reserve your own 1-on-1 DSLR Photography Lesson with Jason today!
  • Learn more about the lessons
  • Spicified Candid Brothers Portrait at Honeymoon Island State Park

    Nikon D300 Tamron 17-50mm f/2.8 @ f/5.6 ISO 200 1/320th Nikon SB-600 Speedlight on light stand above & to the left

    Photographing a portrait session on a beach, even at sunset, can lead to quite a few similar looking shots.  How can you add a little spice to some of the shots?  Topaz Adjust 3 makes it quite easy actually, as it has a "spicify" filter right in it.  I used that filter among others to process the above candid portrait of two brothers who added their own kind of spice to every shot I took of them with their great energy and playfulness.  

    Steps for making the above shot: 

    • import RAW file into Aperture 3
    • applying sharpening, exposure & shadow adjustments using the simple sliders
    • use the polarizing filter in Nik Color Efex Pro 3
    • send that image to Photoshop CS4 as a 16-bit TIFF
    • apply unsharp mask at 68%
    • apply the spicify filter in Topaz Adjust 3
    • dodge the boys to make them stand out a little (save file)
    • adjust hue and red channel in Aperture 3, export jpg 

    Below is the non-spicified version:

    only basic adjustments were made to the RAW file in Aperture 3 for this shot taken at Honeymoon Island State Park

    So what do you think of the spicify filter in Topaz Adjust 3?  Did it help or hurt the portrait?  Or did it simply offer an alternative version of a shot?  Please let me know what you think and why in the comments below.  

    Street Portrait Series 01 - University of Tampa

    Street Portrait of Candid Coeds Chatting -- f/11 ISO 200 1/125th SB-600 handheld off cameraWant to get new ideas?  Go to a photography workshop, even a free one.  My newest photo series, "Street Portraits," was inspired by a workshop by the Lighten Up and Shoot crew who talked about just approaching people on the street and asking if you can make their portrait, or even have them be your model for a little while.  Their workshop was free.  

    Combine the inspiration from that workshop with the experience I had during my 2nd DSLR Photography lesson with student Kelley in downtown Tampa, and boom, the Street Portrait Series was born.  All these shots were actually made during Kelley's 4th DSLR photography lesson.  See our setup for the bench shots here, though I only used a single off camera strobe for mine.  He used the dual-strobe setup.  

    These dudes were all business -- f/11 ISO 200 1/125th SB-600 handheld off cameraThe basic concept of the street portrait is to setup your lighting gear, then anyone you see walking by, ask them politely if they would like to have their portrait made.  If they say no, just say thanks.  If they say yes, say thanks too!  I always offer to send the person(s) the photograph as well.  Basically you combine street photography with candid portrait photography with off camera flash, with a good amount of being able to be outgoing and brave enough to just ask a stranger to let you photograph them.  I will admit, it certainly helped to have Kelley there, as he is not shy about asking people to let us make their portrait.  

    People on the UT campus were very open to be photographed -- f/11 ISO 200 1/250th SB-600 handheld off cameraHowever, I approached the girl (and her friend) above to join in our street portrait experiment.  I would have to say things went very well and several more people (not pictured) let us make their portrait.  Now, all these people were on the University of Tampa campus, no doubt a more likely crowd to let themselves be photographed.  It will be interesting to see how different areas of the city prove to be for street portraits.  I am excited to continue this series and just hope my nerve holds up, especially if I try it alone!

    How I processed these photographs: 

    • RAW files first processed in Aperture 3 (Nikon D300 default setting)
    • exposure & color correction in Nik Color Efex Pro 3
    • Unsharp Mask applied in Photoshop CS4 (exported from Aperture as a 16-bit TIFF)
    • "Portrait Drama" filter in Topaz Adjust 3 applied  

    DSLR Photography Lesson with Chris at St. Petersburg Saturday Market

    Chris (Topaz Adjusted) photographing some crafts at the St. Petersburg Saturday Market

    The return of sunshine to Saint Petersburg brought with it a first DSLR Photography Lesson with Chris, a new Nikon D90 owner, as well as Tamron XR Di II 17-50mm f/2.8 lens owner, and even a new Nikon Speedlight SB-600 owner.  Does some of this gear sound familiar?  That might be because I also use the same Tamron lens and Nikon Speedlight for a majority of my professional photography work.  Chris took my advice to buy the D90 body only, eschewing the kit lens package, and going right for a very quality, and affordable lens in the Tamron 17-50mm.  

    Chris had some photography knowledge and was fairly well practiced with adjusting settings on his D90, he even asked for homework before our first lesson!  I can tell you teachers really love to give homework, so I was happy to oblige.  So our lesson got off to a fairly in-depth discussion of photography techniques and theory.  

    Taking a break from the Saturday Market crowds to photograph some sun thirsty flowers hiding behind some bushes.

    The time passed by very quickly and we had just a little time left to practice off camera flash portraits.  This is something we will practice more in our next lesson for sure.  Chris is already well on his way to making photography a regular creative outlet and pursuit.  I look forward to assigning him some more homework!

    DSLR Photography Lesson with Julie in Saint Petersburg

    With each DSLR Photography Lesson you also get one portrait included!

    Julie received her DSLR Photography Lesson as a gift, which is starting to turn into the most popular way for me to get new students.  A person's significant other sends me an e-mail or gives me a call asking if they can give a lesson as a gift, I say absolutely, boom, a lucky person becomes the recipient of a fairly creative gift idea if I do say so myself.  

    Julie really likes to take pictures, and has taken quite a few good shots, but I began to teach her today how to make photographs by taking control of her DSLR, a Canon XTi.  Like many of my students, she was using the various preset modes on her DSLR, but was not satisfied with the results "sports mode" or any of the other modes produced.  So we went right into aperture priority mode and said good-bye forever to the little icon of the guy running on the XTi mode dial.  

    During this first lesson we mostly focused on the meaning of aperture and how to set it for photographing still or moving objects.  Added in was making sure to use the correct focus mode and the right ISO, and of course white balance too.  Lastly, we briefly touched on the virtue of external flash, which is how I was able to make the above portrait of Julie in broad daylight.

    Julie absorbed a lot in our first lesson--I was impressed--and is ready to go out and practice on her own before we have our second lesson.  Now, will her significant other give her the second lesson as a gift too or . . . ?

    Trial-ing out Topaz Adjust

    A sample candid portrait I processed in Topaz Adjust which took some fiddling about to produce (original below)

    I am a strong supporter of Nik's suite of apps, especially Color Efex Pro 3 and Silver Efex Pro.  However, I have been coming across more and more mentions of Topaz Labs' Topaz Adjust app, which is actually a plug-in for Photoshop.  The before and after photos on the Topaz Adjust product page are impressive.  Several totally blah photographs are miraculously transformed into strikingly colorful portfolio shots.  

    The above photograph is my first attempt at adding some of that Topaz style pop to one of my images.  I was teaching a DSLR photography lesson to student Danielle in Sunken Gardens, actually practicing flash outdoor portraits, when this woman (visiting Florida from Michigan) and her friends passed by and said hello.  I already had my Nikon D300 in hand and my SB-600 Speedlight raised as this woman let out a big smile.  I quickly asked her, "may I take your photo," she did not protest so I pushed the shutter.  Personally, this is my favorite kind of photo to make and I do not often get a chance in public to make one of these in Saint Petersburg, as it is sparsely populated.

    So using one of the softer presets in Topaz Adjust I added a little bit of skin smoothing and then adjusted the color sliders to make the image more vivid.  There are quite a few presets and they did not immediately produce an image I liked, so it took quite a bit of playing with several of the presets and adjusting them to produce results that I liked for the photo.  Some may find any results with Topaz Adjust look too unreal or too HDR-ish.  However, for adding color pop and pulling details out of shadows, I found Topaz Adjust to be a very useful tool.

    I will continue to experiment with Topaz Adjust as there is a learning curve involved.  Topaz Labs offers a free trial of Topaz Adjust.

    The original image with only Aperture's basic RAW file processing.