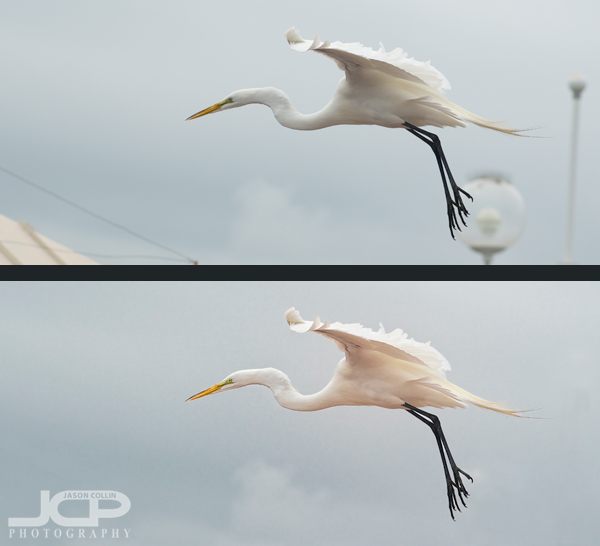
 Top: the original RAW image Bottom: after using clone stamp tool to clean background
When I go around saying digital photography editing skills are 50% of what you need to produce a satisfactory final image, I really mean it even though every other photographer around would probably disagree with that. I invite you to look at the above before and after shots and tell me in the comments below what percent digital editing had in helping the final image be all it could be.
For this photography tip I will just concentrate on:
- how I used the clone stamp tool in Photoshop CS5 to clean up the background, i.e. removing the light posts and wires
When I first pulled up this photo in Aperture 3, I really liked the bird in flight action. The great egret was caught in an unusual mid-flap wing position. However, the background was not clean and the egret's feet were overlapping a light post. Then there was the corner of a roof intruding in the lower left of the frame. Finally, there was a single tall light post on the right of the frame that was another distraction.
To me the two things that really make a photograph of a common subject matter standout are light and background. You need good light for a flattering exposure and a clean background to let the subject stand out. While it is entirely possibly to be at a location where one can get both of these things just right, I, myself, do not want to be limited to just those exact right circumstances. Hence, I have worked on my clone stamp skills with earnest.
 Now, if you have used the clone stamp tool in Photoshop you know it kind of has a mind of its own. It almost never works like you want it too, especially if you use it in broad strokes. First, in order to be able to use the clone stamp tool, you must have a source area in your photo you can sample from. In the great egret shot, I have plenty of other gray clouds to sample to later stamp onto the light posts. Really this is an ideal shot for using the clone stamp tool to fix because of the ample source cloning material, the relatively small amount of area that needs to be stamped on, and the fact that the subject does not much overlap any of the background distractions (just a bit of feet do).
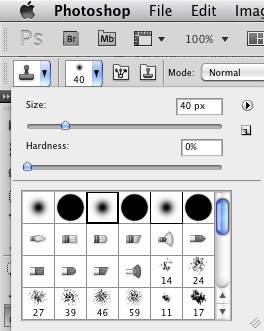
The shortcut for selecting the clone stamp tool is "S" and the key to using Photoshop efficiently is learning as many keyboard shortcuts as you can. To change the size of the brush use the bracket keys: ] and [ To sample an area hold the Option key (on a Mac) then click on the desired spot. I very rarely use the clone stamp at 100% as that makes is hard to control and often artifacts are introduced. For this shot I mostly used 80% opacity. Once I sampled a cloud I stamped in ver short strokes, never more than one or two at a time. Then I would go back and sample the same or another area. Also, I almost always use a soft brush (see screenshot).
So to summarize how I use the clone stamp tool in Photoshop CS5:
- "S" to select it
- [ ] to change brush size
- type 8 to change opacity to 80%, etc
- Option-click to sample an area
- Use short strokes
- Resample every one or two strokes as needed
Try this clone stamping technique on one of your photos and post a link in the comments below to a before and after shot, or e-mail the shot to me and I will include it in this post.
