Shinjuku Tokyo Japan light trails

The view I had walking home at night when I lived in the Shinjuku area of Tokyo, Japan - Nikon D80 f/29 ISO 200 5 sec tripod mountedThis is a photograph from my archives, taken back in October of 2008 at the start of my DSLR shooting from when I lived in Tokyo, Japan.  I lived in the heart of the city, Shinjuku, and getting home required walking over a pedestrian bridge with a great view, day or night, but especially at night.  I brought my Nikon D80 with me and a tripod I had just bought allowing me to make light trail images like this one.  Note that the brake lights appear on the left side of the road, as Japanese drive on the opposite side to the U.S.

Photography Tip - which lens do I use?

These are 3 of my own lenses, how do I choose which one to shoot with?My photography students often ask me, "which lens should I use?"  To me that question does not make much sense because there is usually no question about which lens to use.  Plus, without a lot more information, the question cannot even be answered.  The real problem is that many people start by asking which lens, or which settings should I use instead of starting with, what is the subject?  That is the question that needs to be asked first and answering it makes which lens to use usually pretty obvious.

Once you determine your subject, then simply choose the lens that fits that subject within the framing you want.  If you want to photograph some friends in your living room, it does not make much sense to use a 70-200mm lens does it as you will not be able to fit everyone in the frame.  Likewise, if you want to photograph a mountain top in the distance, using a 17-50mm lens does not make much sense as you will hardly even be able to see the intended subject in the frame.  

So what your subject is, and how much of your subject you want to get in the frame, dictates which lens you should shoot with.  

Snow Leopard Photoshop edit removing cage fencing from photograph

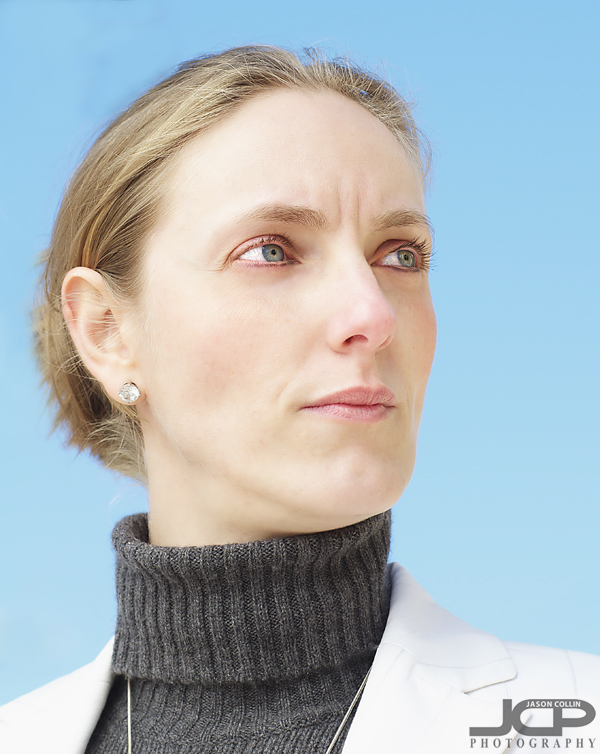
This week one of my former photography students, Betty, contacted me about editing a photo she made that she really liked, but had one serious flaw.  She told me she wanted to be able to make a print of a photograph of a snow leopard she had made, but.....there was facing across the entire image.  She asked if I could remove it.  Upon first looking at the sample she sent I thought no way, at least not in a way that would look good.  However, I often think this initially when looking at a challenging photo edit and after some time my brain starts to formulate some possible solutions.  Still, there was one fatal part of the photo that could not be fixed, the cat's right eye.

Lines and blemishes over and across simple surfaces are usually not hard to correct, such as the case with the wires goings over the fur of the leopard.  However, anything over eyes basically provides an unfixable problem.  After some thinking....my solution?  Copy the cat's left eye, mirror it, and just put it over the problematic right eye!  

It worked better than I thought it would.  To add some differences I removed some reflections in the "new" right eye along with a few changes to the upper eye brow area.  I will not say removing the rest of the wiring was easy or simple, but those edits were a much more straight forward technique of first using the healing brush and then the clone stamp tool to clean up any lingering obvious edits.  Photoshop CS5 was used for these major lifting edits, as I call them.

After removing all the wiring I then applied my normal digital editing workflow to the image to produce the final, fully edited photograph above.  So the next time you think a photograph is impossible to fix in Photoshop, give it a few minutes and maybe a solution will come to you.  Or, send the photo to me as I offer digital photo editing services of all kinds.
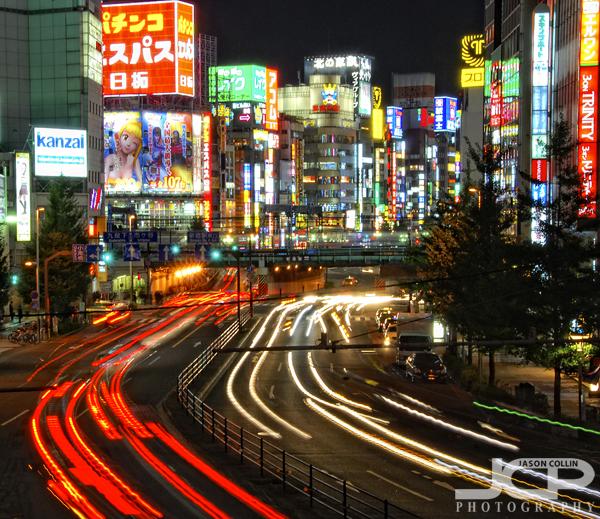
1-on-1 Nikon D4 DSLR Photography Lesson with Stacy in St. Petersburg Florida

Stacy using a stable shooting position to balance the weight of her Nikon D4 during our photography lesson in St. Petersburg FloridaOver the first seven months of 2013, Stacy has become my most prolific student of all-time, starting with the group lessons she took at my Morean class, and now this was her twelfth 1-on-1 photography lesson (thanks Stacy!).  She has been learning from start to very finish how to be a modern DSLR photographer.  By that I mean she is learning what gear to get to fit her photography needs, how to use that gear in the field, then as important what to do with the RAW images once she returns home.  I have spent many hours in her home office getting her iMac setup with software and features to create the same seamless digital photography workflow I have on my own Mac based work station.  This also includes how to make regular backups of all her photos (and other computer files too) and ultimately how to share them in a secure online location with friends and family.  It is a reality that to be a complete DSLR photographer, not insignificant computer skills are also needed, that is if you wish to edit your photos (of course!) and to share your work and have it be seen (yes of course too!).  

This latest lesson though was a more traditional out in the field one, which means my usual downtown St. Petersburg location.  Stacy shoots with a Nikon D4 (yes, a D4, not a typo) and f/2.8 lenses, so gear weight and shooting ergonomics are especially concerning issues for her.  I stressed the importance of always shooting with a stable stance (legs wide apart) and shooting perpendicular to the subject so that the left arm acts as a monopod.  Then of course there is the simple matter of having the right bags for safely and conveniently carrying photo gear.  I gave Stacy advice on that based on seeing her non-camera specific bag she was using, that had to be placed on the ground each time she wanted to take a shot.

Stacy has already signed up for lessons 13-16 which will feature more practical shooting lessons as well as further refining her digital workflow.

Severe Lightning Storm & Waterspout over St. Petersburg Florida June 2013

Severe lightning strikes in St. Petersburg Florida during a powerful June 2013 storm - Nikon D300 Tamron 17-50mm @ f/8 ISO 200 bulb mode lens covered until strike tripod mounted with cable releaseWhile out teaching a 1-on-1 DSLR Photography Lesson in downtown St. Petersburg on June 25, 2013 my photography student and I were treated (?) to a spectacular view of a powerful storm that produced a waterspout, funnel clouds and ground shaking lightning.  While keeping a safe distance, I was able to quickly setup to try and capture some lightning shots.  This means setting the shutter speed to bulb mode and covering the front of the lens until lightning is visible and keeping the lens exposed just long enough so the overall shot looks good.  I only had three chances and was lucky enough to get the above lightning photograph on that third try.

Waterspout over Vinoy Park in St. Petersburg Florida June 2013 - Nikon D300 Tamron 17-50mm @ f/11 ISO 200 1.6 sec tripod mounted with cable releaseThis waterspout attracted a lot of onlookers.  In grew in size greatly and I could not get my camera around the tree in the foreground to show its full length.  It was eerily translucent and silent dipping up and down from the clouds above.

Oncoming ominous storm clouds approach St. Petersburg Florida waterfront - Nikon D300 Tamron 17-50mm @ f/11 ISO 200 5-exposure HDR tripod mounted with cable releaseThis is the approach to the storm before we saw any lightning, waterspouts or funnel clouds.  I had never seen such a long, thin band of angry looking clouds stretch all the was from Tampa Bay to south St. Petersburg.  The sun was going down adding a bit of pretty color to the underside of what really was a menacing stormy sky.

Funnel clouds came from this cloud band along the downtown St. Petersburg Florida waterfront - Nikon D300 Tamron 17-50mm @ f/11 ISO 200 5-exposure HDR tripod mounted with cable releaseTurning and looking to my right from the same spot as the previous photo shows just how long that band of clouds stretched too.  Right above the sailboats two funnel clouds would eventually form right in front of us!  They never touched the ground and all we ended up was a little wet once the rain came, but the storm added a lot of excitement to our photography lesson!

Portrait Photograph Tip - set the focus on the eyes

When making a portrait, set the focus on the eyes, then recompose.I always use a single focus point when photographing still subjects.  Most of the time I keep that single focus point in the center, and the recompose how I want the final image to look.  Of course for shooting still subjects I use AF-S (one shot) focus mode.  So when making portraits using the settings described previously, I set the focus on the subject's eyes, then recompose because the most important thing with a portrait is getting the eyes in focus.  

Very rarely do I center subjects, and in a portrait the eyes of the subject are not very likely to end up perfectly centered as well.  In the above shot I first put my center focus point on the subject's eyes, then recomposed to put her eyes in the upper third of the frame (also her right eye ends exactly at the right horizontal third).

So when making portraits, set the focus on the eyes, then recompose how you like.

1-on-1 Nikon D5100 DSLR Tripod Photography Lesson with Lisa in St. Petersburg Florida

Lisa photographing a water spout during our stormy photography lesson in St. Petersburg FloridaFor our second of four 1-on-1 DSLR Photography Lessons in downtown St. Petersburg I met Lisa in the evening for a tripod focused photography lesson.  With sunset around 8:30pm, our 2-hour lesson would cover sunset through twilight through night.  However, Mother Nature provided a bit of a diversion in the form of a severe thunderstorm.  It was the loudest most powerful lightning I have felt in Florida in 15 years!  Before all that happened there was a waterspout staring us down and two funnel clouds floating overhead.  We stayed safe and out of danger, but we ended up getting a bit wet once the rain came before we got to cover.  All this made for quite an exciting lesson!

There were plenty of stormy skies to photograph before sunset, then of course the waterspout too.  So instead of a photographing a gentle sunset from Vinoy Park as I planned, we actually photographed the waterspout and then tried to get some lightning shots too.  It was the most exciting photography lesson in a long time!