Photography Tips

Nikon D7000 1-on-1 DSLR Photography Lesson in St. Petersburg Florida with Bart

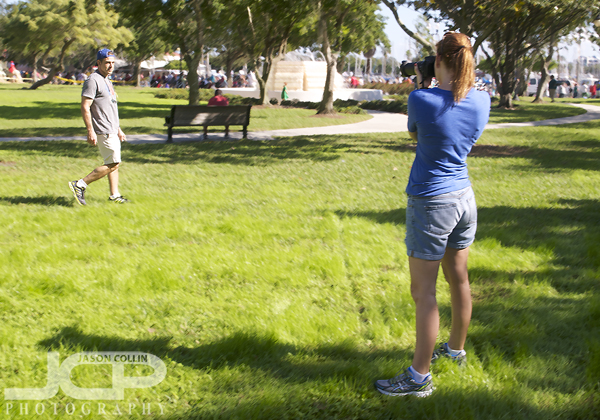
Bart aims his Nikon D7000 for a more creative composition style in St. Petersburg FloridaI first met Bart earlier this year when he took my photography class at the Morean Art Center.  Since then he has been out shooting a lot keeping in practice and adding some new items to his camera bag as well.  He contacted me recently for a 1-on-1 DSLR Photography Lesson to give him some advice on the large body of work he has made in the past year and offer suggestions for further improving his shooting.

We met at the usual spot in downtown St. Petersburg and had a small Q&A session to start out with.  From looking at some of his photo galleries I offered my thoughts that his shots could use a little bit more focus, and that even landscapes could have more distinct central subjects which could be made by anchoring a foreground subject.  Along with a few other tips and practicing them in the field during the lesson, I showed Bart a few new features of his DSLR body, like the AEL lock button.  I will be looking forward to seeing how he applies these new tips and techniques in his next few months of shooting!

Canon DSLR Photography Lesson in downtown St. Petersburg Florida with Christina & Chris

Christina practicing photographing a moving subject (Chris) during our DSLR photography lesson in downtown St. Petersburg FloridaThere was a "snowfest" and parade happening in downtown St. Petersburg Florida during a Canon DSLR Photography Lesson with Christina and Chris, but the weather could not have been warmer for a December day.  In fact, there was a woman in a bikini sunbathing right in front of the parade route and just a block over from where kids were sliding down a small hill of surely not long to last snow.  C & C had similar Canon DSLRs and were looking to learn how to make better photographs, which led to them finding me and coming up from Sarasota for the lesson.  They said they could not find anyone in the Sarasota area, and to my knowledge I am the only full-time professional photographer that offers 1-on-1 photography lessons in the field.  I have taught well over 300 lessons to date!

Chris had done a good bit of reading about photography and knew some about my 5-step process for making a sharp and well exposed photograph in any shooting conditions.  What books do not tell, or do not make that clear, is the exact process to use in the field to get the exposure you want when shooting in manual mode.  Photography is a creative art, but there exists an exact process for at the least getting the exposure correctly . . . composition, that is something else!

It was a nice change to teach two people instead of the usual 1-on-1 lesson, most of all because it means one of them could be the subject for practicing photographing action on! (see photo above)  I look forward to seeing their improved photography results now that they know how to properly shoot in manual mode and can focus more on being creative.

Nikon D600 1-on-1 DSLR Photography Lesson St. Petersburg Florida with Heather

Heather with her new Nikon D600 during our 1-on-1 DSLR photography lesson in St. Petersburg FloridaOn a way too hot for December Florida afternoon I met Heather with her new Nikon D600 for a 1-on-1 DSLR Photography Lesson in downtown St. Petersburg.  This was not her first DSLR, she had a Canon for several years, but only had been using it in auto-mode.  Even with the new Nikon D600, it was more auto-mode so in order to be able to make better photos of her two young children, she decided to take a photo lesson.  

Even though we were shooting outdoors the entire time, I advised her on settings she would need to be able to make photographs of her kids indoors.  The technique for both indoor and outdoor or really any kind of photograph is the same.  There are five things you ever need to set.  There is just better starting points for settings indoors or outdoors.  For example, no need to use the lowest ISO on your DSLR when shooting indoors, 95% of the time you need to use at least ISO 800.  

After the 2-hour lesson and with the help of the 140+ photo tips on my site, Heather has the resources to start getting the most out of her DSLR and make photos of her children that will only increase in value as years go by.

Editing digital photos tip - Use Dodge Tool in Photoshop to whiten eyes & brighten eyes

With Photoshop, there is always a very complicated way to do a particular digital photo edit.  The key to getting proficient at Photoshop is learning the "quick & dirty" ways of doing the same complicated edit.  You may not have 15 minutes just to brighten eyes in a portrait, or the 30 minutes to follow a complicated tutorial for how to do it.  I use a much simpler process to whiten eyes that is as easy to do as any other Photoshop edit.

To whiten or brighten eyes in Photoshop:

  • Select the Dodge tool (O)
  • Set the Range to:  highlights
  • Set the Exposure to:  10%

Setting the Range to highlights means only white areas are mostly affected by the Dodge tool, perfect for the whites of eyes.  It is very easy to overbrighten the eyes, which is why I set the Exposure low to 10% and click as needed.  I find that a subtle brightening works best and keeps the eyes looking natural.  I set the brush to be within the upper and lower eye-lids then click first on the iris of the eye to give them a little pop, then on the white to one side and then the other.  

Even a little eye brightening can have a large impact on the overall face of the subject.  Look at the graphic above and see how it appears that the entire face has been brightened.  The only difference in the photos is that the lower one has had the eyes brightened using the Dodge tool.

O selects Dodge Tool, then change Range to highlights and Exposure to 10%

1-on-1 Canon 5D Mark III DSLR Photography Lesson in St. Petersburg Florida with Dan 2

Dan learning how to shoot in natural light with his Canon 5D Mark III during our St. Petersburg Florida photography lessonIt has been five weeks since I met Dan for our first 1-on-1 DSLR Photography Lesson in downtown St. Petersburg and he has decided to turn that single lesson into a 4-pack of lessons.  He told me he also basically forgot everything from the lesson and we changed our plans of him photographing his dog to having a refresher on the process needed to shoot in manual mode with his Canon 5D Mark III.  

We began by him showing me some photographs he took at a chalk festival to see where in the 5-step process of getting a well exposed and sharp photograph he went astray.  While he was getting the meter to show neutral before pressing the shutter on some shots, it was not the ideal way of doing so, i.e. with a high ISO and super fast shutter speed rather than a minimum ISO and slower shutter speed.  

After getting things sorted out with the workflow for when to increase aperture, shutter speed and ISO, we then walked around the downtown area putting it into practice making a few natural light portraits and starting to introduce some composition tips too.  I look forward to seeing Dan's improved results next time we meet!

Photography Tip - use a monopod with your DSLR and telephoto lens

For a very simple piece of photography gear, a monopod is very useful in many different ways.  Traditionally, a monopod is used by sports and wildlife photographers who shoot with large, heavy telephoto lenses.  Using a monopod with such a setup it suddenly becomes weightless, something you can balance in place with one finger.  If you are shooting with a lens that has a lens collar (see above photo, which allows one to attach the monopod to the lens not the camera body) then using a monopod is highly recommended for prolonged shooting.  If your lens does not have a lens collar available, but the weight of holding even a non-f/2.8 telephoto lens or sub-500mm lens is taxing, then a monopod will help with that also.

Other ways you can make use of a monopod even without a telephoto lens?  You can shoot from a very high perspective by elevating the camera way up in the air holding the monopod at its bottom most point.  You can see photographers trying to get shots of someone surrounded by a group of people using this technique.  

Also, if you are shooting in a low light situation, but there is not space for the large footprint of a tripod, then a monopod will add a lot of stability helping reduce camera shake, especially in the vertical axis.  

How do you use your monopod?

1-on-1 Canon 70D DSLR Photography Lesson with Jody in St. Petersburg Florida

Jody composing a landscape photograph during our 1-on-1 DSLR photography lesson in downtown St. Petersburg FloridaThis morning I met Jody in downtown St. Petersburg Florida for a 1-on-1 DSLR Photography Lesson with her just purchased Canon 70D.  Like many past students, Jody's interest in photography was growing and she wanted to take the step up from point-and-shoot to DSLR.  I have taught dozens of such people and am always glad to be able to save people the years of grinding I did teaching myself by concentrating all my current years of experience into a two-hour info packed photography lesson!

Within the first sixty minutes of the lesson I had Jody looking through her viewfinder using the camera's meter to assist her in setting the shutter speed while shooting in manual mode with a daylight default aperture of f/11.  From there I taught her how to control DoF in order to create a shot with bokeh before concluding with some tips for shooting landscapes.  Jody now has a headstart on learning how to use her DSLR and I look forward to seeing the results.