Photography Tips

DSLR Photography Lesson with Teresa & her Canon 7D


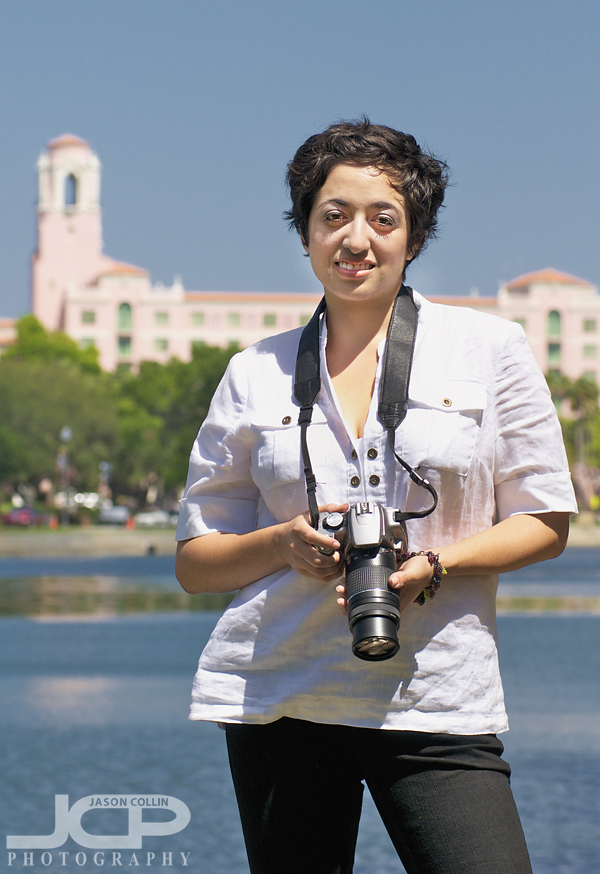
This week starts off with a DSLR Photography Lesson with new student Teresa and her Canon 7D.  As you might expect from a Canon 7D owner, Teresa already has photography knowledge.  What I helped her do in this first of four lessons she has already booked (which gets her a discounted price) is pull all that existing knowledge together and add to that my own process for dialing in the best settings that produce the exact exposure, DoF and sharpness I want.  

Teresa is already entering into action pet photography and hopes to break into newborn photography as well, especially since a family member will be having a baby soon.  She has a nice assortment of lenses and a new Nisson external flash, so first it is a matter of finding out what gear is best for each type of situation.  Using her Canon 70-200mm f/4 lens we practiced photographing moving subjects in strong mid-day Florida sunshine, which she will often need to do in her pet photography work.  We started out using aperture priority to see what shutter speeds it would give us, and they were all over the map.  Varied results are exactly what one does not want.  Thus, we switched to manual mode.

Knowing that to freeze most action a minimum shutter speed of 1/500th is required, we set the shutter to 1/640th to make sure we had enough, then adjusted our aperture and ISO settings to yield the best possible exposure given the non-ideal light conditions.  In this manner we locked in settings that consistently produced results we were happy.  Once one locks in the best possible settings, the photographer is then free to concentrate just on shooting, composition, etc with no worries about exposure or other technical aspects of shooting.

Our next lesson will be how to make use of her external flash for portrait work as well as how to use Color Efex Pro to edit digital photos.  It will be a longer lesson than usual, but Teresa is a self-declared photography sponge right now, which makes having lessons fun for me as well.  I am looking forward to it since external flash and Color Efex Pro are two of my favorite photography related things! 
  • Reserve your own 1-on-1 DSLR Photography Lesson with Jason today!
  • Learn more about the lessons
  • Browse past lessons with all of my students
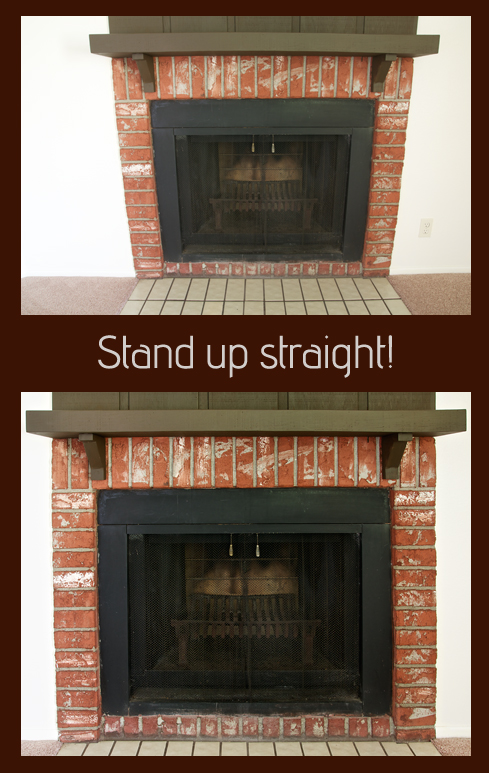
  • Photography Tip - correct lens distortion & straighten up edges

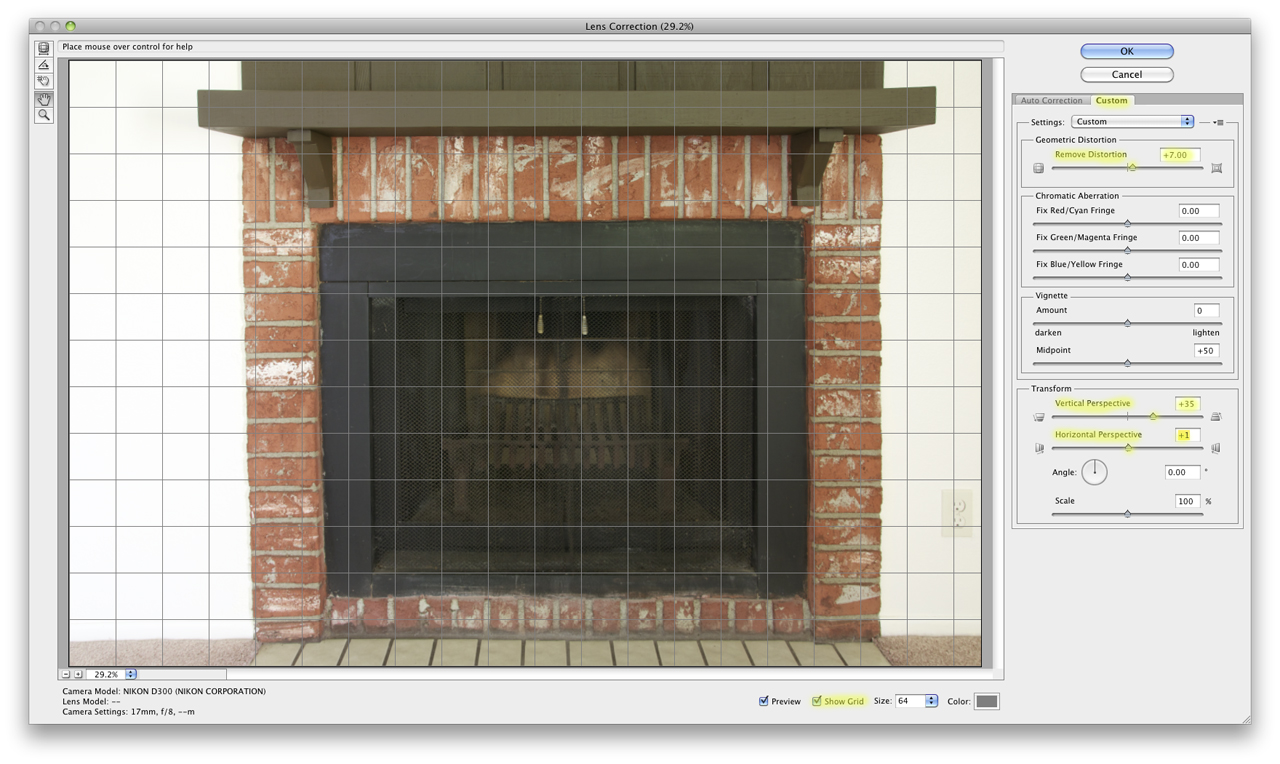
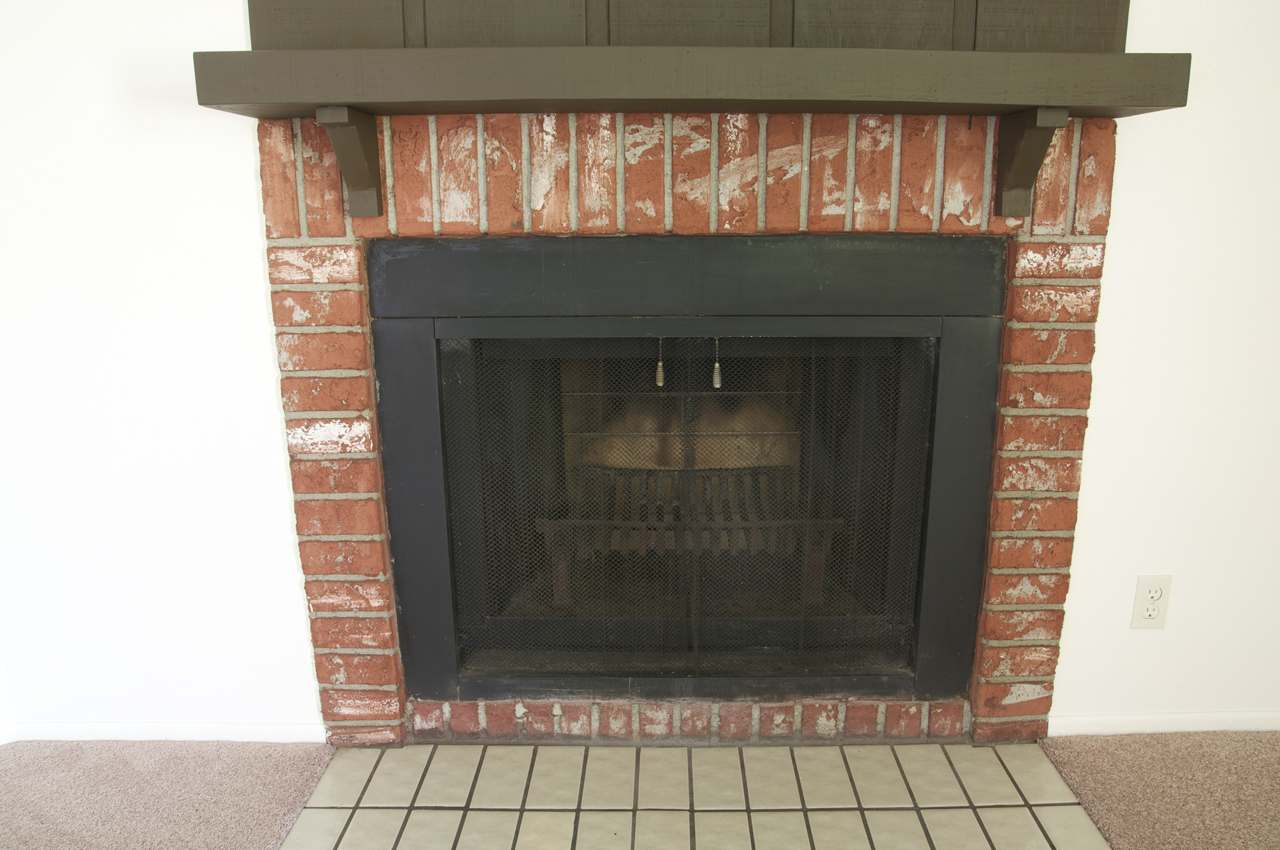
    Using Photoshop CS5 the fireplace was made to appear normal, not distorted by the wide angle lens.

    Wide angle lenses cause distortion.  Depending on the subject of the photograph, the distortion can be very apparent or very hard to notice.  If there are tall straight lines in the photo, especially at the edges of the frame, then the distortion will be very easy to see.  If the photo is free of geometric shapes, then the distortion will not be obvious.  Wide angle lens distortion is very easy to see when photographing buildings or other rectangular shaped objects, like the fireplace above.  It was shot at 17mm causing the walls to pinch inward and the mantle to appear to have a bulge in the center.  Here is how I used Photoshop CS5's lens correction filter to straighten it up:

    Click on the image for a larger version - Photoshop CS5's lens correction window with grid onIn Photoshop CS5, the keyboard shortcut for launching the lens correction filter is SHIFT-CMD-R.  Or, you can just go into the Filters menu and select it there.  The auto correction by choosing camera and lens model does not work for me, so I always go into the custom tab.  For the Tamron 17-50mm f/2.8 lens I used for wide angle shooting, I always have to Put the Geometric Distortion slider into positive territory, as I did here (+7).  Then what I do from there depends on the individual shot, but I mostly adjust the Vertical and Horizontal Perspective sliders as needed.  I turn the Show Grid option on and adjust those sliders as needed until a horizontal/vertical line in the photo becomes parallel with a horizontal/vertical grid line.  I also toggle Preview on and off to see the differences made.  Click OK and Photoshop does the rest!  

    Lens Correction Workflow:

    • SHIFT-CMD-R in CS5 to launch the lens correction filter
    • Toggle on Preview and Show Grid
    • Slide Remove Distortion to positive side as needed
    • Adjust Vertical/Horizontal Perspective sliders as needed following grid lines for guidance

    Practice yourself!

    Show us your practice results with a link in the comments below.  If you correct one of your own images send me a 600px wide version of the original and corrected one and and I will feature it in this post.

    DSLR Photography Lesson Portrait Practice with Natasha & Canon XT

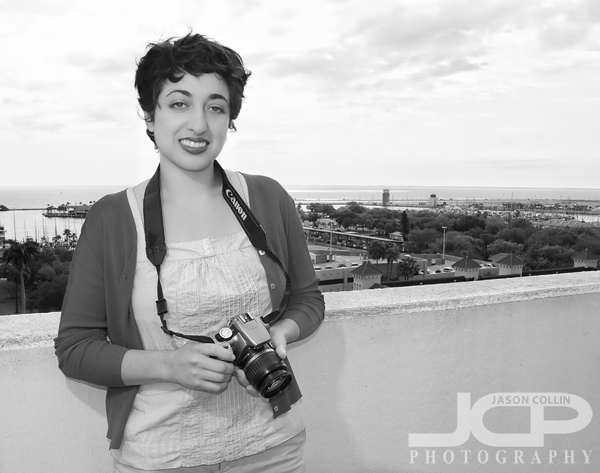
    Natasha atop a parking garage in downtown St. Petersburg with her Canon XT for portrait practiceFor our second of four DSLR photography lessons, I once again meet Natasha in downtown St. Petersburg.  For this second lesson we focused on low light portraits.  We started off in a covered area along 2nd Ave that I have used for other lessons.  For all my portrait work I use manual exposure mode.  However, I had Natasha start out using aperture priority because I wanted her to see what type of exposures the camera is capable of choosing on its own.  Using several different apertures and even adjusting the ISO did not yield an exposure I thought was the best possible.  This is when I had Natasha switch to manual mode.

    Aperture priority mode did provide us with useful information.  Noting the shutter speeds it chose, I was able to advise Natasha on what shutter speed to actually set in manual mode to yield a more properly exposed portrait.  For example, if the camera was choosing 1/160th in aperture priority mode with a slightly dark exposure, in manual mode a slower shutter speed like 1/100th would be set to better expose the subject matter.  

    Natasha does not yet have an external flash, so we used the popup flash on her Canon XT.  Using some special composition techniques, and a well placed wall, I was able to show her how to kind of bounce the light even from her popup flash so as to not directly blast the subject straight on, which usually results in a not very natural skin tone.

    I am enjoying these single focused, high detail lessons.  Lesson three will be soon! 

  • Reserve your own 1-on-1 DSLR Photography Lesson with Jason today!
  • Learn more about the lessons
  • Browse past lessons with all of my students 
  • DSLR Photography Lesson with John & his Nikon D300s

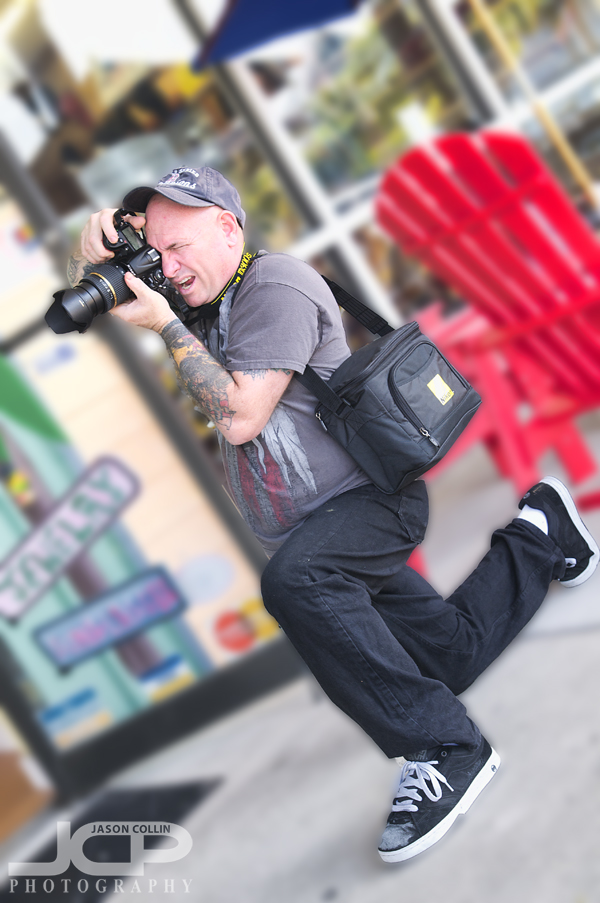
    John very focused on getting a shot with his Nikon D300s in John's Pass VillageIt seems lately my DSLR photography students are coming in even more enthusiastic, more eager to learn than ever before.  New student John and his Nikon D300s is yet another such example.  Even though John has quite a significant photography background in the past, if one does not keep up on it, like with many other things, skills can be forgotten, or at least buried under other memories.  So during our first lesson I helped John dig up some of that old photography knowledge and added a lot of new DSLR specific info for him to put into his memory banks as well.

    John (his website) is a very interesting person of some notoriety in the permanent makeup world, though I cannot say I had even heard of that term before I met him.  

    Due to the St. Pete Grand Prix going on last weekend, we did not meet at my preferred first lesson local, downtown St. Petersburg, instead meeting at John's Pass Village.  After setting up his Nikon D300s with all the customizations I have done to my own Nikon D300, we used the mix of waterfront, beach and gift shop environments to go through all the normal settings one needs to change on a given day of photography in the bright Florida sunshine.

    John has the same awesome Nikkor AF-S 105mm f/2.8G VR micro lens that I do, which is what we ended the lesson practicing with.  That macro lens has very unique DoF properties, outstanding sharpness and the best looking bokeh around.  John is excited about having more and more lessons, and I am as well, especially using the 105mm lens. 

  • Reserve your own 1-on-1 DSLR Photography Lesson with Jason today!
  • Learn more about the lessons
  • Browse past lessons with all of my students
  • DSLR Photography Lesson Cindy gets Nikkor 70-200mm VR II lens!!

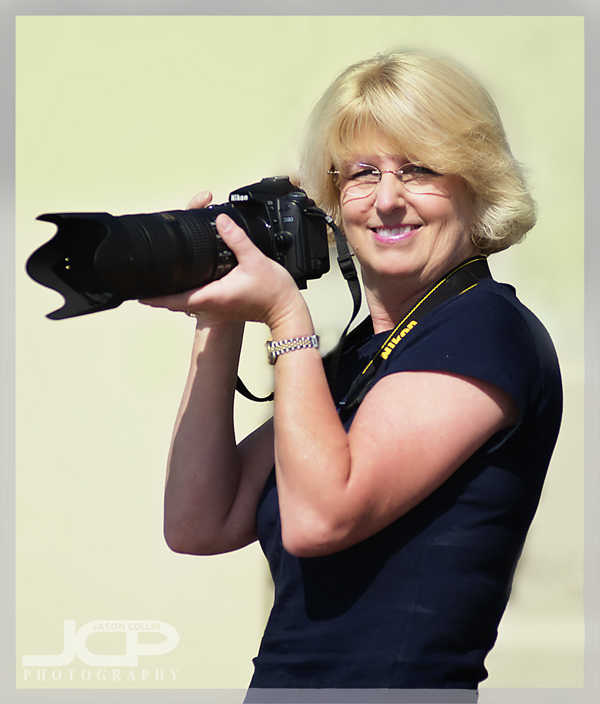
    Cindy has the new flagship Nikkor AF-S 70-200mm f/2.8G VR II lens!!For our second of four DSLR Photography Lessons I met Cindy once again in downtown St. Petersburg returning to The Pier as well because . . . she made a significant gear investment by getting the Nikkor AF-S 70-20mm VR II f/2.8G lens!  Most people not into photography would be shocked by what such a lens goes for, but as mentioned in this lesson post, Cindy is headed for Alaska and wants her gear to not be any source of limitation while photographing whales and eagles.  Plus, this lens will be great for the next 10+ years.  Lenses have a very long life, much longer than camera bodies or really any other type of gadget or electronics.

    We hopped the trolley to The Pier saving us some of the walk and headed straight to its roof where there was a succession of small airplanes taking off and landing whose distance and size provided very good whale photography simulation.  For sure Cindy wants to get shots of the tails of whales sticking out of the water and of course of them breeching.  Therefore, blurry shots are not tolerable, thus in the bright sunlight I had her use manual mode with a shutter speed of 1/640th and an aperture of f/5.6 with some adjustments made as we went along shooting.  One can always make a slightly underexposed image brighter in the digital editing process, but there is no rescuing a blurry shot, so making shutter speed a priority for such shots is my advice.

    More new gear (an external flash) may be showing up in Cindy's bag by the time we have our third pre-Alaska lesson in the coming weeks.  I think I am just as excited about a student getting new gear as she/he is. 

  • Reserve your own 1-on-1 DSLR Photography Lesson with Jason today!
  • Learn more about the lessons
  • Browse past lessons with all of my students 
  • DSLR Photography Lesson with Natasha & her Canon XT

    Natasha & her Canon XT DSLR on our first lesson with the Vinoy Hotel in the backgroundNew DSLR Photography Lesson student, Natasha, will be helping photograph her friend's upcoming wedding in April.  Thus, she has booked my new 4-lesson discount package in order to get up to speed as fast as she can by then, as she already previously has some photography knowledge.  In addition to learning the basic settings (aperture, ISO, WB, focus mode) that are in need of regular changing, one must also know their gear well.  Natasha's friend will be arriving at her wedding location in a horse-drawn carriage in the middle of the afternoon (tricky lighting).  So to photograph this well a fast enough shutter speed must be used to freeze the action and certain moving subject shooting skills need to be refined.

    We simulated this scenario by having me walk in an arc around her while she was in AI-servo (AF-C for Nikon) and burst mode.  Through several practice rounds we found out what were the best settings to use in broad daylight, and most importantly how fast her DSLR/lens combination (Canon XT) could get a focus lock on a moving subject.  It is critical to know how many usable shots (six or two or four, etc.) one can get in a given space.  This exercise helped give Natasha some idea what she can expect when photographing the bride arriving via horse-drawn carriage for real and what can be expected of her photography gear.

    We will cover more topics and scenarios like this in our next three lessons so hopefully come her friend's wedding day, she will feel as prepared as possible! 

  • Reserve your own 1-on-1 DSLR Photography Lesson with Jason today!
  • Learn more about the lessons
  • Browse past lessons with all of my students 
  • Photography Tip - Use Photoshop Clone Stamp Tool to clean backgrounds

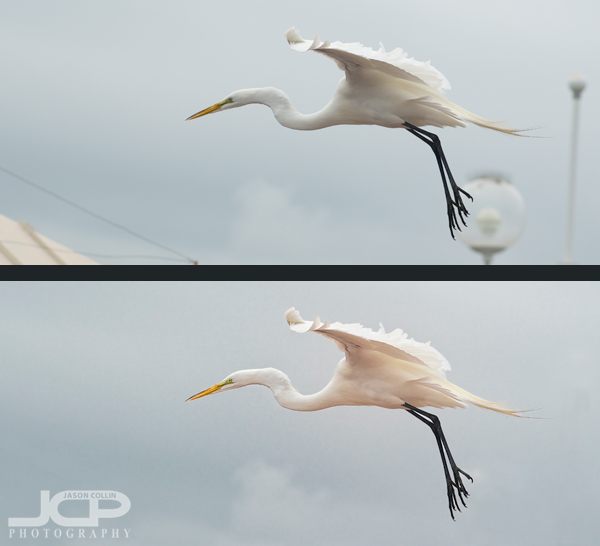
    Top: the original RAW image Bottom: after using clone stamp tool to clean background

    When I go around saying digital photography editing skills are 50% of what you need to produce a satisfactory final image, I really mean it even though every other photographer around would probably disagree with that.  I invite you to look at the above before and after shots and tell me in the comments below what percent digital editing had in helping the final image be all it could be.  

    For this photography tip I will just concentrate on: 

    • how I used the clone stamp tool in Photoshop CS5 to clean up the background, i.e. removing the light posts and wires 

    When I first pulled up this photo in Aperture 3, I really liked the bird in flight action.  The great egret was caught in an unusual mid-flap wing position.  However, the background was not clean and the egret's feet were overlapping a light post.  Then there was the corner of a roof intruding in the lower left of the frame.  Finally, there was a single tall light post on the right of the frame that was another distraction.  

    To me the two things that really make a photograph of a common subject matter standout are light and background.  You need good light for a flattering exposure and a clean background to let the subject stand out.  While it is entirely possibly to be at a location where one can get both of these things just right, I, myself, do not want to be limited to just those exact right circumstances.  Hence, I have worked on my clone stamp skills with earnest.  

    Now, if you have used the clone stamp tool in Photoshop you know it kind of has a mind of its own.  It almost never works like you want it too, especially if you use it in broad strokes.  First, in order to be able to use the clone stamp tool, you must have a source area in your photo you can sample from.  In the great egret shot, I have plenty of other gray clouds to sample to later stamp onto the light posts.  Really this is an ideal shot for using the clone stamp tool to fix because of the ample source cloning material, the relatively small amount of area that needs to be stamped on, and the fact that the subject does not much overlap any of the background distractions (just a bit of feet do).  

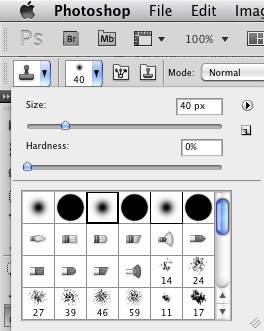
    The shortcut for selecting the clone stamp tool is "S" and the key to using Photoshop efficiently is learning as many keyboard shortcuts as you can.  To change the size of the brush use the bracket keys:  ] and [   To sample an area hold the Option key (on a Mac) then click on the desired spot.  I very rarely use the clone stamp at 100% as that makes is hard to control and often artifacts are introduced.  For this shot I mostly used 80% opacity.  Once I sampled a cloud I stamped in ver short strokes, never more than one or two at a time.  Then I would go back and sample the same or another area.  Also, I almost always use a soft brush (see screenshot).  

    So to summarize how I use the clone stamp tool in Photoshop CS5: 

    • "S" to select it
    • [ ] to change brush size
    • type 8 to change opacity to 80%, etc
    • Option-click to sample an area
    • Use short strokes
    • Resample every one or two strokes as needed 

    Try this clone stamping technique on one of your photos and post a link in the comments below to a before and after shot, or e-mail the shot to me and I will include it in this post.