Photography Tips

Nikon MC-30 Cable Release Review & Photography Tip

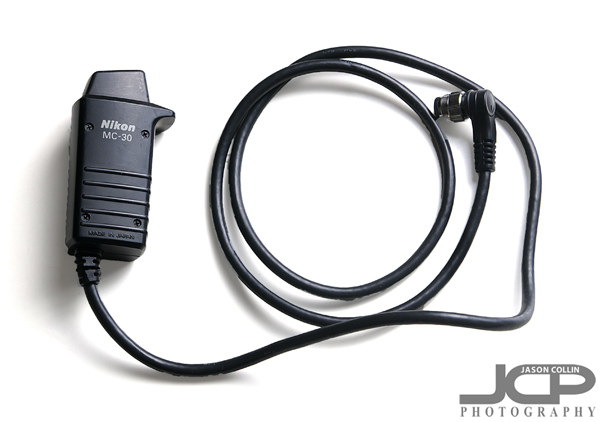
My own well-worn Nikon MC-30 cable release which is an essential piece of gear in my bagI am a very firm believer in having the right tools for the right job, and if you own a tripod, then you certainly should own a cable release as well.  Cable releases tend to only work with a select few DSLRs based on the connection the camera has.  The cable release for my Nikon D300 is the Nikon MC-30 which at the time retailed for $99, but thankfully Amazon.com had it for just $49 on sale.  It currently is priced at $55.61.  There are cheaper cable releases for other cameras and of course much more expensive ones with LCD screens and more functions.  For my $49 I got the most basic cable release you could get, a small rectangle of plastic with a shutter release button and a lock button.  That said, it does its job very well and I have gotten my money's worth out of it.

It just plain feels cool to use a cable release, like you are an old-time photographer.Why do you need a cable release if you already have your camera on a tripod?  Because the act of pushing the shutter with your finger can and will produce shake even with your DSLR on a stable tripod.  Using a cable release along with a tripod insures the most stable shooting method.  Plus, it just plain feels cool to use a cable release!  It will make you feel like an old-time photographer.  It is just another tool, along with a good tripod, that really, really helps you relax while out in the field making photographs.  

The lock button on the Nikon MC-30 helps when shooting in bulb modeThe one feature of the Nikon MC-30 cable release is its lock button, or rather switch on the side of the device.  Being able to lock the shutter open is very convenient when using bulb mode.  This way you do not need to keep the shutter pressed the entire time, you can just lock it.  When I photograph fireworks, I lock the shutter open allowing me to concentrate on blocking the front of the lens with a card.

The unique connector port for the Nikon MC-30 on my Nikon D300Refer to your particular's DSLR maker's website for which cable release will work with your camera because there are several different port connectors on cameras.  One complaint about the Nikon MC-30 is that connecting it is awkward due to the small line up point markings on it, but I actually always attach it blind because the bend of the cable naturally lines up with the pin connector!  Likewise, I never screw the cable onto the port, I just push it in and it has never popped off.

Even at its current price, the Nikon MC-30 can seem very expensive for essentially a piece of wire with a button on it, but I believe the value of having one and using it will definitely help your photography.

  • Read more gear reviews
  • More of Jason's photography tips
  • Take a 1-on-1 private DSLR Photography Lesson with Jason today!
  • Nikon D90 & Nikon D40x DSLR Photography Lesson in St. Petersburg with Chris & Paul

    Chris & Paul showing good shooting form with their Nikons during our photography lesson in St. Petersburg FloridaI met Chris and his father-in-law Paul on a pleasant overcast St. Petersburg evening to help them both get off auto-mode on their Nikons.  Each of them had a few lenses and had been shooting for awhile, but they thought it was time to learn how to take more control over their DSLRs and that is exactly what my DSLR Photography Lessons are designed to do!

    In addition to teaching my four step process for getting the exposure and focus right for any given shooting situation, I also teach several habits of the pro-photographer than anyone with a DSLR should emulate as well.  This starts with safely changing lenses, putting everything in the same place in your camera bag every time, always leaving your DSLR on until you put it away in your bag and of courrse how to properly hold your DSLR to maximize stability (see above stances).

    Once again I did not have to be the model during this lesson as Chris & Paul took turns being the subject for each other as we ended the lesson with a little flash portrait practice using the scenic St. Petersburg harbor as the background at dusk.  I look forward to seeing how their photographs improve as they put the skills we covered to use to take more control over their shots!

    Canon T3i Natural Light Portrait Photography Lesson in St. Petersburg with Elizabeth

    Elizabeth photographing her boyfriend who thankfully modeled during our natural light portrait photography lesson in St. PetersburgFor our second of four 1-on-1 DSLR Photography Lessons in St. Petersburg, Florida Elizabeth brought her boyfriend and his brother to model for our lesson on natural light portraits.  This was great for me as otherwise I would have had to of been the one in the shots as I am most of the time when students want to practice portraits.  Bringing your own model also has the benefit of at the end of the lesson you have portraits of someone you know that you can share and display rather than twenty forgettable shots of yours truly.

    Elizabeth will soon be investing in some strobist gear, so instead of bothering to use the almost useless popup flash in portraits practice, I had her put on her Canon 70-300mm lens and just use natural light and over exposing techniques to make some creative portraits all over the place, from under a shaded hall of columns (see above) to the interior of the Baywalk parking garage to the front steps of a museum.  

    Indeed we also practiced making silhouette shots atop the parking garage utilizing a railing high up in the air to create some rather cool images.  Thanks to the models' willingness to go wherever we asked Elizabeth not only learned the technique for using natural light in portraits, but also actually ended up with some great shots of her boyfriend and his brother.

    Canon T3i 1-on-1 DSLR Photography Lesson in downtown St. Petersburg Florida with Elizabeth

    Elizabeth with her new Canon T3i learning how to use manual mode & leave auto-mode behind!I met Elizabeth on a warm St. Petersburg morning for our first of four 1-on-1 DSLR Photography Lessons to help her get off auto-mode and on her way to making photographs with complete control over exposure.  She brought with her a new Canon T3i and a pair of lenses (18-55mm & 70-300mm).  We begin with how to properly change lenses to minimize the amount of time the DSLR's sensor is exposed which could possibly lead to getting unwelcome spots on it that will need to be tediously cleaned using a special kit or taken to a pro for worry free cleaning.  I still take my own DSLR in to The Camera Cure when it needs a cleaning as I am of messing with the sensor.

    Next I showed Elizabeth how to get around her T3i and change all the settings necessary for getting a well exposed and in-focus shot.  We stayed on aperture priority mode most of the 2-hour lesson as the T3i's meter did a pretty good job of selecting the shutter speed.  

    Elizabeth would eventually like to make portraits for money, so the conclusion to this first lesson was touching on the basics of what lens, focal length, aperture, shutter speed and when to use and not use flash.  We will go into how to make portraits in much greater detail during our second lesson where I am very thankful she will be bring a model to practice on saving me from having to be both instructor and subject!

    1-on-1 Nikon D90 DSLR Photography Lesson with Chris at The Pier

    Getting to eye level with your subject during a 1-on-1 DSLR Photography Lesson with a NIkon D90 in St. Petersburg FloridaFor our second of four 1-on-1 DSLR Photography Lessons Chris and I went out to The Pier in downtown St. Petersburg in an attempt to photograph birds in flight, in particular pelicans.  Well, there were many pelicans, but they were all only lazily napping or preening themselves!  Still, we were able to practice good composition skills, switching back and forth from shutter priority to manual mode, as well as AF-S to AF-C focus modes.  Now Chris will have both brown pelican shots in her portfolio and a cormorant too!

    We also practiced basic landscape photography from the top of The Pier, which on a Monday morning we had entirely to ourselves.  Since Chris will soon visit the Smoky Mountains I pointed out that for landscape shots one does not always automatically use a wide angle lens.  If a mountain is very far away then using a medium telephoto lens like a 70-200mm could be the ideal lens to a landscape shot (see my shot of Mt. Fuji) featuring just the mountain itself.

    Chris photographing a small bird during our lesson at The Pier in St. Petersburg

    I look forward to seeing Chris' Smoky Mountain images, especially if she makes the effort to wake up an hour before sunrise and really capture some of that morning mist on the mountains!

    How to Photograph Fireworks - 4th of July Fireworks St. Petersburg Florida 2012

    4th of July Fireworks over downtown St. Petersburg Florida 2012 - Nikon D300 Nikkor 80-200mm @ f/11 ISO 200 10.5 sec tripod mounted with cable release covering lens frequently with a cardThere is an art and methodology to photographing fireworks that if you have the necessary gear is pretty fun.  To photograph fireworks properly you need:

    • DSLR camera with bulb mode
    • Lens with appropriate focal length for your location
    • Very stable tripod
    • Cable release
    • A stiff card large enough to cover the front of your lens

    Other tips for shooting fireworks:

    • Choose a spot with a clear open view (obviously!)
    • Choose a spot that is upwind (so smoke does not blow into your shots)
    • Include foreground elements (do not just shoot the fireworks themselves)
    • Do not record overlapping fireworks (will just look blown out in one spot)

    4th of July Fireworks in St. Petersburg Florida 2012 - Nikon D300 Nikkor 80-200mm @ f/11 ISO 200 27.4 sec tripod mounted with cable release covering lens frequently with a cardThe actual process for making and recording a multiple firework image:

    1. While still light out focus on something where the fireworks will be
    2. Set your focus to manual focus so you do not have to worry about autofocusing in the dark
    3. Use manual exposure mode set to bulb mode and f/8 or f/11 & your lowest ISO
    4. Hold the shutter open with your cable release when seeing a streak going into the air
    5. Cover the front of the lens quickly & carefully with the card
    6. When the firework explodes remove the card for a split second
    7. If another firework explodes in a different spot, remove the card again
    8. Repeat step 7 a few times then release the shutter

    4th of July fireworks finale in St. Petersburg Florida 2012 - Nikon D300 Nikkor 80-200mm @ f/11 ISO 200 28.8 sec tripod mounted with cable release covering lens frequently with a cardI also try to avoid removing the card for fireworks that are just bright balls of light as these tend to overexpose and just look like all-white blobs.  Overly bright fireworks can also reflect light onto smoke in the sky ruining the shot.  The ideal is to catch a streaking firework trail going up, a low firework explosion, a middle one, and then a very high one.  This evening they tended to explode in the same spot like three times in a row, which is no good as the overlapping makes them start to again look like an all-white blob.  If you are patient, study the patterns of explosions, and use good technique exposing the front of the lend with the card, then you will give yourelf the best chance at creating a satisfying fireworks multiple explosion image.  

    Post a link to your fireworks shots in the comments below!

    1-on-1 DSLR Photography Lesson in St. Petersburg Nikon D90 with Chris

    During our 1-on-1 DSLR Photography Lesson Chris had a chance to photograph these ducklings!On a not too hot St. Petersburg morning I met new DSLR Photography Lesson student Chris for our first of four 1-on-1 photography lessons.  She had taken a photography class about a year ago, but soon after reverted to using auto-mode again so in our lessons I will help her get off of that once and for all and learn to love manual mode!

    She has a Nikon D90 and a pair of lenses to go along with her already acquired photography knowledge.  We started with a tour of her DSLR and how to change the four (or five if in manual mode) necessary settings for any given shot.  The D90 has two dials and a top LCD making it pretty quick to be able to do a wholesale set of changes.  For anyone wanting to be serious about shooting in dynamic situations, I highly recommend a DSLR with that feature set, otherwise it will take much longer to change settings than you will most likely have.  

    Toward the end of our 2-hour lesson it was a nice surprise to come across a mama duck and her three ducklings.  They provided a very fun subject matter to practice photographing moving subjects.  The key of course is setting the focus mode to AF-C (Ai Servo) and then using good tracking technique to maintain a focus lock on the moving subjects by always keeping the shutter pressed halfway down.

    For our second lesson will we head out to The Pier to photograph pelicans and other wonders.