clone stamp

McLaren 650S in black multiple strobist blend layer mask photography tip Clearwater Florida Car Photography

What if you want to photograph a large object, especially in a low light situation, but you only have two speedlights, or even only one?  No problem!  Here is how you can do it and what you will need.

Photo gear used to photograph the McLaren 650S indoors:

  • Nikon D300
  • Tamron 17-50mm f/2.8
  • SB-800 & SB-600 Speedlights
  • 2 shoot through umbrellas
  • Yongnuo radio triggers
  • tripod
  • cable release
  • assistant (to help move and hold the lights)
  • Photoshop CS5

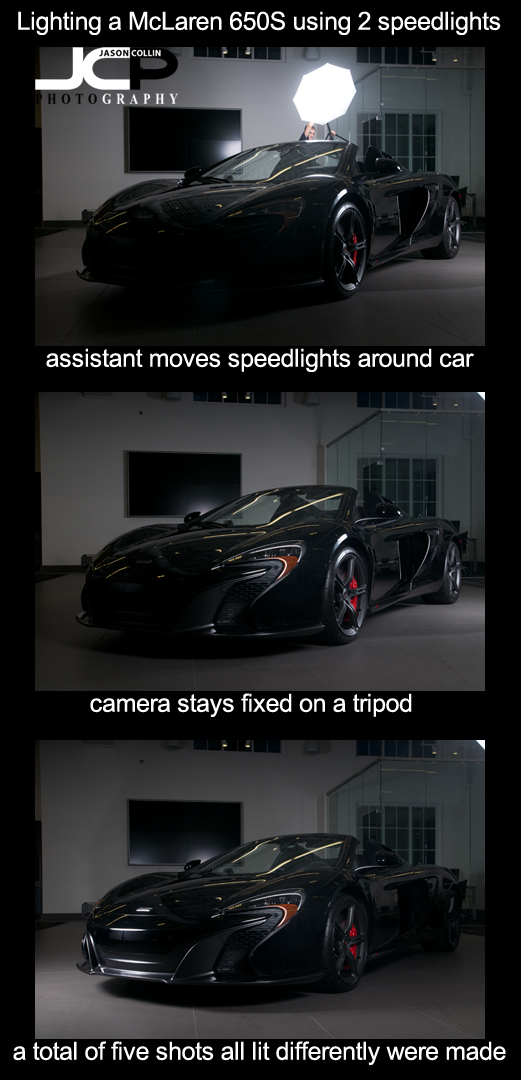
A tripod is a must because you will need to take multiple shots from different angles to properly light the subject, in this case the McLaren 650S supercar.  In all I ended up using five photographs to make the one fully lit photograph (below).  I lit the front of the car first, then moved the lights around the car (counterclockwise in this case) taking another photograph each time.  I even had my assistant hold a speedlight over the top of the car (see top most image).  The assistant being in the shot or a lightstand partially being in the shot is no problem at all as the final step takes place at home in Photoshop using layer masks.

In the above photo all 5 shots have been blended together one at a time using layer masks in Photoshop.  I started with the shot of the McLaren 650S lit from the front.  I then dragged it onto the next photo in the series with the driver's side wheels lit up.  I created a layer mask and then revealed the lit wheels photograph underneath, keeping the front lit part from the other photo.  I then flattened all layers and repeated this process using the other three photographs.  You can see shadows from coming from more than two angles in the above shot because effectively ten speedlights were used to light up the car, not just the two in reality I had for the shoot.  

I could have stopped with the 5 shot composite, but I got carried away with removing objects from the background until I finally decided just to remove them all!  I started this edit on Saturday night, and finished it on Monday afternoon it took that long and I kept wanting to do more and more to it.  I did nothing special to remove the background objects, just simply used the Clone Stamp tool on only carefully selected portions of the photo.  Then I removed a lot of the reflections on the car body and cleaned up the floor.  The final result was my most advanced photopraph edit in Photoshop to date!

Give this multiple exposure strobist blend layer mask type image a try and let me know the results in the comments below.

Snow Leopard Photoshop edit removing cage fencing from photograph

This week one of my former photography students, Betty, contacted me about editing a photo she made that she really liked, but had one serious flaw.  She told me she wanted to be able to make a print of a photograph of a snow leopard she had made, but.....there was facing across the entire image.  She asked if I could remove it.  Upon first looking at the sample she sent I thought no way, at least not in a way that would look good.  However, I often think this initially when looking at a challenging photo edit and after some time my brain starts to formulate some possible solutions.  Still, there was one fatal part of the photo that could not be fixed, the cat's right eye.

Lines and blemishes over and across simple surfaces are usually not hard to correct, such as the case with the wires goings over the fur of the leopard.  However, anything over eyes basically provides an unfixable problem.  After some thinking....my solution?  Copy the cat's left eye, mirror it, and just put it over the problematic right eye!  

It worked better than I thought it would.  To add some differences I removed some reflections in the "new" right eye along with a few changes to the upper eye brow area.  I will not say removing the rest of the wiring was easy or simple, but those edits were a much more straight forward technique of first using the healing brush and then the clone stamp tool to clean up any lingering obvious edits.  Photoshop CS5 was used for these major lifting edits, as I call them.

After removing all the wiring I then applied my normal digital editing workflow to the image to produce the final, fully edited photograph above.  So the next time you think a photograph is impossible to fix in Photoshop, give it a few minutes and maybe a solution will come to you.  Or, send the photo to me as I offer digital photo editing services of all kinds.

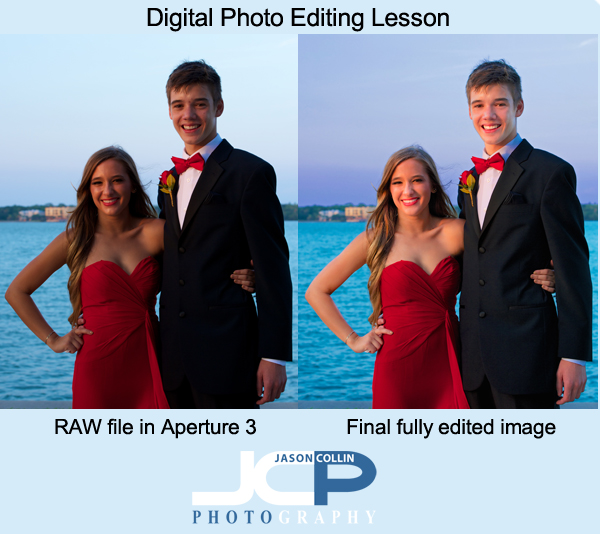
Digital Photo Editing Lesson with Stacy - prom couple before and after

The past few weeks I have been teaching former Morean Arts Center photography student, Stacy, how to develop a Mac digital photo editing workflow.  She is new to Mac as well, so I have been showing her some of my top tips for using OS X as efficiently as possible (hint, use Expose every day).  She also got the same apps I have so she could learn my exact photo editing workflow which starts in Aperture 3, then Color Efex Pro 3, then finally Photoshop CS5.  

Stacy made this photo of her daughter and her boyfriend on their junior prom night.  No flash was used, only natural light.  Here is the process for how the photo was transformed:

Aperture 3 workflow:

  • white balance slider increased toward cooler (blue)
  • shadows slider increased
  • mid-level contrast slider increased
  • dodging brush used on all skin areas

Color Efex Pro 4 (she has 4, I use 3):

  • Polarization filter applied
  • Pro Contrast filter applied

Photoshop CS5 (approximate steps):

  • Quick Select Tool used on all skin areas
  • Dodge Brush used selectively
  • Healing Brush used for blemish removal
  • Clone Stamp Tool used for more complex blemish removal and slight skin softening in general
  • Dodge Brush used in highlights mode to brighten eyes & teeth
  • Clone Stamp Tool used to lighten under the eyes
  • Quick Select Tool used on water
  • Contrast adjustment made selectively to water
  • Quick Select Tool used on sky
  • Highlights adjustment made selectively to sky
  • Saturation adjustment made selectively to sky
  • Unsharp Mask filter applied

None of these individual techniques is advanced.  To a properly trained Photoshop professional they might even seem crude.  However, what each technique lacks in complexity, the complexity comes from knowing when and how to use each one to accomplish a photo retouching goal.  At each stage of editing the photo looked better.  Through experience it can be learned how to keep adding yet another stage to one's editing workflow to make a photograph reach its full potential, or in some cases, save a photo that would otherwise be culled.

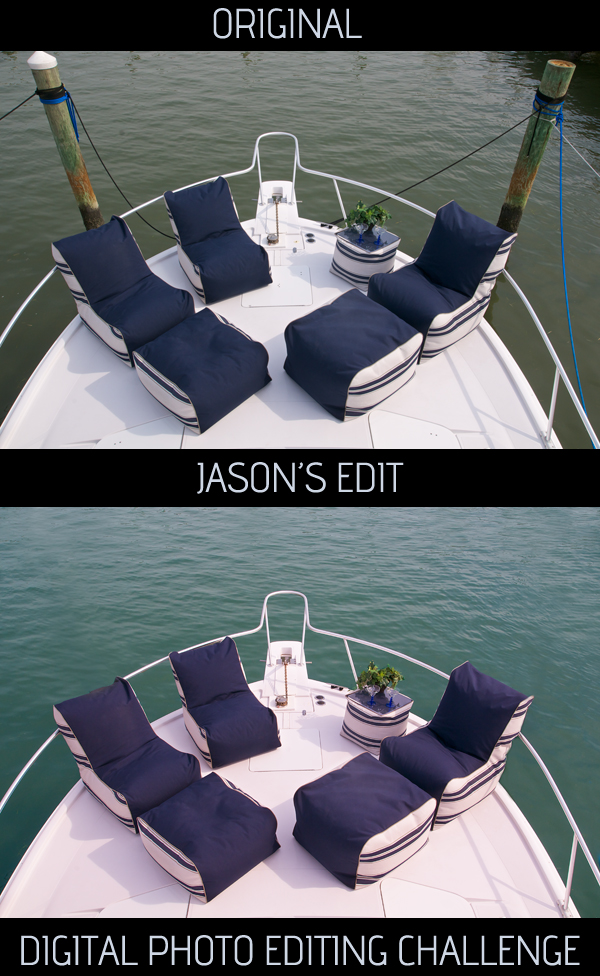
Digital Editing Challenge 01 - boat bow

DIGITAL EDITING CHALLENGE is a new feature on Jason Collin Photography.  Download the source photo of the original, then edit it to be as close to my own edit of the photograph.  I fully expect some of you to be able to do an even better job than I did.  Place a link to your edit in the comments below and I will add it to the body of this blog post with name credit.  After the challenge is closed (time to be determined) I will update this blog post with how I made my edit.  Thanks for taking the challenge!

EDITS THAT NEED TO BE MADE: 

  • basic color & contrast correction
  • removal of poles and ropes
  • change water color 

GOOD LUCK & THANKS FOR TAKING THE CHALLENGE! 

  • post a link to your edit in the comments below 

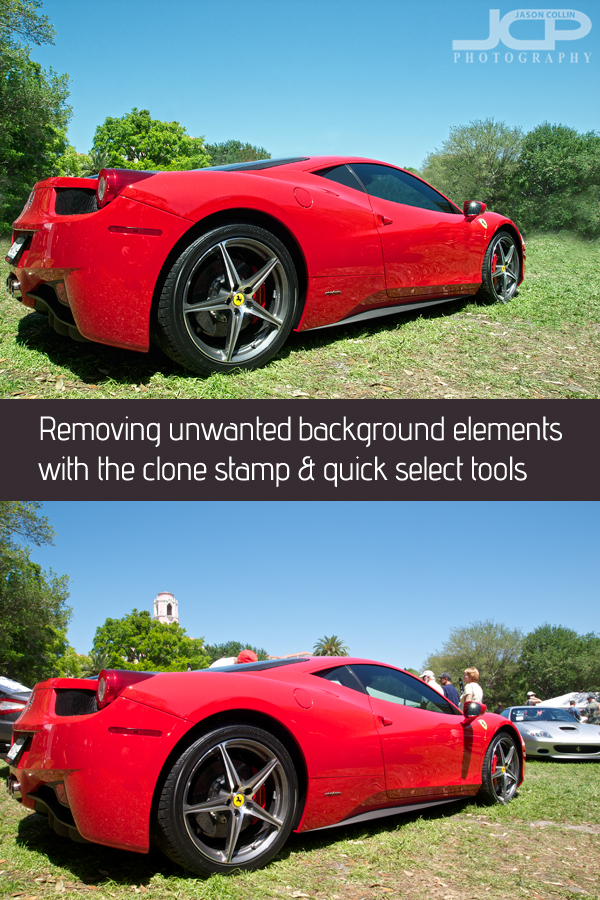
Photography Tip - selecting and cloning a clean Ferrari 458 Italia

2011 Ferrari 458 Italia at a car show in St. Petersburg Florida

  • Learn this digital photograph editing technique from Jason in a 1-on-1 lesson, reserve today!

Car shows are great places to see a large number of awesome cars in a small space.  However, that small space and numerous other car fans walking around create a nearly impossible situation for photographing the cars in full.  Detail shots are usually what I focus on, but still I want to have at least a few full car shots as well.  Some of you may know that the Ferrari 458 Italia is my current favorite car in the world.  At a recent St. Petersburg, Florida car show I had a chance to talk with the owners of the above 458 Italia who were very nice people.  I photographed their Ferrari at length.

I could not get a shot like I wanted to while there due to other cars being parked so close to the 458 Italia and of course because of many other people coming to peek at Ferrari's latest mid-engine super car.  So I had to settle for the best angle I could get taking into account the sun's position and just the space I had to shoot in.  Photoshop CS5 helped with the rest.

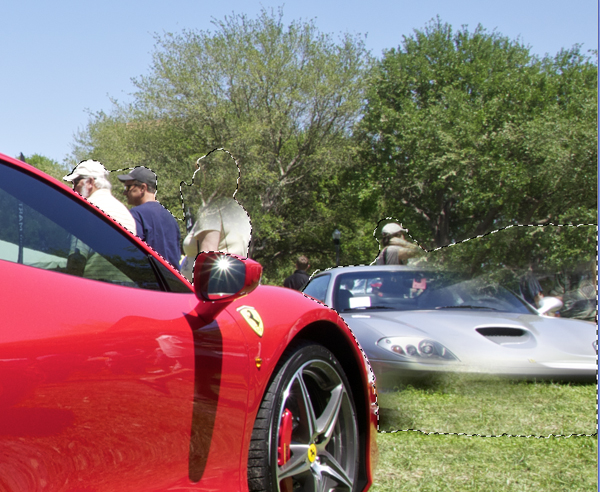
Too clone out things from complex surroundings, quick select them then clone stamp in safetyIn the above screen shot you can see how I first used the Quick Select Tool (W) to put a protective fence around the objects I wanted to remove (silver car, people, etc).  I do this because the Clone Stamp Tool (S) is very temperamental and very hard to use along a distinct edge like the front fender of the red Ferrari and the silver Ferrari.  Basically, containing the unwanted object in a quick select field allows me to not worry about coloring outside the lines, so to speak.  You can see I selected some grass from the foreground and already started stamping it onto the silver Ferrari.  The sharp edge of the red Ferrari fender will remain perfectly intact.

Likewise for the people above the red Ferrari.  I will clone some of the trees and stamp them on top of the people to complete the illusion that the Ferrari 458 Italia is alone in a field.  To close the quick select areas hit CMD-M (on a Mac).

Using this quick select and cloning method will allow you to cleanly and easily remove objects from complex surroundings.

Photography Tip - Use Photoshop Clone Stamp Tool to clean backgrounds

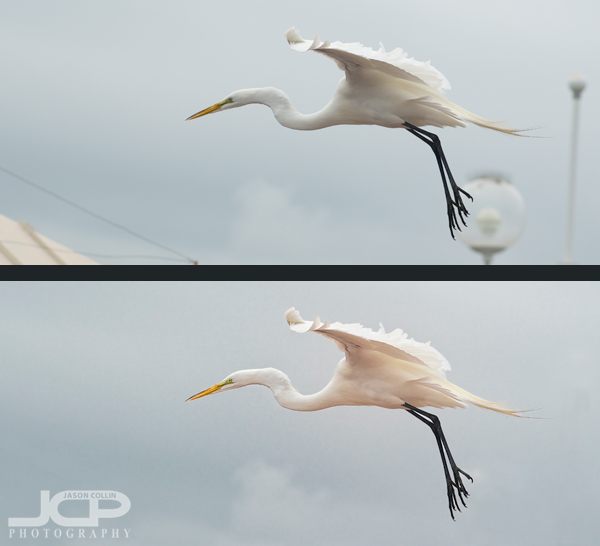
Top: the original RAW image Bottom: after using clone stamp tool to clean background

When I go around saying digital photography editing skills are 50% of what you need to produce a satisfactory final image, I really mean it even though every other photographer around would probably disagree with that.  I invite you to look at the above before and after shots and tell me in the comments below what percent digital editing had in helping the final image be all it could be.  

For this photography tip I will just concentrate on: 

  • how I used the clone stamp tool in Photoshop CS5 to clean up the background, i.e. removing the light posts and wires 

When I first pulled up this photo in Aperture 3, I really liked the bird in flight action.  The great egret was caught in an unusual mid-flap wing position.  However, the background was not clean and the egret's feet were overlapping a light post.  Then there was the corner of a roof intruding in the lower left of the frame.  Finally, there was a single tall light post on the right of the frame that was another distraction.  

To me the two things that really make a photograph of a common subject matter standout are light and background.  You need good light for a flattering exposure and a clean background to let the subject stand out.  While it is entirely possibly to be at a location where one can get both of these things just right, I, myself, do not want to be limited to just those exact right circumstances.  Hence, I have worked on my clone stamp skills with earnest.  

Now, if you have used the clone stamp tool in Photoshop you know it kind of has a mind of its own.  It almost never works like you want it too, especially if you use it in broad strokes.  First, in order to be able to use the clone stamp tool, you must have a source area in your photo you can sample from.  In the great egret shot, I have plenty of other gray clouds to sample to later stamp onto the light posts.  Really this is an ideal shot for using the clone stamp tool to fix because of the ample source cloning material, the relatively small amount of area that needs to be stamped on, and the fact that the subject does not much overlap any of the background distractions (just a bit of feet do).  

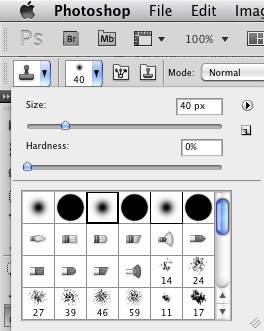
The shortcut for selecting the clone stamp tool is "S" and the key to using Photoshop efficiently is learning as many keyboard shortcuts as you can.  To change the size of the brush use the bracket keys:  ] and [   To sample an area hold the Option key (on a Mac) then click on the desired spot.  I very rarely use the clone stamp at 100% as that makes is hard to control and often artifacts are introduced.  For this shot I mostly used 80% opacity.  Once I sampled a cloud I stamped in ver short strokes, never more than one or two at a time.  Then I would go back and sample the same or another area.  Also, I almost always use a soft brush (see screenshot).  

So to summarize how I use the clone stamp tool in Photoshop CS5: 

  • "S" to select it
  • [ ] to change brush size
  • type 8 to change opacity to 80%, etc
  • Option-click to sample an area
  • Use short strokes
  • Resample every one or two strokes as needed 

Try this clone stamping technique on one of your photos and post a link in the comments below to a before and after shot, or e-mail the shot to me and I will include it in this post.