clean background

Photography Tip - manage the background for less distraction

This week's photography tip deals with the background of photographs.  The background is one of three things that makes or breaks any photograph.  In the examples above, I sat in the exact same spot to make each photograph.  In the top example much of the background is visible and in varying degrees of focus.  The subject is sharp and well exposed, but despite that the background still distracts from it.  Plus, the subject is not big enough in the frame either.

For the second shot, I used a different lens, different settings, and different composition to make the background as much of a nonfactor as possible, and for the background to even try and complement the subject.  Having a clean background allows the viewer to focus only on the intended subject of the photograph.  

How the difference was accomplished: 

  • 17-50mm f/2.8 lens switched to 50mm f/1.8 lens
  • 38mm focal length to 50mm
  • f/8 to f/2.8

About this subject . . . it is a large light bulb that I found floating in the water behind my apartment one morning.  It is encrusted with barnacles.  It fascinates me how something as fragile as a light bulb could survive in open water long enough to number one become barnacle encrusted and second to not simply have shattered.  I keep it on a bookshelf in my living room as a reminder of how interesting the world is and how such extraordinary things are possible.

Removing the photograph background but preserving foreground details for depth

In an attempt to further refine my own skills with using the "Refine Edge" function in Photoshop's Quick Select tool I made the above photograph of Kiki right here in the living room.  I knew beforehand I would be removing the background and painting in a new one.  I have really started to like using this technique lately, especially when adding a pure white background.  However, when including a full view of the subject, replacing the entire background be it with all white or any other color a lack of depth can result as the foreground and background are exactly the same.  As you can see in the finished version on the right some shadow and light remain on the floor around Kiki's paws.  After doing my usual edits to the image, the process I followed for making the digital backround was thus: 

  • Quick Select the floor area only & increase its contrast
  • Using the Eye Dropper tool select a color from the increased contrast floor (gray-ish in this case)
  • Increase the area Quick Selected to included everything except Kiki herself
  • Using the Brush tool at 100% paint the background up until the edge of the floor
  • Change the opacity to 40% and paint the floor area until a uniform gradient appears 

In am happy with the process I used to make the digital background in this case, but I would like to improve the smoothness of the gradient/transition of the background to foreground even more by using every smaller opacities to brush it in.

The finished final image of Kiki with gray background added in Photoshop leaving floor light and shadow for depthAlas there is no editing I can do to make Kiki not look like a sad puppy.  This was right before our usual dog park time and I think she was wondering why do I have to sit through this when we could already be on our way to the park!  Next time I will attempt her portrait in the morning.

Get images like these of your dog or cat or pet done right in your own living room . . . contact Jason today to reserve your shoot!

Photography Tip - selecting and cloning a clean Ferrari 458 Italia

2011 Ferrari 458 Italia at a car show in St. Petersburg Florida

  • Learn this digital photograph editing technique from Jason in a 1-on-1 lesson, reserve today!

Car shows are great places to see a large number of awesome cars in a small space.  However, that small space and numerous other car fans walking around create a nearly impossible situation for photographing the cars in full.  Detail shots are usually what I focus on, but still I want to have at least a few full car shots as well.  Some of you may know that the Ferrari 458 Italia is my current favorite car in the world.  At a recent St. Petersburg, Florida car show I had a chance to talk with the owners of the above 458 Italia who were very nice people.  I photographed their Ferrari at length.

I could not get a shot like I wanted to while there due to other cars being parked so close to the 458 Italia and of course because of many other people coming to peek at Ferrari's latest mid-engine super car.  So I had to settle for the best angle I could get taking into account the sun's position and just the space I had to shoot in.  Photoshop CS5 helped with the rest.

Too clone out things from complex surroundings, quick select them then clone stamp in safetyIn the above screen shot you can see how I first used the Quick Select Tool (W) to put a protective fence around the objects I wanted to remove (silver car, people, etc).  I do this because the Clone Stamp Tool (S) is very temperamental and very hard to use along a distinct edge like the front fender of the red Ferrari and the silver Ferrari.  Basically, containing the unwanted object in a quick select field allows me to not worry about coloring outside the lines, so to speak.  You can see I selected some grass from the foreground and already started stamping it onto the silver Ferrari.  The sharp edge of the red Ferrari fender will remain perfectly intact.

Likewise for the people above the red Ferrari.  I will clone some of the trees and stamp them on top of the people to complete the illusion that the Ferrari 458 Italia is alone in a field.  To close the quick select areas hit CMD-M (on a Mac).

Using this quick select and cloning method will allow you to cleanly and easily remove objects from complex surroundings.

Photography Tip - Use Photoshop Clone Stamp Tool to clean backgrounds

Top: the original RAW image Bottom: after using clone stamp tool to clean background

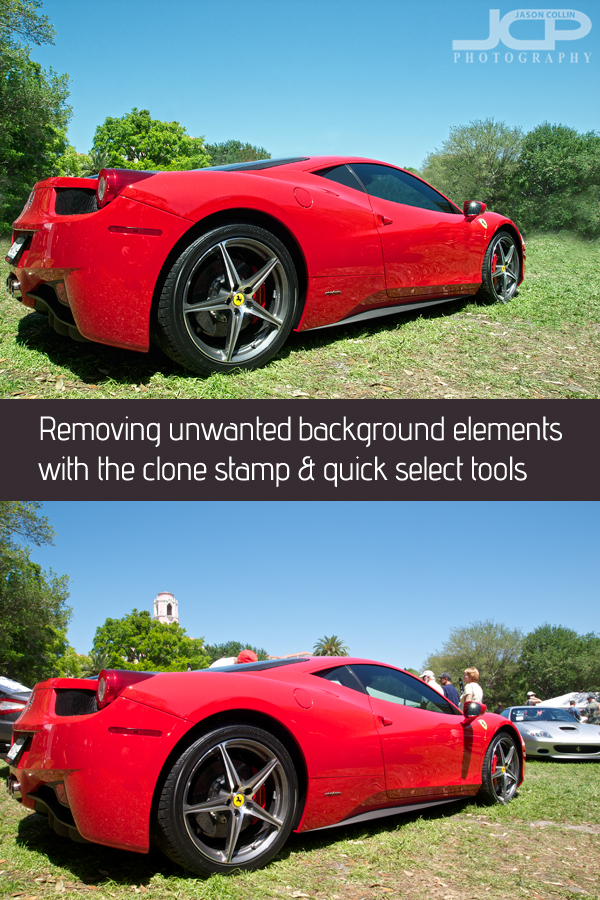
When I go around saying digital photography editing skills are 50% of what you need to produce a satisfactory final image, I really mean it even though every other photographer around would probably disagree with that.  I invite you to look at the above before and after shots and tell me in the comments below what percent digital editing had in helping the final image be all it could be.  

For this photography tip I will just concentrate on: 

  • how I used the clone stamp tool in Photoshop CS5 to clean up the background, i.e. removing the light posts and wires 

When I first pulled up this photo in Aperture 3, I really liked the bird in flight action.  The great egret was caught in an unusual mid-flap wing position.  However, the background was not clean and the egret's feet were overlapping a light post.  Then there was the corner of a roof intruding in the lower left of the frame.  Finally, there was a single tall light post on the right of the frame that was another distraction.  

To me the two things that really make a photograph of a common subject matter standout are light and background.  You need good light for a flattering exposure and a clean background to let the subject stand out.  While it is entirely possibly to be at a location where one can get both of these things just right, I, myself, do not want to be limited to just those exact right circumstances.  Hence, I have worked on my clone stamp skills with earnest.  

Now, if you have used the clone stamp tool in Photoshop you know it kind of has a mind of its own.  It almost never works like you want it too, especially if you use it in broad strokes.  First, in order to be able to use the clone stamp tool, you must have a source area in your photo you can sample from.  In the great egret shot, I have plenty of other gray clouds to sample to later stamp onto the light posts.  Really this is an ideal shot for using the clone stamp tool to fix because of the ample source cloning material, the relatively small amount of area that needs to be stamped on, and the fact that the subject does not much overlap any of the background distractions (just a bit of feet do).  

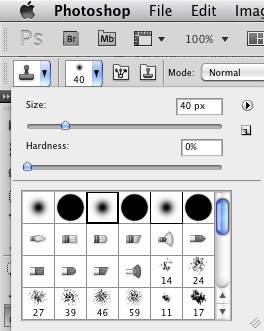
The shortcut for selecting the clone stamp tool is "S" and the key to using Photoshop efficiently is learning as many keyboard shortcuts as you can.  To change the size of the brush use the bracket keys:  ] and [   To sample an area hold the Option key (on a Mac) then click on the desired spot.  I very rarely use the clone stamp at 100% as that makes is hard to control and often artifacts are introduced.  For this shot I mostly used 80% opacity.  Once I sampled a cloud I stamped in ver short strokes, never more than one or two at a time.  Then I would go back and sample the same or another area.  Also, I almost always use a soft brush (see screenshot).  

So to summarize how I use the clone stamp tool in Photoshop CS5: 

  • "S" to select it
  • [ ] to change brush size
  • type 8 to change opacity to 80%, etc
  • Option-click to sample an area
  • Use short strokes
  • Resample every one or two strokes as needed 

Try this clone stamping technique on one of your photos and post a link in the comments below to a before and after shot, or e-mail the shot to me and I will include it in this post.