Digital Photograph Editing Services - Cape Coral Ft Myers Naples or anywhere!
| DIGITAL PHOTOGRAPHY EDITING SERVICES FOR CAPE CORAL + |
|
|
| CALL: 813-240-5357 | E-mail: CONTACT FORM |

|
|
 |

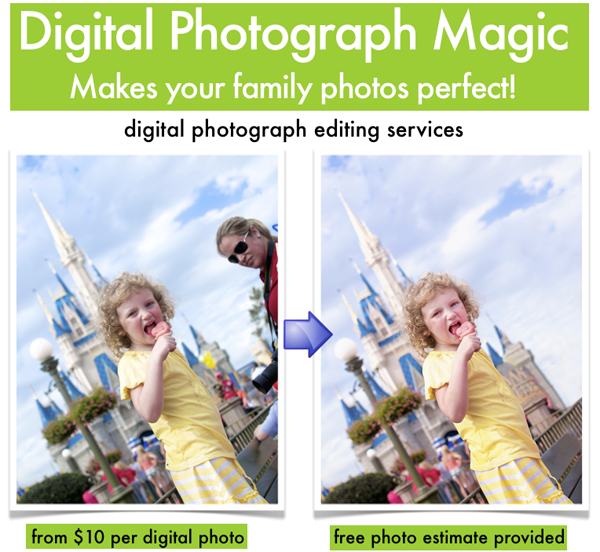
editing digital photos
| DIGITAL PHOTOGRAPHY EDITING SERVICES FOR CAPE CORAL + |
|
|
| CALL: 813-240-5357 | E-mail: CONTACT FORM |
|
|
|
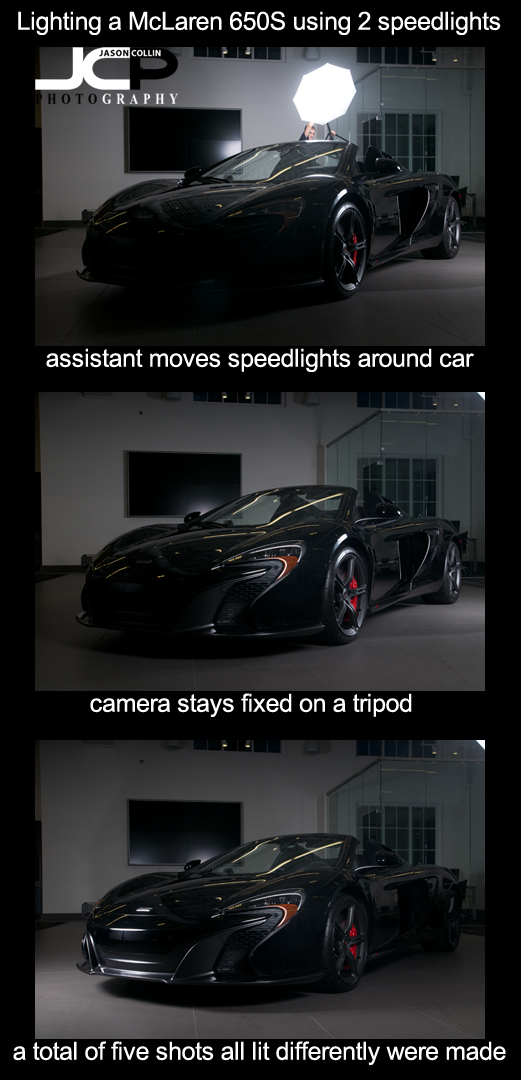
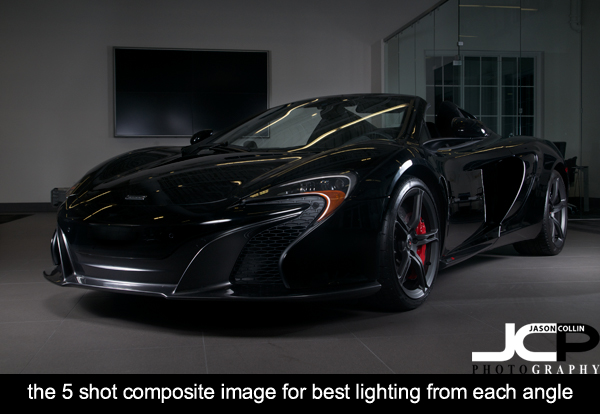
What if you want to photograph a large object, especially in a low light situation, but you only have two speedlights, or even only one? No problem! Here is how you can do it and what you will need.
Photo gear used to photograph the McLaren 650S indoors:
A tripod is a must because you will need to take multiple shots from different angles to properly light the subject, in this case the McLaren 650S supercar. In all I ended up using five photographs to make the one fully lit photograph (below). I lit the front of the car first, then moved the lights around the car (counterclockwise in this case) taking another photograph each time. I even had my assistant hold a speedlight over the top of the car (see top most image). The assistant being in the shot or a lightstand partially being in the shot is no problem at all as the final step takes place at home in Photoshop using layer masks.
In the above photo all 5 shots have been blended together one at a time using layer masks in Photoshop. I started with the shot of the McLaren 650S lit from the front. I then dragged it onto the next photo in the series with the driver's side wheels lit up. I created a layer mask and then revealed the lit wheels photograph underneath, keeping the front lit part from the other photo. I then flattened all layers and repeated this process using the other three photographs. You can see shadows from coming from more than two angles in the above shot because effectively ten speedlights were used to light up the car, not just the two in reality I had for the shoot.
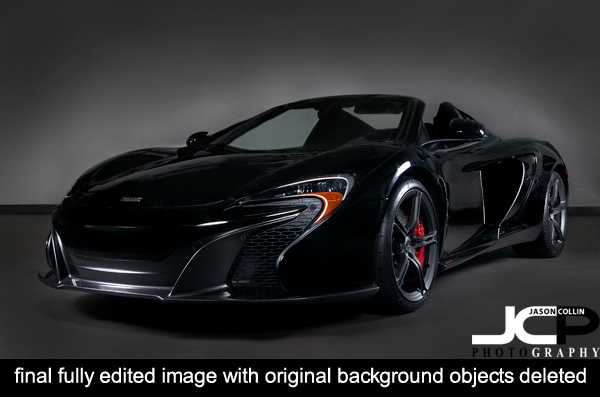
I could have stopped with the 5 shot composite, but I got carried away with removing objects from the background until I finally decided just to remove them all! I started this edit on Saturday night, and finished it on Monday afternoon it took that long and I kept wanting to do more and more to it. I did nothing special to remove the background objects, just simply used the Clone Stamp tool on only carefully selected portions of the photo. Then I removed a lot of the reflections on the car body and cleaned up the floor. The final result was my most advanced photopraph edit in Photoshop to date!
Give this multiple exposure strobist blend layer mask type image a try and let me know the results in the comments below.
 |
 |
![]() Audi R8 supercar at Crown Audi in Clearwater - Nikon D300 f/11 ISO 200 5-exposure HDR - orange background added digitallyWhile photographing an Audi A3 premiere event at Crown Audi in Clearwater, I took a moment to make a photograph of an Audi R8 supercar that was also on site. It was parked just outside the greenhouse like showroom, which made for a pretty good background, but when I was shooting it I already had in mind I would remove it from the existing background and put it on a digital one.
Audi R8 supercar at Crown Audi in Clearwater - Nikon D300 f/11 ISO 200 5-exposure HDR - orange background added digitallyWhile photographing an Audi A3 premiere event at Crown Audi in Clearwater, I took a moment to make a photograph of an Audi R8 supercar that was also on site. It was parked just outside the greenhouse like showroom, which made for a pretty good background, but when I was shooting it I already had in mind I would remove it from the existing background and put it on a digital one.
Below is the existing background HDR image. Despite the complexity of the background, it was not too complicated to use the Quick Select tool in Photoshop and cut out the Audi R8 onto an empty layer. I chose an orange gradient digital background as recently I am starting to really like that color (also used for a headshot).
![]() The same Audi R8 as above in its original setting at Crown Audi in Clearwater Florida - 5-exposure HDR
The same Audi R8 as above in its original setting at Crown Audi in Clearwater Florida - 5-exposure HDR
One day it would be nice to be able to just shoot a car in a large studio with an existing white background for an even easier and more efficient editing process.
 |
 |
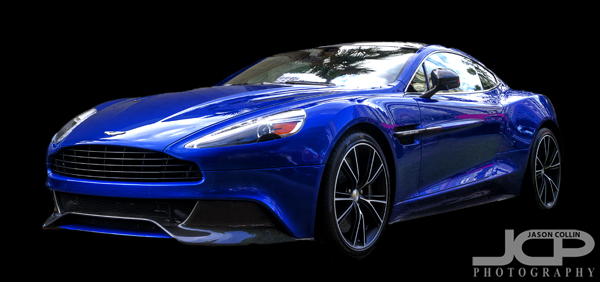 Aston Martin Vanquish in Cobalt Blue a stunning supercar St. Petersburg Florida - Nikon D300 Tamron 17-50mm @ f/11 ISO 200 7-exposure HDRThe highlight of going to the duPont Concours d'Elegance in St. Petersburg Florida last month was getting to see this Aston Martin Vanquish in person. To me, it is the most beautiful car in existence, as seen here in a special Cobalt Blue color, although I think it looks its absolute best in Skyfall Silver. I just stood next to this supercar and appreciated all the lines and details in the carbon fiber bodywork. It was parked in the far back corner of the event space, but I would have put it right by the entrance!
 The original image used to make the finished edit of the Aston Martin Vanquish above.As is often the case with photographing cars at car shows, the background was less than ideal. There was also a Mercedes S550 right next to it limiting the angles the Aston Martin could even be photographed from. To minimize distraction I cut just the car itself out and dropped it onto a digital black background in Photoshop (top photo). This particular Vanquish as of this moment is still for sale at Dimmit Aston Martin!
 |
 |
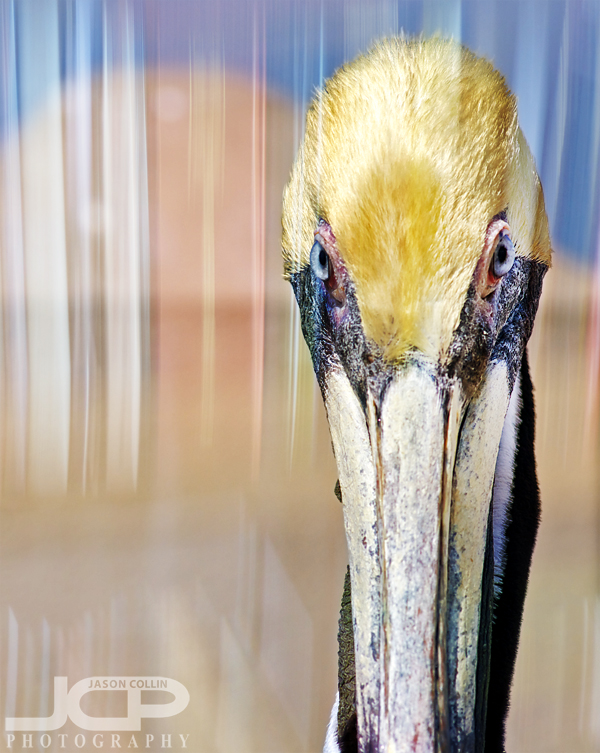 This is a composite of two images, with a texture abstract photo blended over a pelican photo.I have a folder of abstract and texture photographs I keep for when I want to make composite images like the one above. It is fun sometimes to spice up an image by combining two (or more) photographs in a complementary way.
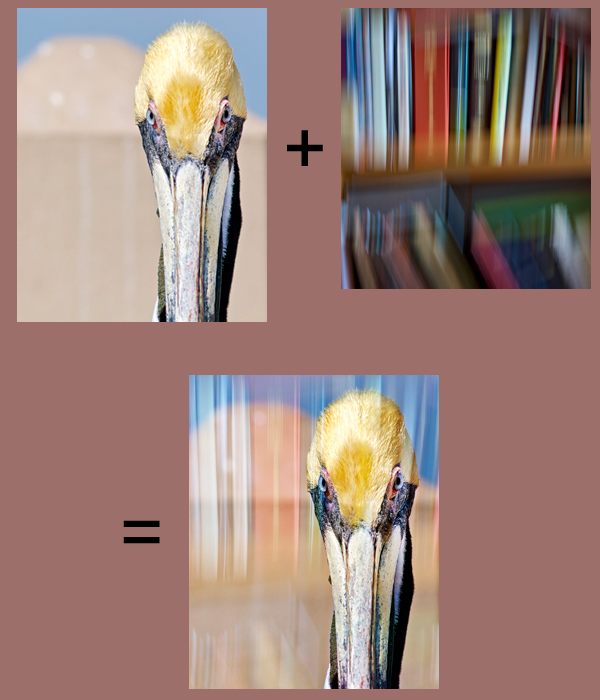
A blurry photo of a bookshelf was overlayed onto the photo of the pelican in Photoshop. I just adjusted the opacity of the book case photo down a little and set the blending mode to Overlay. Then I layer masked a little of the bookshelf image off of the pelican to make the pelican look cleaner. Digital Photography School has a good tutorial on how to do this if you would like to try it yourself!
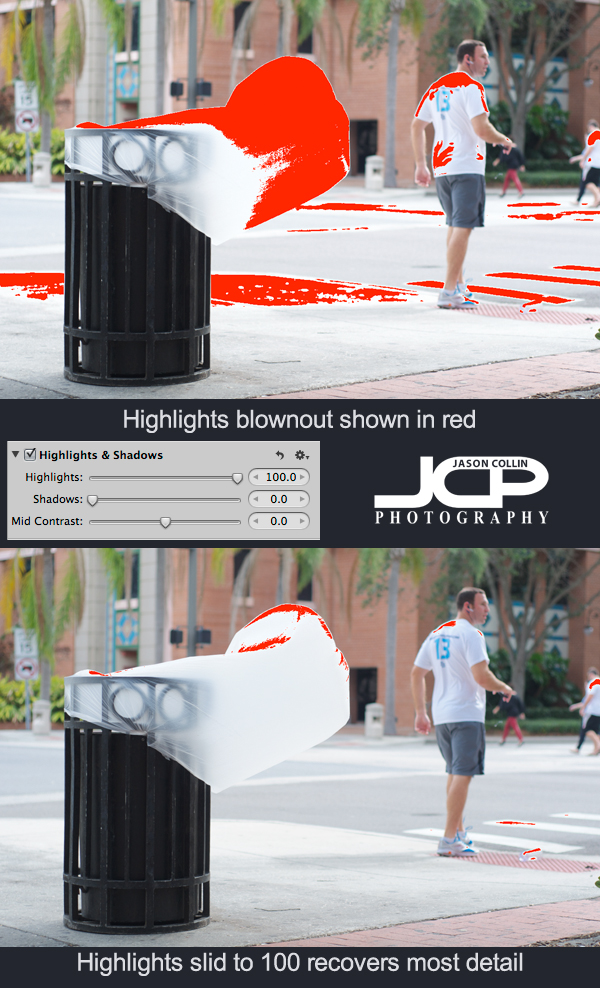
When shooting outdoors in the harsh Florida sun, it is not uncommon to blowout the highlights in a photograph, especially if there are any white colors in the shot or there are reflective surfaces. In the above example you can see one thing that fascinates me about St. Petersburg - its trash cans. On windy days when the trash cans are empty, the trash bag itself gets kind of turned inside out and blows out like a tongue. These wave and thrash in the wind and it amuses me to see this phenomenon.
In the shot, the trash bag is the lightest thing in the whole frame. Most of the shot looks exposed correctly, but the white trash bag is catching a lot of light and that results in it looking blownout. Using Aperture 3 I turned on the show Highlights/Shadows view which paints red over the parts of an image that are overexposed (blownout). Sometimes detail can be recovered in blown highlights and it is very simple to do.
---> Just use the Highlights slider to get back details
In this case it had to go all the way to 100%, but usually less is needed. In the second screenshot after the Highlights slider has been adjusted, there is much less red visible.
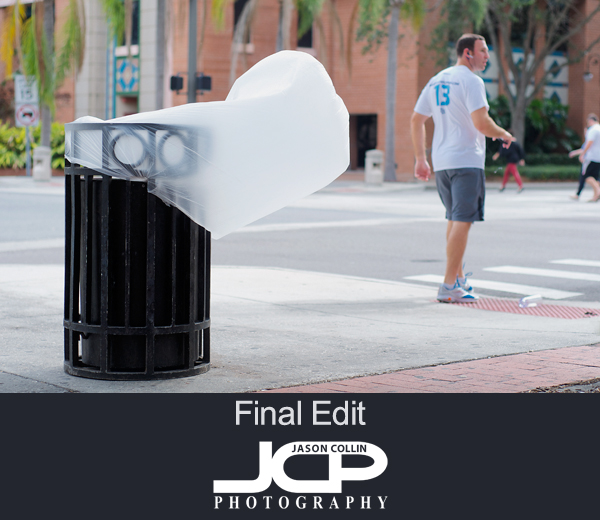
After doing all my usual editing to a photoggraph, the results allow the viewer to see the trash bag as more than just a pure white cylinder. Try adjusting the Highlights slider when editing your photographs to recover as much details as possible, especially when shooting out in bright sunny conditions.
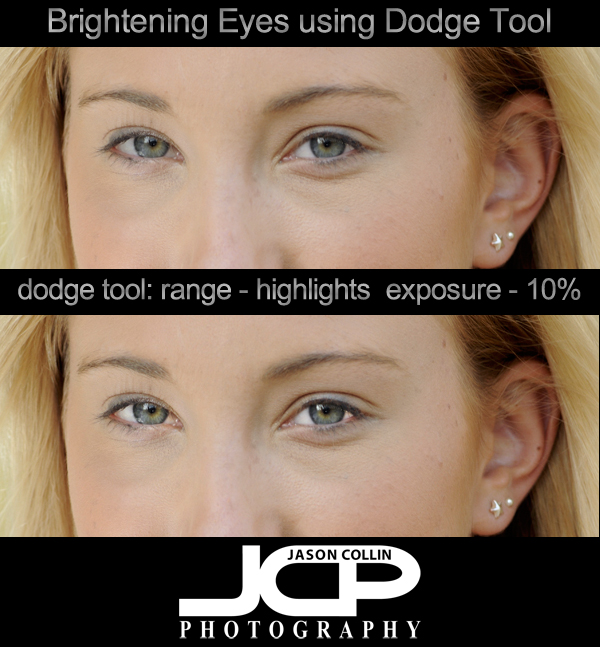
With Photoshop, there is always a very complicated way to do a particular digital photo edit. The key to getting proficient at Photoshop is learning the "quick & dirty" ways of doing the same complicated edit. You may not have 15 minutes just to brighten eyes in a portrait, or the 30 minutes to follow a complicated tutorial for how to do it. I use a much simpler process to whiten eyes that is as easy to do as any other Photoshop edit.
To whiten or brighten eyes in Photoshop:
Setting the Range to highlights means only white areas are mostly affected by the Dodge tool, perfect for the whites of eyes. It is very easy to overbrighten the eyes, which is why I set the Exposure low to 10% and click as needed. I find that a subtle brightening works best and keeps the eyes looking natural. I set the brush to be within the upper and lower eye-lids then click first on the iris of the eye to give them a little pop, then on the white to one side and then the other.
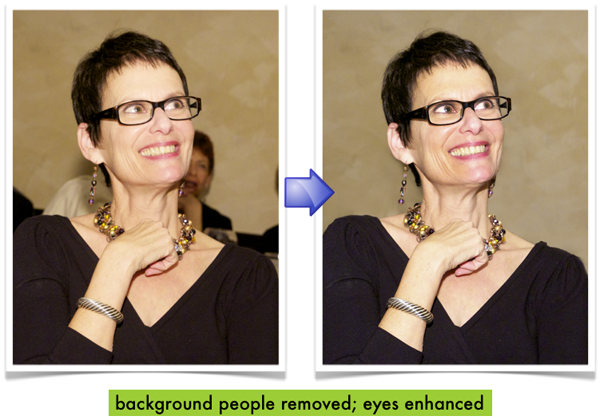
Even a little eye brightening can have a large impact on the overall face of the subject. Look at the graphic above and see how it appears that the entire face has been brightened. The only difference in the photos is that the lower one has had the eyes brightened using the Dodge tool.
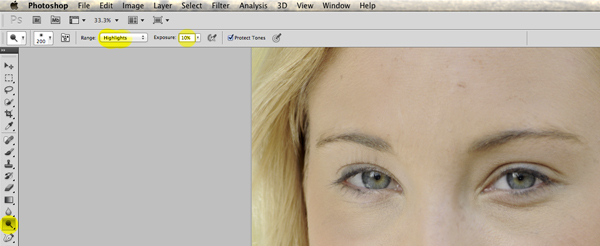 O selects Dodge Tool, then change Range to highlights and Exposure to 10%
