healing brush

Snow Leopard Photoshop edit removing cage fencing from photograph

This week one of my former photography students, Betty, contacted me about editing a photo she made that she really liked, but had one serious flaw.  She told me she wanted to be able to make a print of a photograph of a snow leopard she had made, but.....there was facing across the entire image.  She asked if I could remove it.  Upon first looking at the sample she sent I thought no way, at least not in a way that would look good.  However, I often think this initially when looking at a challenging photo edit and after some time my brain starts to formulate some possible solutions.  Still, there was one fatal part of the photo that could not be fixed, the cat's right eye.

Lines and blemishes over and across simple surfaces are usually not hard to correct, such as the case with the wires goings over the fur of the leopard.  However, anything over eyes basically provides an unfixable problem.  After some thinking....my solution?  Copy the cat's left eye, mirror it, and just put it over the problematic right eye!  

It worked better than I thought it would.  To add some differences I removed some reflections in the "new" right eye along with a few changes to the upper eye brow area.  I will not say removing the rest of the wiring was easy or simple, but those edits were a much more straight forward technique of first using the healing brush and then the clone stamp tool to clean up any lingering obvious edits.  Photoshop CS5 was used for these major lifting edits, as I call them.

After removing all the wiring I then applied my normal digital editing workflow to the image to produce the final, fully edited photograph above.  So the next time you think a photograph is impossible to fix in Photoshop, give it a few minutes and maybe a solution will come to you.  Or, send the photo to me as I offer digital photo editing services of all kinds.

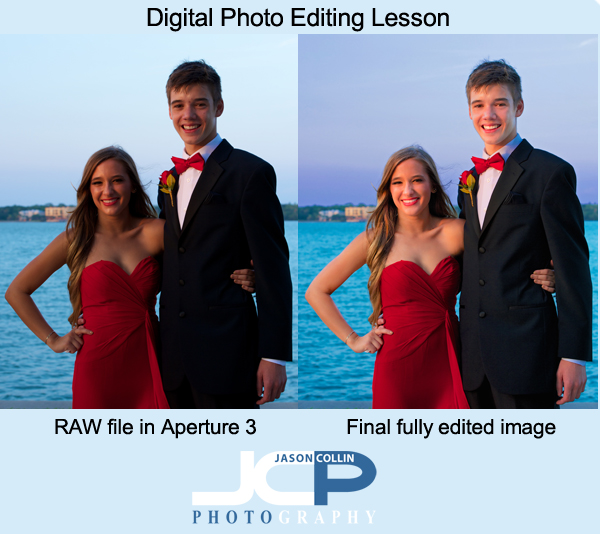
Digital Photo Editing Lesson with Stacy - prom couple before and after

The past few weeks I have been teaching former Morean Arts Center photography student, Stacy, how to develop a Mac digital photo editing workflow.  She is new to Mac as well, so I have been showing her some of my top tips for using OS X as efficiently as possible (hint, use Expose every day).  She also got the same apps I have so she could learn my exact photo editing workflow which starts in Aperture 3, then Color Efex Pro 3, then finally Photoshop CS5.  

Stacy made this photo of her daughter and her boyfriend on their junior prom night.  No flash was used, only natural light.  Here is the process for how the photo was transformed:

Aperture 3 workflow:

  • white balance slider increased toward cooler (blue)
  • shadows slider increased
  • mid-level contrast slider increased
  • dodging brush used on all skin areas

Color Efex Pro 4 (she has 4, I use 3):

  • Polarization filter applied
  • Pro Contrast filter applied

Photoshop CS5 (approximate steps):

  • Quick Select Tool used on all skin areas
  • Dodge Brush used selectively
  • Healing Brush used for blemish removal
  • Clone Stamp Tool used for more complex blemish removal and slight skin softening in general
  • Dodge Brush used in highlights mode to brighten eyes & teeth
  • Clone Stamp Tool used to lighten under the eyes
  • Quick Select Tool used on water
  • Contrast adjustment made selectively to water
  • Quick Select Tool used on sky
  • Highlights adjustment made selectively to sky
  • Saturation adjustment made selectively to sky
  • Unsharp Mask filter applied

None of these individual techniques is advanced.  To a properly trained Photoshop professional they might even seem crude.  However, what each technique lacks in complexity, the complexity comes from knowing when and how to use each one to accomplish a photo retouching goal.  At each stage of editing the photo looked better.  Through experience it can be learned how to keep adding yet another stage to one's editing workflow to make a photograph reach its full potential, or in some cases, save a photo that would otherwise be culled.

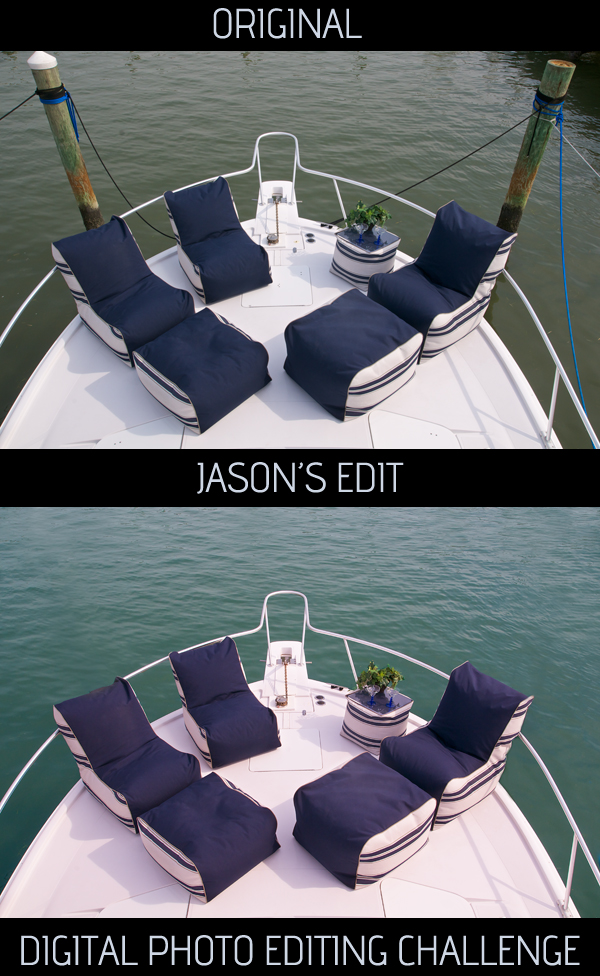
Digital Editing Challenge 01 - boat bow

DIGITAL EDITING CHALLENGE is a new feature on Jason Collin Photography.  Download the source photo of the original, then edit it to be as close to my own edit of the photograph.  I fully expect some of you to be able to do an even better job than I did.  Place a link to your edit in the comments below and I will add it to the body of this blog post with name credit.  After the challenge is closed (time to be determined) I will update this blog post with how I made my edit.  Thanks for taking the challenge!

EDITS THAT NEED TO BE MADE: 

  • basic color & contrast correction
  • removal of poles and ropes
  • change water color 

GOOD LUCK & THANKS FOR TAKING THE CHALLENGE! 

  • post a link to your edit in the comments below