The advantage of using HDR processing in photography

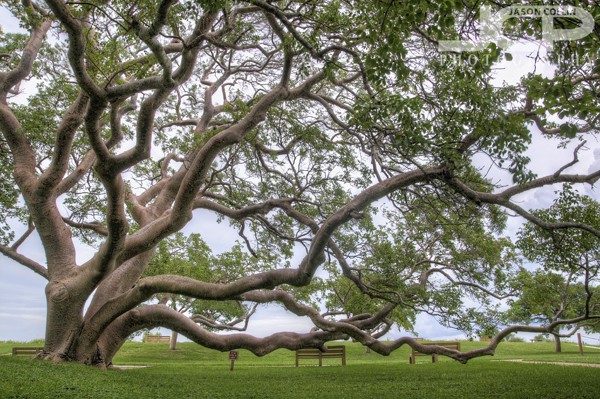
Over the past few years HDR processing has becoming very popular.  A term has even been coined for photographers who first discover HDR then basically only ever make HDR images from then on, "falling into the HDR hole."  It took me a long time to come around to realizing the benefit of HDR because, frankly, all the HDR images I saw online I thought were horrid, and I still personally do not care for a majority of HDR images I see.  This is of course a heated topic in the photography community.  However, for this photography tip, I just want to demonstrate the power HDR has to produce very detailed & dynamic images.
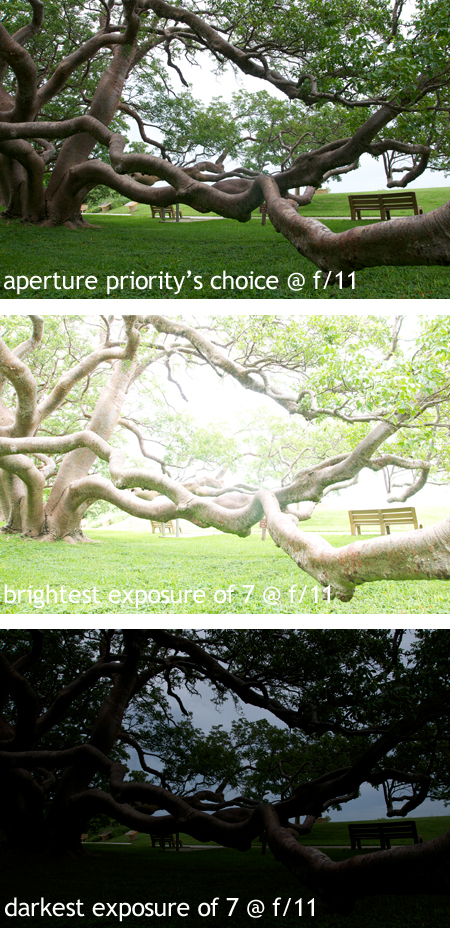


Many times, using aperture priority mode will result in a very good looking image.  The top photo is the result of setting my Nikon D300 to f/11 in aperture priority mode (A - Nikon, Av - Canon).  Aperture priority produced an ok looking image.  I set my focus point on the middle elbow of the lowest branch using matrix metering mode.  Thus, the priority for the sensor was exposing the tree well.  You can see pretty good detail in all the tree branches, the grass and even the leaves.  However, there is virtually no detail in the sky at all.  Using a single exposure, one has to choose whether to expose for highlights or shadows, and if the highlights are much brighter than the shadows, one of them will have to be sacrificed to a certain degree.  In this case, the sky was sacrificed in order to expose the tree better.

HDR processing overcomes this by using a series of bracketed shots, some overexposed and some underexposed along with the base image (what aperture priority thinks is best).  For this Gumbo-limbo tree shot, I took 7-bracketed images, of which you can see the brightest (+3 exposure) and the darkest (-3 exposure).  I ommitted the other two exposures for blog post space reasons, but those would just be a little less bright and a little less dark.
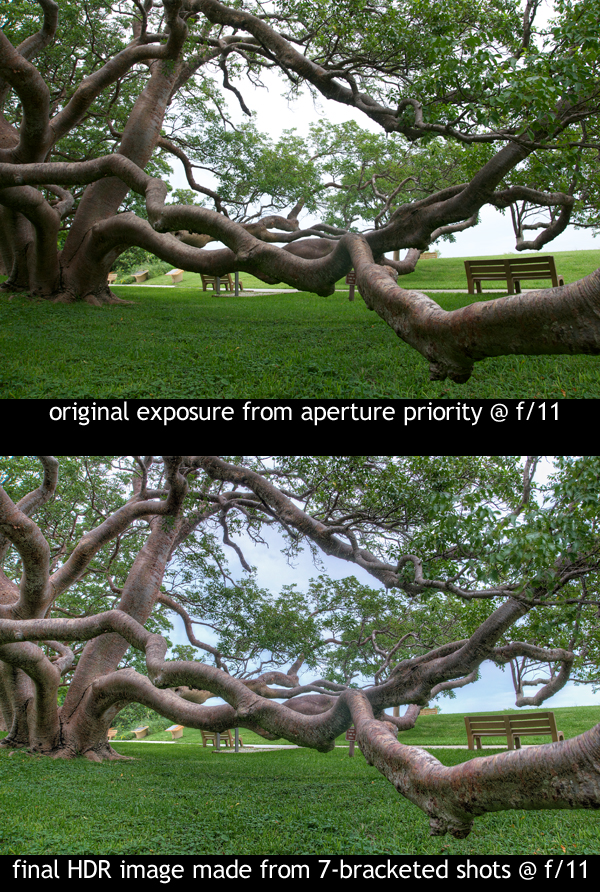
Using Photomatix Pro 3 to combine all seven of those photographs, taking the best exposed parts from each, the final HDR image is able to show the tree in even more detail than the single aperture priority exposure shot and also detail and color in the sky as well.  Therefore, when trying to photography a scene that has a high dynamic range (HDR), taking a bracketed series of shots and combining them into one final HDR image can produce results that no single exposure can.  This is the advantage of HDR processing.

Binocular Viewer a relic of the past looks at the future

Binocular Viewer on The Pier in St. Petersburg Florida - to me a relic of the past - Nikon D300 Tamron 17-50mm lens @ f/11 ISO 200 7-bracket HDR mounted on Induro CT214 tripod with cable releaseWhile teaching a DSLR Photography Lesson a student wanted to photograph that thing you see above.  Its proper name I could not even dream of at the time.  Even after giving it more thought, not until I visited its maker's website did it seem obvious:  this thing is called a binocular viewer.  To look upon one up close is to me to witness a relic of the past.  Something first encountered on a family trip as a child.  Some marker of a place of significance that is better seen up close.  

I would guess few objects are made like a binocular viewer still is, its pedestal seemingly hewn from a solid piece of iron and the binoculars themselves cast from thick steel.  Few things seen in modern daily life seem as immutable.  I cannot imagine its exterior design has changed at all in fifty years.  The inner optics must have, but maybe not.  

It also never occured to me to feed it a quarter and look through it.  25 cents somehow seems an unacceptable fortune to see something I already can.  There is no LCD screen or preview or marketing gimmick attached to the binocular viewer to pry a valuable and useful quarter from my pocket.  Yet, I felt immensely glad it was there, and continues to exist, like the feeling one has when coming across and old, solitary tree.

DSLR Photography Lesson Night Tripod Instruction with Pam & her Canon 60D

The top of The Pier offers a great vantage point for a sunset to twilight DSLR Photography Lesson in St. PetersburgFor our sixth DSLR Photography Lesson I met Pam at the usual spot in downtown St. Petersburg, each of us with DSLR, tripod and cable release in tow for practicing twilight and night photography.  I finally was able to figure out how to unlock the focus point in her Canon 60D viewfinder without having to go inconviently into the menus to do so.  Pam said, "I just learned something new."  She then said how her mother told her that if she learns at least one new thing each lesson, then it's worth it.  I thought to myself, "hmm, $75 to learn how to move the focus point!"  Of course though we did practice and hopefully learn a lot more over the course of the 2-hour lesson.

Being able to easily move the single focus point throughtout the frame in the viewfinder is especially useful when working with a tripod.  Once you frame the shot how you want it, the best place to set the focus may not be the dead center.  So instead of having to set the focus and recompose again, just being able to direct the focus point to the ideal location for a given shot in the viewfinder is a huge advantage.  Deep in the settings menus of her Canon 60D we found the ability to unlock the focus points.  Many other cameras have a dedicated button on the back to lock or unlock the focus point.  Check your manual if it is not intuitive for how to move your focus point with the D-pad on the back of your DSLR.  

For once Pam and I also did not have to dodge any passing thunderstorms and The Pier was surprisingly free of people for a Thursday night.  We photographed in peace from dusk to nightfall using manual mode to get the exact exposure we wanted.  One time, to Pam's delight, several cars drove down the causeway to The Pier allowing her to get light streaks in her long exposure shot.  

For our seventh lesson, we will return to using our 50mm f/1.8 lenses starting out in a bakery Pam has raved about.  Hopefully they will have some free samples!

  • Reserve your own 1-on-1 DSLR Photography Lesson with Jason today!
  • Learn more about the lessons
  • Browse past lessons with all of my students 
  •  

    --Professional Model DSLR Photography Lessons now available!

    Commercial Photograph License by Silver Vine website - green leaves

    "Last Green Leaves of Autumn" licensed by Silver Vine graphic design & featured on the home page

    Andrew, a graphic designer from Australia, contacted me about using my "Last Green Leaves of Autumn" photograph on his business website (view here).  This image has already been published in the largest English language magazine in Japan, Metropolis, as its photo of the week in October 2008 (see bottom of page).  I was more than happy to license the image to Andrew who I think put it to very good use on the home page of his business website.  

    Andrew's request spurred me on to formally offer a single location for browsing and getting information about licensing my photographs.  All this information is now located on a single page:

    LICENSE PHOTOGRAPHS FOR BUSINESS & PUBLICATION USE

    I hope to be able to provide images to more great clients like Andrew sharing my photographs of Florida, Japan and more.

    DSLR Photography Lesson with Marcia & her Canon 7D in St. Petersburg Florida

    Marcia on a new swing in downtown St. Petersburg with her Canon 7D during our photography lessonI met new DSLR Photography Lesson student Marcia for a rare Saturday morning lesson in downtown St. Petersburg.  She has owned a DSLR for awhile, having previously shot with a Canon 30D before getting the new Canon 7D.  She is even personal friends with Scott Kelby!  Marcia has a bag full of gear:  3 lenses, a tripod, external flash, etc. but for the first lesson we concentrated on the faily standard focal range of 18mm to 200mm which was covered entirely by her Canon 18-200mm f/3.5-5.6 IS lens.  

    I taught Marcia my 4-settings method of producing the correct exposure for any given type of shot ranging from midday sunny widangle shots to being able to eliminate a distracting background to produce a good looking portrait anywhere.  Despite the strong sunshine, thunder rumbled from somewhere so we concluded the lesson under the safety of the big kapok silk-cotton tree beside the Museum of Fine Arts.  Presumably the museum put up the new swing hanging from one of the tree's large branches which makes for a nice prop for portrait practice.  Only using her external flash for for a few minutes, Marcia realized we could have an entire lesson just on it.  I said that is exactly right, as the first lesson usually covers a broad topic range, with each subsequent lesson focusing on one particular area of photography.

    I look forward to seeing Marcia's photos of her poodles and travel related images she likes to make.

  • Reserve your own 1-on-1 DSLR Photography Lesson with Jason today!
  • Learn more about the lessons
  • Browse past lessons with all of my students 
  •  

    --Professional Model DSLR Photography Lessons now available!

    DSLR Photography Lesson using Canon 70-200mm f/4 at The Pier St. Petersburg

    The front element of Pam's new Canon 70-200mm f/4 IS lens at the end of our evening lesson at The Pier in St. PetersburgThis evening Pam and I dodged rain and humidity in pursuit of photographing pelicans in flight at The Pier using her new Canon 70-200mm f/4 IS L lens.  This was also the first lesson of the second four pack of DSLR Photography Lessons Pam has reserved.  

    We met in downtown St. Petersburg and made our way on foot out to The Pier where along the way we got our settings for photographing moving subjects dialed in.  Due to the overcast skies, light was already fading two hours before sunset, so we immediately went into manual mode setting the shutter speed at 1/800th of a second to insure we could freeze gliding pelicans.  To compensate for this fast shutter speed Pam needed to use the max aperture setting of f/4 for her lens, along with ISOs that eventually topped out at 1600 by lesson's end!

    The pelicans always seemed to stay 50 meters ahead of us, but eventually we were able to photograph some in flight.  I taught Pam my tracking technique which is not an easy thing to pick up on if you are not used to using your lens as a scope and then quickly ducking your eye into the viewfinder, all the while trying to get a focus lock on a small, rapidly moving subject.  However, Pam now knows the technique and can practice it on her own before our next lesson next week.

  • Reserve your own 1-on-1 DSLR Photography Lesson with Jason today!
  • Learn more about the lessons
  • Browse past lessons with all of my students 
  •  

    --Professional Model DSLR Photography Lessons now available!

    Gumbo-limbo tree of De Soto National Memorial Park Bradenton Florida

    Gumbo-limbo tree largest in North America in De Soto National Memorial Bradenton Florida - Nikon D300 with Tamron 17-50mm lens @ f/8 ISO 200 7-bracket HDR on Induro CT214 tripod with cable releaseAlmost by accident visitng De Soto National Memorial on Labor Day has become an annual tradition.  When I first visited the park last year, it was an accident also as I left the house planning to visit only one park.  When that park turned out to be rather non-descript, I quickly checked the map and was blown away by how great De Soto was, as it only appears to be a very small peninsula.  Of the many impressive features of the park, perhaps the most is the Gumbo-limbo tree near the entrance, which is the largest of its kind in North America.  I intended upon my return to the park two days ago to photograph the tree properly, which required the proper gear:  tripod, cable release, wide angle lens.

    The above shot was made using my Induro CT214 tripod at its shortest leg length.  I wanted to get to near eye-level of the lowest branches of the Gumbo-limbo and to show just how far the lower branches extend horizontally.  They seem to grow impossibly parallel to the ground.

    Gumbo-limbo tree horizontal branches in De Soto National Memorial Bradenton Florida - Nikon D300 with Tamron 17-50mm lens @ f/8 ISO 200 7-bracket HDR on Induro CT214 tripod with cable releaseI used the exact same setup to try and create a 3D looking shot of the longest and lowest of the branches.  I do not think anyone coud actully limbo under these, and I certainly did not try!  

    Gumbo-limbo tree vertical branches in De Soto National Memorial Bradenton Florida - Nikon D300 with Tamron 17-50mm lens @ f/8 ISO 200 7-bracket HDR on Induro CT214 tripod with cable releaseThe thing about the Gumbo-limbo tree is, not only does it have very long horizontal branches, but its vertical branches extend straight up high into the sky as well.  It really is an amazing tree and the crown jewel of the hidden gem that is De Soto National Memorial park.

    These Gumbo-limbo photographs are available for as fine art prints, inquire today!