Photography Tips

Photography Tip - set DSLR Drive Mode to its fastest for action shots

One big differentiator between DSLR models is how many frames per second it can shoot.  10 FPS is fast, 3 FPS is not.  6 FPS is a minimum for being able to produce pretty good action and sports photography shots.  The faster the FPS of your DSLR, the better the odds are for you to capture the best moment in an action sequence.  Knowledge of the action type definitely helps, but ultimately a lot of it comes down to just being lucky enough to have had your DSLR capture that particular frame that looks the best, the coolest, the most dynamic.  

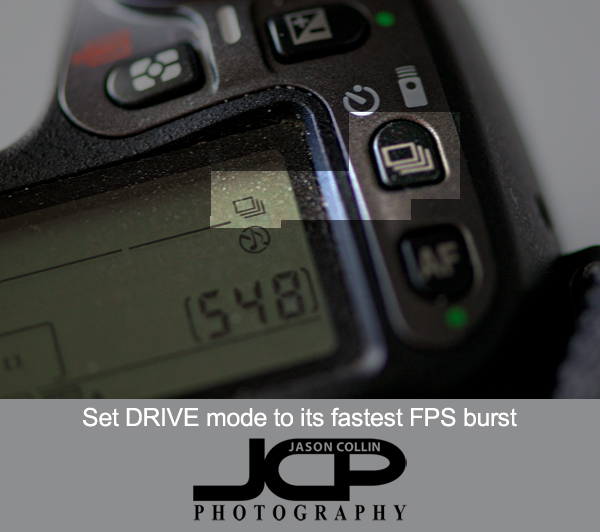
By default most DSLR will be set to take only a single shot no matter how long one holds the shutter down for.  For me, I always leave my Nikon in its faster FPS setting.  In the menus this is usually called the Drive Mode and its symbol looks like a stack of cards (see photo above).  Many DSLRs will have a button for changing this setting on the camera body.  My thinking for leaving it set to the fastest is you never know when something cool will happen and I much rather have 6 chances in a second of capturing it than one.  Of course I do not always hold the shutter down and take 6 FPS.  I have trained my finger to only actuate one shot each time I press the shutter if I only want to make one shot.  I have seen though that many newer model DSLRs have a very sensitive shutter button making this very hard to do.  Maybe those will eventually wear in and not be so sensitive.

If you find you are taking too many shots at once due to a sensitive shutter or other reasons, there is usually a second, less fast FPS setting you can use, without having to go to just a single shot setting.  When photographing the St. Anthony's Triathlon that was the drive mode I was recommended to use in order not to end up with too many shots of each triathlete.   
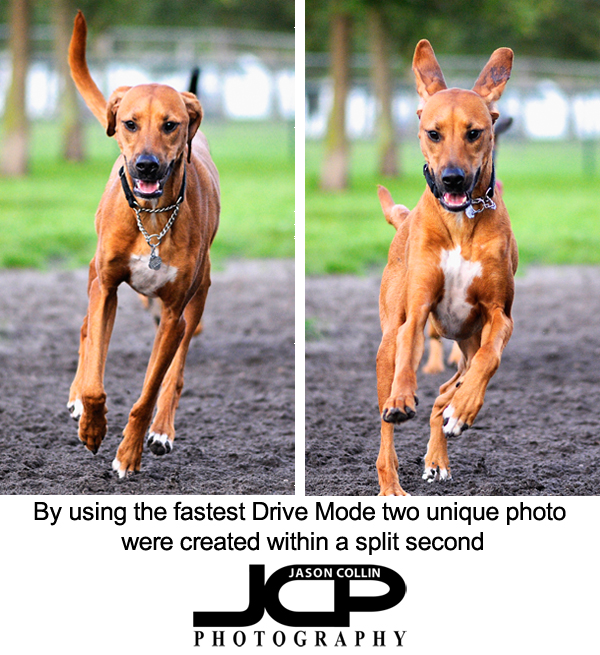
In the above dog photos these were made withing a split second of each other.  If I was trying to specifically get an ears up or ears down shot, I would never rely on having perfect timing to do it with one shot!  For sure I would use the fastest burst mode available.  This is definitely a case where you lock onto your subject and just hold the shutter down and hope the final frozen action of the subject looks good.  You use your skills to set exposure and focus, and to position yourself well relative the moving subject.  This minimizes how much you need to be lucky to capture good action shots.  Get your settings right, put yourself in good position, then hold the shutter down and hope you got just the right moment!  The faster your FPS, the better your chances.

1-on-1 Nikon D5100 DSLR Rooftop Photography Lesson with Lisa in St. Petersburg Florida

Up at the top of a parking garage in downtown St. Petersburg Florida, Lisa practices shooting in manual mode with her Nikon D5100The last time I met Lisa in downtown St. Petersburg for a 1-on-1 DSLR Photography Lesson with her Nikon D5100 the most powerful thunderstorm of the year hit!  It allowed us to get some cool funnel cloud and lightning shots, but it also made us nervous.  The weather for this morning's third of four photography lessons was the usual Florida sunshine with only the persistent heat to deal with.  

Lisa is taking a trip to Tennessee later this month and wanted to get some practice in photographing wide open scenery.  Now that The Pier is closed, I suggested we go to the top of a parking garage for the best high views.  I also gave Lisa a thorough review of shooting in manual mode and kept trying to stress there is no need to ever ask what shutter speed should be used, the meter tells you what shutter speed is needed for a proper exposure.  The only thing you need to remember about shutter speed is not to go below the minimum speed for hand holding a shot (1/60th in most cases).

I look forward to seeing her photos of Tennessee mountains and rivers.

Photography Tip - fill the frame corner to corner - Florida Pelican Fine Art Photography

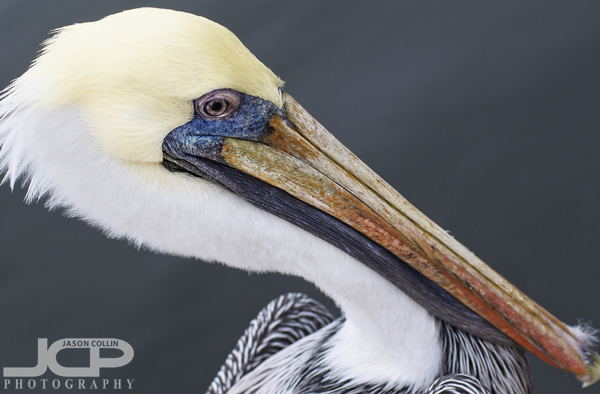
Fill the frame corner to corner to make an impact with composition - brown pelican St. Petersburg Florida Fine Art Photography - Nikon D300 Nikkor 80-200mm @ f/5.6 ISO 200 1/250th

At any given moment, you can find a brown pelican to photograph in downtown St. Petersburg, Florida.  Chances are you already have numerous pelican photos in your archives.  This can be said for any number of common subject matters.  So how to make such a common subject stand out?  One way is to use a more creative composition, like having the subject fill the frame corner to corner.  Use the shape of the subject to fill the frame in the most complementary way.  For the pelican, with it's long narrow head, going diagonal corner to corner allows for filling the frame with the subject.  Also, going through the edges of the frame creates a very different impression than fitting everything inside (with any subject it also helps to have a good, clean, complementary background; in the above photo the dark water of Tampa Bay combined with the large aperture I chose creates a smooth, gray bokeh).

When you go out shooting next time look for a subject that you can frame corner to corner.  

Photography Tip - Invert colors to make photos look psychedelic

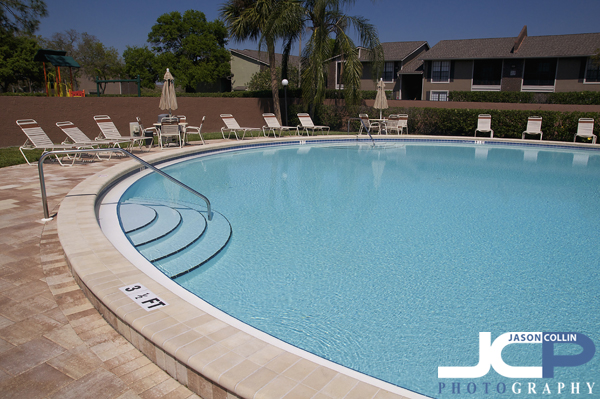
I often hit Invert in Photoshop by accident because the command for resizing is close to it and as I often work very quickly in Photoshop, sometimes a very crazy looking image flashes on my screen.  However, this also means happy accidents happen too.  

I was editing this ordinary pool photo from a real estate shoot and as I was finishing it and preparing it for web size, I went to hith CMD-SHIFT-I but missed the SHIFT part and instead only hit CMD-I resulting in the below inverted color version.

Looks much cooler, right?  So if you are needing something to spice up a photo, try hitting CMD-I in Photoshop next time and you may be pleasantly surprised!

Photography Tip - when to leave space above subject in a portrait and when not to in composition

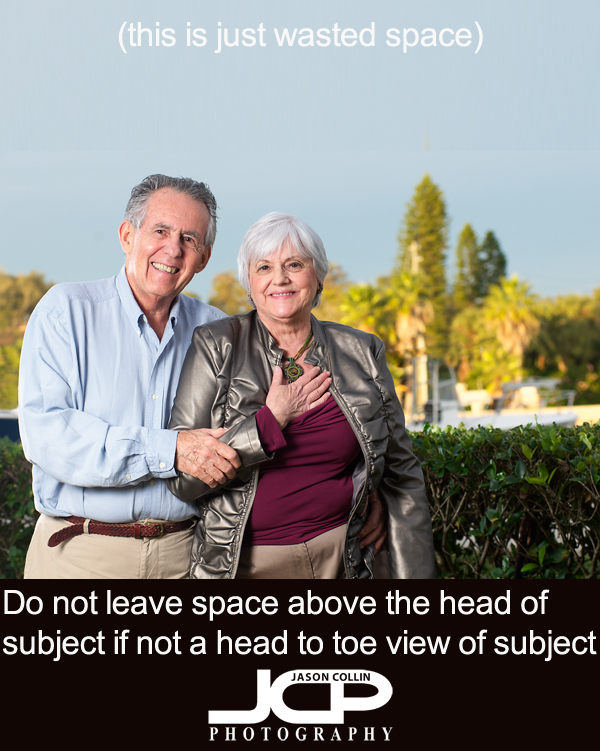
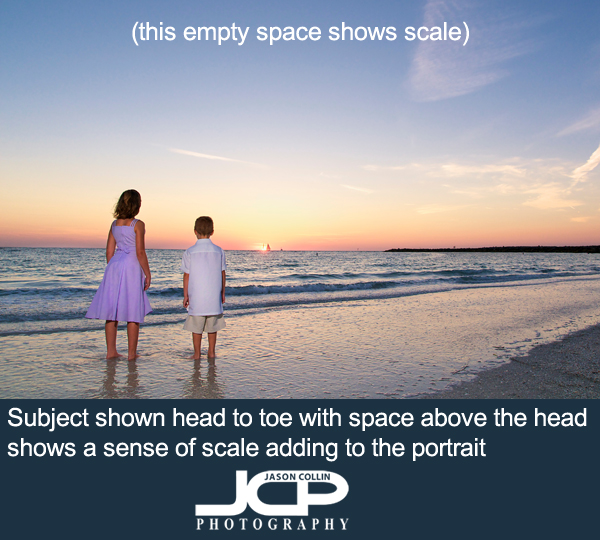
During my 1-on-1 DSLR Photography Lessonsstudents often practice portraits, which means I often have to be the subject.  I alway let the student use their instict first for composing a portrait, rather than giving them composition tips first, so I can see their natural eye for composing.  A vast majority of the time this results in a portrait of me looking tiny and kind of in the photo by accident.  By that I mean I am usually dead centered (an issue for a future photography tip) and very low in the frame with lots of space above my head.  This results because I was composed to be dead center horizontally and vertically and most of the time was cut off at the waist.  I doctored the above photo to show excess space above the heads of the subjects that is just doing nothing.  It adds nothing to the photograph and in fact just makes the subject look smaller in the frame for no reason.

This is how the photograph looked as I shot it in the field, with minimal space above the heads of the subject allowing the subjects to fill the frame vertically and look like normal adult sized people and definitely in the photo on purpose.  

The rule here is:

--when photographing people from the waist up do not leave space above their heads

If you photograph someone from the waist up and leave a bunch of space above their head, then it looks like you might not have intended for them to be in the shot in the first place.  At the least, the person looks lost in the frame and tiny, which is not very flattering!

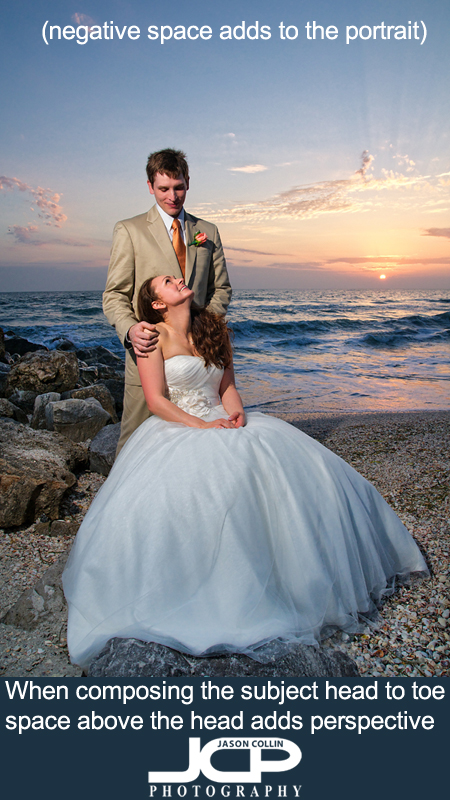
In contrast, when framing the shot to include the subject from head to toe, especially in portrait orientation, leaving space above the subject's head can add perspective to the shot.  The space above the head is then not just empty useless space.  Since you are showing the entire body of the subject, it puts the subject into a proper, normal looking perspective to the viewer.

Even in landscape orientation, if you show the subject from head to toe, leaving lots of space above the subject's head will help to show the scale of the environment the subject is being photographed.  In the example above, showing the wide open beach and water surrounding the children (shown head to toe) does show them properly as they are, small kids.  

The next time you make portraits, be mindful of the space above the subject's head.


Jason Collin Photography now focuses on professional photography services across the Monterey Peninsula including headshots, commercial photography, drone video, event coverage and real estate photography.


Silly Goose at Crescent Lake Park St. Petersburg Florida DSLR Photography Lesson with Stacy

A goose being silly in Crescent Lake Park in St. Petersburg Florida - Nikon D300 Nikkor 80-200mm @ f/4 ISO 200 1/320This morning I met long time DSLR Photography Lesson student Stacy in Crescent Lake Park, where I knew it was very likely we would be able to photograph a goose or two.  I suggested she bring a blanket so that she could lie down comfortably on the grass in order to be able to get at eye level to the birds.  I got down low myself for the shot above.  

In this lesson I pointed out even more to Stacy that the meter gives just a suggestion, as to get a good exposure of the geese in the deep shade they were standing in, it was necessary to use settings that the meter thought would result in an overexposed shot.  That was mostly due to the background being much brighter than the foreground.  Also, I recommended that there is no need to change aperture to fix the exposure.  The aperture should be set first (when shooting in manual mode) so to set the depth of field, and then the shutter speed should be set as needed to get the desired exposure.  

Photography Tip - watch out for horizon intruders

When the horizon is contained in the composition of your photograph, a lot of attention has to be paid to it.  The first thing is to make sure it is straight.  Then where it is positioned in the vertical part of the frame is another thing to be mindful of (read about that photo tip here).  Add to your horizon checklist the search for intruders at the edges of the frame.  In the above photograph, only part of the condos on the left are shown.  This makes them intruders to me.  Either have the condos completely in the frame, or not at all.  Now, on the right of the horizon are some trees.  These are part of the natural landscape and I do not view them as intruders.  The trees do not breakup the natural flow of the horizon when looking at the photograph, but the condos at the edge do.  Buildings are what you need to look out most for at the edges of the horizon.  Overall, always pay close attention to the horizon when composing a photograph for the best results.