Photography Tips

Photography Tip - shoot in RAW to get greater details in shadows

One of the many advantages of shooting with a DSLR camera over a lot of point and shoot cameras and the cameras built into phones, is that you can shoot in RAW quality level.  However, by default DSLRs are usually set to shoot in only JPG mode, and not even the highest quality JPG images at that!

The photo above was made kind of by accident as I was testing shooting tethered to my MacBook Pro (hence it is just a photo of my laptop), but when I saw the results I thought this is a good example of why to shoot in RAW.  My Nikon D300 is always set to shoot in RAW + JPG (basic) mode.  So in one shot it makes two images, one RAW and one JPG.  So both photos above are actually a single shot, the top is the JPG result and the bottom is the RAW result (both just put into Aperture 3, no editing done).

One advantage of shooting in RAW is the much greater detail you can get in shadows.  Look at the keyboard in the JPG, you cannot even really see individual keys.  In the RAW image you can see them individually.  On the laptop screen look at the upper right corner.  In the RAW version you can see the grass on the side of the road.  In the JPG version it is pure black.  In the RAW photo you can see the dishwasher in my kitchen, in the JPG it is just a black blob under the window.  

Shooting in RAW is a great advantage if you do a lot of low light photography.  

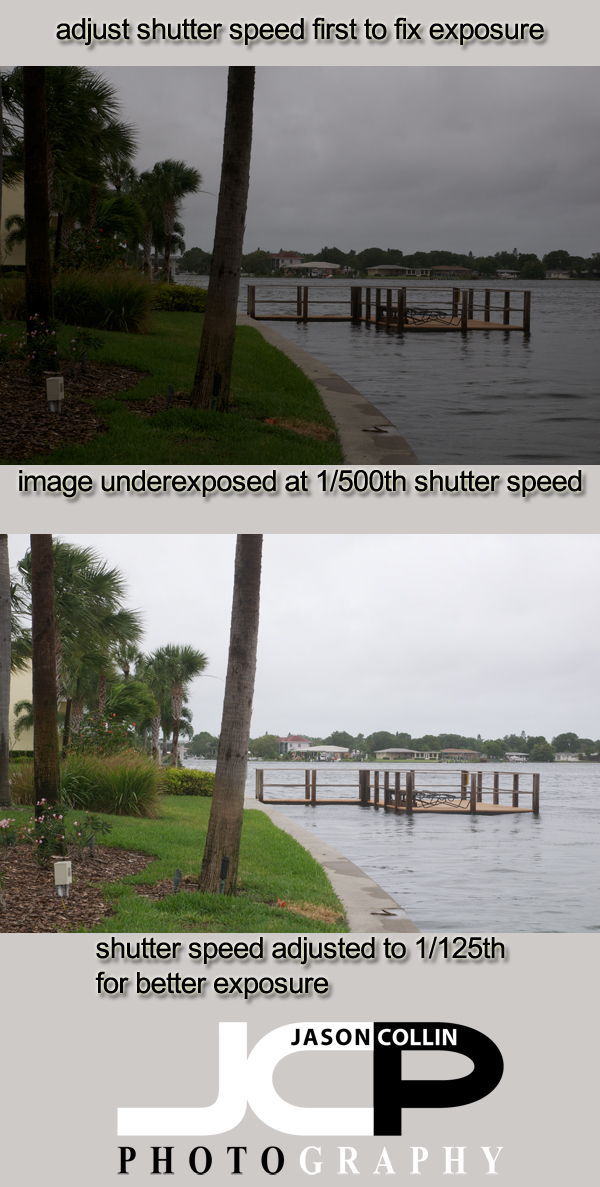
DSLR Photography Tip - adjust shutter speed first to fix exposure

If you are photographing a still subject, you should be shooting in manual mode with your DSLR (if you do not know how, I offer 1-on-1 photography lessons that will).  Therefore, you have an aperture you want to shoot at in order to get the best DoF for your subject.  So if your initial shot does not have the exposure you want (underexposed or overexposed), then you should adjust shutter speed first in order to fix the exposure, not aperture or ISO.

In my example photographs above, both images are straight out of the camera at the exact same settings, save for the shutter speeds.  At 1/500th the image is underexposed, which is not surprising since at default daylight settings I only recommend 1/320th as a max shutter speed and today is very overcast with a tropical storm passing by (note the dock is almost underwater!).

I did not change my aperture as I want to maintain the DoF f/11 offers, and I did not adjust the ISO as I kept that set at the lowest in order to maintain the best image quality.  On pretty much every DSLR, even if it has only one dial on the camera body, in manual mode that dial defaults to shutter speed for a reason...because you change shutter speed the most often.  In the photo of the dock, I adjusted the shutter speed from 1/500th to 1/125th to get the exposure I wanted, leaving all other settings the same.

So remember when shooting still subjects in manual mode, adjust the shutter speed first in order to fix any exposure problems.

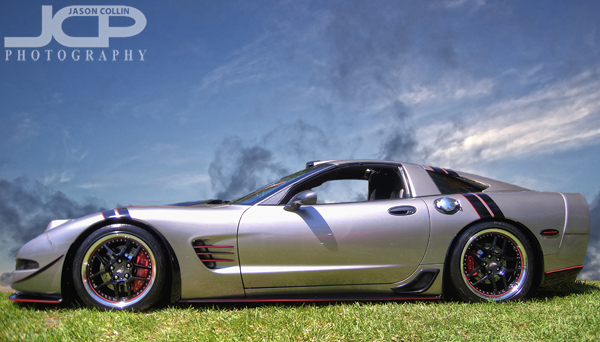
Photography Tip - replace a busy background with clean sky Corvette Photography

This Corvette is real, and the sky is real, but they were not really photographed together.

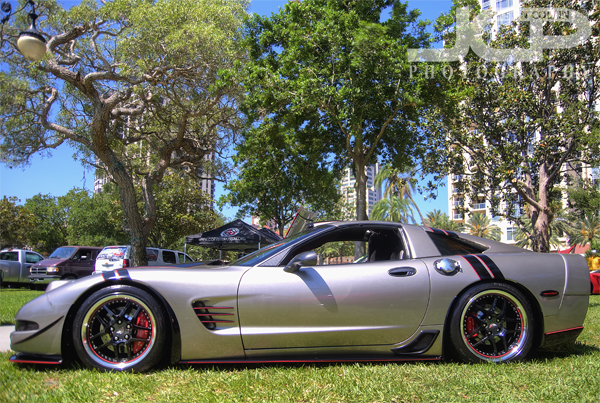
I went to a Corvette car show in South Straub Park this past Saturday mostly to meet the owner of the above customized Corvette.  I first photographed his car back in November.  He was not by his car at the time and only by chance found my photograph of it.  Since then I have been in regular contact with the owner, Bobby, about possibly doing a full shoot of his Corvette.  That still has not happened yet, but at least on Saturday I got a chance to go see him and say hello.  

This is the original image as made on site at a car show in St. Petersburg FloridaI have written several times that shooting cars at car shows often results in less than desirable images, if you want the focus to be on the car itself.  This case was no different as the trees in the background compete for the viewer's eye just as much as the Corvette.  The solution for a busy background?  Replace it with a better one!

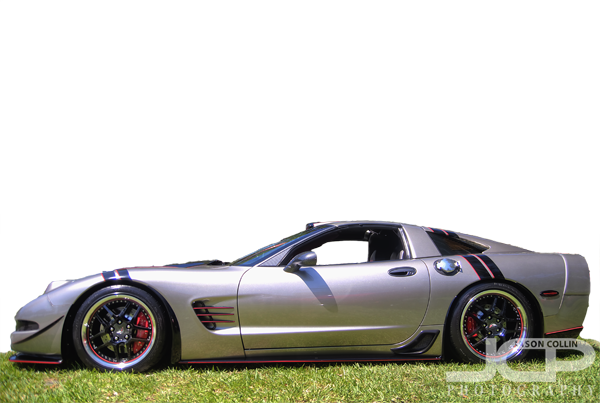
Corvette cut out from the background using Photoshop Quick Select ToolIt was pretty straight forward to remove the Corvette from its background using the Quick Select Tool in Photoshop.  I kept the grass foreground as seen above.  I was careful to of course not select the inside of the window so that too could be part of the background replacement.

The replacement background used in the composite image.I went into my photo archives to look for a suitable replacement background.  Using actual objects is rather hard to do as proportions can be very difficult to match (car looks giant, buildings look tiny, etc).  A sky background is usually a good and easy replacement background subject.  I used one I made of Sunset Beach on Treasure Island, Florida.

The new background slipped right behind the Corvette, window included.Then it is just a matter of slipping the sky background layer behind the Corvette layer in Photoshop.  I positioned it taking into consideration cloud placement.  I did not even need to cut out the sandy beach part because that is all hidden behind the Corvette.  The above image is the final composite photograph which allows the viewer to focus on the Corvette as the subject.

Motion blur added to a more advanced edit of the Corvette composite image

After getting a composite image I liked, I experimented with even more Photoshop editing.  I added a motion blur to the grass and a radial blur to the tires to create the illusion that the Corvette is speeding along on the grass.  I darkened the window and put in a silhouette of my own head to show a driver inside to help complete the motion illusion.  What do you think of the motion shot?  Is it convincing or not quite there yet?

Photography Tip - manage the background for less distraction

This week's photography tip deals with the background of photographs.  The background is one of three things that makes or breaks any photograph.  In the examples above, I sat in the exact same spot to make each photograph.  In the top example much of the background is visible and in varying degrees of focus.  The subject is sharp and well exposed, but despite that the background still distracts from it.  Plus, the subject is not big enough in the frame either.

For the second shot, I used a different lens, different settings, and different composition to make the background as much of a nonfactor as possible, and for the background to even try and complement the subject.  Having a clean background allows the viewer to focus only on the intended subject of the photograph.  

How the difference was accomplished: 

  • 17-50mm f/2.8 lens switched to 50mm f/1.8 lens
  • 38mm focal length to 50mm
  • f/8 to f/2.8

About this subject . . . it is a large light bulb that I found floating in the water behind my apartment one morning.  It is encrusted with barnacles.  It fascinates me how something as fragile as a light bulb could survive in open water long enough to number one become barnacle encrusted and second to not simply have shattered.  I keep it on a bookshelf in my living room as a reminder of how interesting the world is and how such extraordinary things are possible.

Photography Tip - look up!

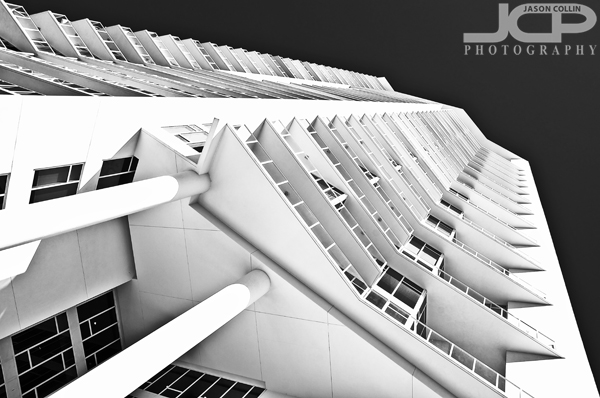
When looking to make a photograph remember to also look up!Pushing the shutter on your camera when looking at a subject at eye level with nothing else special done is very likely to result in an uninteresting photograph.  Shooting like these I often refer to as just snapshot photography.  I tell my photography students that to make a photograph one often has to show the viewer something she/he cannot also see simply by standing there too.  One of the easiests ways to compose a shot that breaks from this constraint is to simply look, up!  A sharp eyed viewer will also notice one of my other favorite composition techniques in the above shot of Signature Tower in downtown St. Petersburg--ending lines flush in corners.  

Photography Tip - get close, then get closer for higher impact images

Getting in very close on this photograph of Kiki showing her viewpoint and thoughts.Getting in close to your subject is one way to immediately add more impact to the photograph.  Once you think you have gotten in as close as you should, try going in even closer.  This is especially true for portraits, as seen above in the portrait of Kiki seemingly in deep thought.  The framing only reveals her right eye and some of her head leaving all else a mystery to the viewer.  

It helps to use a macro lens to make this kind of shot.  Another good way is to use a long focal length (200mm+).  

Get close, and then closer even for group portraits to capture more emotion.The get close, and then get closer composition style also works for group portraits, not just single subject portraits.  In the above example showing the groom and groomsmen head to toe is a fine shot, but the viewer feels distant from the subject.  Zooming in and composing a much tighter shot reveals each person's individual character more and makes for a much more personal experience for the viewer.

Try getting much closer than you normally do in composing your shots and let me know in the comments below what the results were.

Photography Tip - shoot slowly after you push the shutter exhale and follow through

Wait to do this until you have at least finished pushing the shutter!

I have noticed when people are beginning to formally learn photography they can be impatient with seeing how their shot came out.  I see this behavior when they are shooting.  It seems almost before they have even finished pushing the shutter they are already looking at the back of their camera to see how bad the shot came out.  I always discourage this behavior and encourage taking your time.  Pushing the shutter on your DSLR, and thus starting the action of making a photograph, is a lot like a swinging motion.  The follow-through is important too.  

So when you push the shutter, push it and follow through by holding the shot, by exhaling, letting thoughts flow through your mind about what you just did, and then review your shot on the back of your camera.  If you are so hastily looking at your shot after you take it then you were not ready in the first place to even push the shutter.  Prepare more before pushing the shutter so you know what to expect after you do.