Photography Tips

Focus Mode AF-S or AF-C photography tip

One of the five things you need to know how to set correctly to make a well exposed and sharp shot in any given shooting conditions is focus mode.  Fortunately, focus mode is by far the easiest of those five settings to set as there are only two choices (disregarding manual focus mode):

  • AF-S (One Shot - Canon) for still subjects
  • AF-C (Ai Servo - Canon) for moving subjects

That is all there is to choosing which focus mode to use.  Is the subject moving or not?  In the above example the chainlocked bike certainly is not moving so I used AF-S to shoot it.  In the other example the triathlon cyclist was definitely moving, and fast, so I used AF-C.  

Most DSLRs offer a third, and useless, kind of auto auto-focus setting that you should just pretend does not even exist!

So there is no reason to ever make a focus mode mistake if you can just remember AF-S (think "S" for still subjects") and AF-C (think "C" for continuous, moving subjects).  No matter what you make a photograph of, moving or still, now you know which focus mode to use!

Tripod Nikon D7000 DSLR Photography Lesson with Tim in St. Petersburg Florida

Tim using his Manfrotto tripod to make a shot of downtown St. Petersburg during our third photography lesson.For our third of four 1-on-1 DSLR Photography Lessons Tim brought his Manfrotto tripod along for a lesson based on slowing down one's photography and not taking so many shots that make the thought of going through them all rather daunting in the editing process.  Using a tripod naturally slows you down as a photographer, thereby reducing the number of shots you take, while simultaneously improving the shots you take as each shot on a tripod needs to be carefully framed and crafted.  Free of the weight of holding the camera, using a tripod allows you to really feel at ease when shooting.  I know it is how I feel.

Long exposure shots are only possible with a tripod, and one of the best spots to make such shots are from The Pier, which is where Tim and I headed out to.  Along the way we noted how completely gray and blah the sky was and that we would not be able to make any keepers tonight from an artistic standpoint, but learning the skill of making long exposure dusk & night shots would not be affected.  I commented that is such conditions I just get in the mindset of knowing I will probably convert the images to black & white later.

Then all of a sudden a touch or orange reflected off the low clouds and soon thereafter the sky exploded with color and Tim was able to make some fantastic long exposure shots of the downtown St. Petersburg waterfront (see my shots here).  We were very lucky in the end!  For our next lesson, we will move on to flash portraits.

Nikon D300s 1-on-1 DSLR Photography Lesson St. Petersburg Florida with Lisa

Lisa with her new Nikon D300s and Nikkor 70-300mm lens during our first photography lesson in St. Petersburg FloridaMy first 1-on-1 DSLR Photography Lesson of the fall was this morning with Lisa and her newly acquired Nikon D300s.  The leaves may not be changing color or anything like that in downtown St. Petersburg, Florida, but things were definitely not as hot and a bit less humid, which is what early fall amounts to here!  Like a majority of my photography students, Lisa had only experience with small or point and shoot digital cameras so I started basically from the very beginning introducing her to the DSLR world.  It may seem like a big leap going from a point and shoot to a pro level DSLR like the Nikon D300s, but in another way it is a great simplifying of photography as each shot becomes about five tangible settings, not like on a point and shoot choosing the right scene mode or trusting auto mode to make what you want.

In that way, within minutes I had Lisa using her D300s in full manual mode switching between photographing still and moving subjects, changes lenses and learning how to read the histogram as a way of confirming exposure in the field.  It is easier to do this in fact with a more advanced camera like the D300s because every setting has its own dedicated button, no need to ever venture into menus.  

This was our first of four photography lessons, with the second already booked for next Monday.  I look forward to helping Lisa continue to build her DSLR photography skills!

iO6 Panorama Feature on iPhone 5 first photo example St. Petersburg Florida

Before I went to bed last Thursday, I set the alarm on my iPhone 4 for 2:55am.  This was not because I have a new paper route or decided to follow in my grandfather's footsteps and be a milkman, but because I want to insure I was able to get one of the first preorders in for the new iPhone 5 that here on the coast would be first available at 3am Friday morning.  So I rumbled out of bed and began refreshing the iPhone 5 page on apple.com.  Another reason to be one of the first was that I had already secured in my buy-back price for my 2-yeard old iPhone 4 on the great site gazelle.com for a whopping $146!  That's right, it basically meant that the new iPhone 5 would only be $54 out of pocket, if I could get one before October 1st.  

Well, my early rising paid off as my iPhone 5 (white, 16GB, AT&T) was delivered on the first available date (Friday the 21st).  It took almost four hours to sync all my backup data to it, so I did not have much opportunity to test the new iOS 6 panorama feature until yesterday (Saturday).  I was walking Kiki around Crescent Lake Park, a common Saturday evening activity and with the wide open views from the lakeside, I had my first chance to test the panorama function.

I saw a video of how it works so I knew you do not take five or six separate shots in a row, but rather turn the panorama feature on and then glide the camera over the area you want to photograph.  There are visual guides to keep your framing on track, and I must admit I was rather wobbly in my first attempt as you can see in the unedited image above.  

Still, there was a large portion of the image that was usable.  I cropped out the left, right and bottom edges and found a decent remaining image.  The exposure was a little off and there was a lot of noise in the sky, but overall I thought the new panorama feature in iOS 6 on first impression seems to be very usable.  I look forward to trying it again with a more steady hand and in different light.  

Have you made any panoramas with iOS 6 yet?  Post your examples in the comments below.

1-on-1 Canon G10 Photography Lesson in St. Petersburg Florida with Mari

Mari using her Canon G10 in manual mode creating a patterned floral shot in St. Petersburg FloridaThis morning I met long-time dog park friend Mari for a 1-on-1 Photography Lesson using her Canon G10, an advanced point and shoot style camera.  It was my first time to get hands on with this category of camera, which I had long been curious about, but I found the controls to be too cryptic to compete with a full DSLR in terms of usability.

Mari often is up early walking around the downtown St. Petersburg waterfront with her dog Sport and usually only uses her iPhone camera to photograph all the sunrises she sees.  Now she can bring her G10 along and use the power of manual controls to get the exposure how she wants it to make creative and sharp shots.  I taught her the shutter speed and aperture threshold settings from which she would then need to start to increase ISO, and how purposefully overexposing or underexposing a shot can lead to great results in the right circumstances.  

It was nice to see Mari outside of the dog park and start to help her improve her photography.  I will look forward to seeing her sunrise photos!

1-on-1 Canon T4i DSLR Photography Lesson on pelicans with Nicole

This morning I met Nicole for our second 1-on-1 DSLR Photography Lesson in downtown St. Petersburg.  The topics for our lessons continue to be based on assignments she gets for her photojournalism class.  Today's topic was wildlife, so we went out to The Pier to photograph pelicans and anything else we could find along the way.

It was a very sleeping morning out at The Pier, hardly any creatures were stirring.  The sky was mostly overcast, but the humidity was heavy, putting a general malaise on all, but this meant the pelicans were extra approachable allowing for some very closeup shots of the large birds.  There were a number of males and females in various sitting, standing and preening positions allowing Nicole to get a good range of shots to submit for her class.

We concluded by photographing a few semi-curious squirrels in North Straub Park.  Barring any of her classmates making a quick trip to Africa, I am sure Nicole will end up with the best shots once again!

Corvette great subject bad background digital photography editing tip

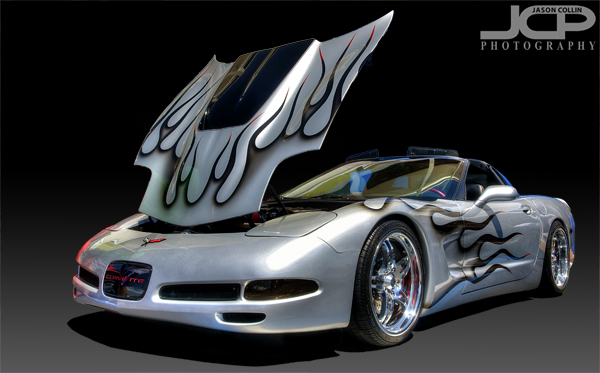
Final fully edited custom silver Corvette - Nikon D300 Tamron 17-50mm @ f/11 ISO 200 5-exposure HDR - black gradient background added digitallyWhat if you have a great subject to photograph, but a terrible background?  I tell my DSLR photography students that assuming you have a good subject, then what makes or breaks a shot, what sets it apart is the light (lighting) and the background.  For this shot the subject is a really cool custom Corvette.  However, the background was horrible and I could not use depth of field techniques to just turn the background into beautiful bokeh because the subject was too close to the background, at least if I wanted to photograph the entire car, which I did.  So, to make the shot usable I opend up my digital photographing editing toolkit.

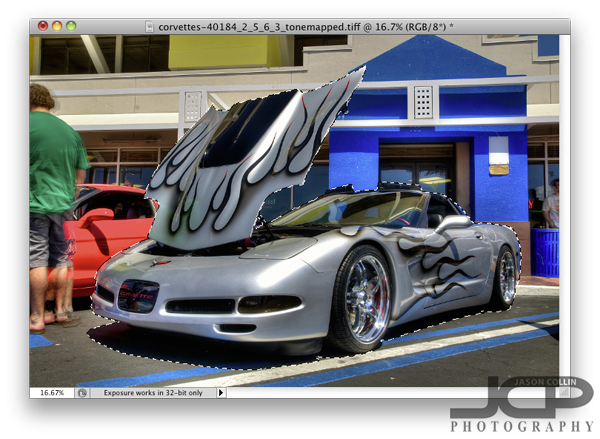
So what did I do first after processing the HDR image and do a few little minor edits?  I loaded the photo in Photoshop (I still use CS5) and chose the Quick Select (W is the keyboard shortcut) tool.  The background looks very busy and it might seem like selecting the Corvette would be difficult, but there are several factors why it was not too tedious.  One is the Corvette is a fairly distinct, blocky object, no lone thin parts or openings.  Second, none of the surrounding colors are similar to the Corvette itself.  The hood did take a little fine tuning to get selected, but other than that it was not too bad.  Notice I selected the naturally existing shadow under the car too.  Once finished I clicked on the Refine Edge option up in the Quick Select menu bar.

In the Refine Edge window you can clean up the extra bit of edging that you do not want as well as export just the selected subject to a new layer, which is what I always do.  Once that is done, I add a new layer to use as a background that I can paint any color.  I usually choose white first to see how it looks and also to make sure I really cleaned up all the edges.  I liked the white background, so I saved a JPG from the PSD project.

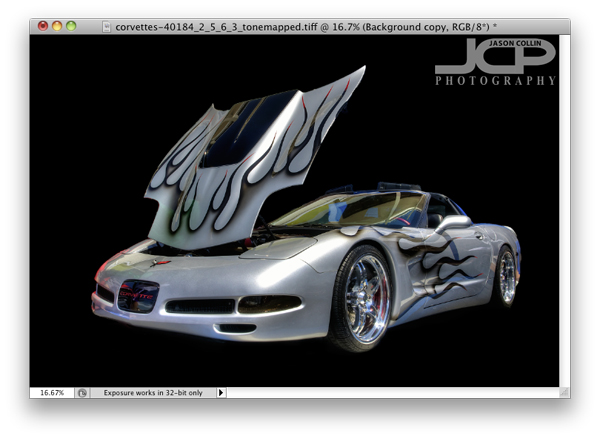
Next I just painted over the white background with the Brush Tool at 100% opacity black.  Right away I liked the black background better as I thought it made the silver Corvette pop out.  The black background caused the shadow to become invisible and kind of made the shot look a little two dimensional, so the final touch was adding a 40% opacity vertical gradient only from the mid-height point of the image.  

This process can of course be used for any subject with a variety of digital or real backgrounds.  So the next time you see a really cool subject, but are disappointed by the background, be sure to still make the shot in the field knowing you can using a few Photoshop techniques to produce a final image you will be happy with.