Photography Tips

Color Efex Pro 3 - Make Fake Autumn in the Park

Kiki running on grass turned brown by Color Efex Pro 3 - Nikon D300 Nikkor AF-S 105mm VR micro f/2.8G @ f/2.8 ISO 400 1/800thI really like that Florida is such a green and lush place nearly year round.  This, however, means there is a near complete absence of autum colors.  At Walsingham Dog Park last weekend, even though it was in the second half of November, all was as green as always.  However, as you can see, Kiki is running on brown grass.  This transformation was done with just one mouse click.

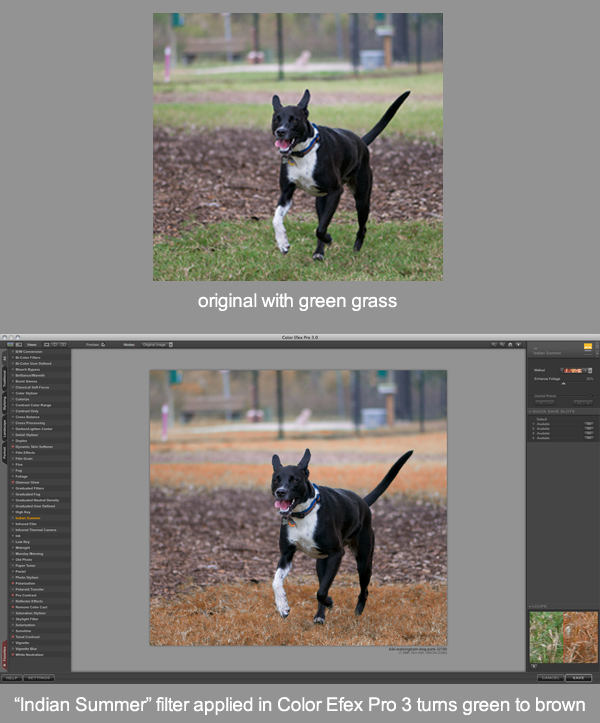
I really recommend the plugin app Color Efex Pro 3.  I have it for Aperture 3 and use its filters on everyone of my photographs.  It is very easy to use wiht a list of filters on the left that are applied with a single click.  The effects can be modified down to very fine details if desired by using the fine tuning controls on the right column.  The "Indian Summer" filter does just one thing - turn greens to browns.  So with just the application of that single, simple filter, photographs can have that autumn look to them no matter what time of the year they were shot.

Kiki at Walsingham Dog Park - Nikon D300 Nikkor AF-S 105mm VR micro f/2.8G lens @ f/4 ISO 200 1/500thThe green leaves that make up the bokeh of this shot were made to look like autumn colors once again by applying the "Indian Summer" filter in Color Efex Pro 3.  As you can see, Kiki's markings and collar retain their correct colors since none of them included green.

Vivid St. Petersburg Florida Downtown Skyline at Night

St. Petersburg Florida downtown skyline at night from The Pier - Nikon D300 Tamron 17-50mm @ f/11 ISO 200 20 sec mounted on Induro CT214 tripod with Nikon MC-30 cable releaseIt is easy to make photography all about handheld daytime shots.  After all, one is outside more during the day than at night and cameras are mostly conveniently held in hand.  This is all the more reason to venture out at night, and all the more reason to buy a good tripod.  Want to do something radical with your photography?  Go out at night.  Put your DSLR on your tripod and leave it there.  These two actions will have dramatic effects on both how you make photographs and the photographs you produce.

Photography tip:  shoot at night; shoot on a tripod

Things are calmer at night, at least in St. Petersburg.  Making a photograph using a tripod is a calmer way of producing a shot than handholding the camera.  Night photography requires very long shutter speeds.  For the above image I kept the shutter open 20 seconds.  You cannot just go around shooting willy nilly when just one shot takes 20 seconds.  This is a good thing.  

Working at night on a tripod requires a lot of setup and previsualization before pushing the shutter.  I have not shot at night much in the past myself, but am really liking it and plan on doing it more, especially since earlier this year I bought a "no compromises" tripod that is simply a pleasure to use.  This kind of tripod just plain makes photography more fun.  Does it cost $600 for such a tripod?  Yes, it does.  Are there any cheaper "no compromises" tripods out there?  No, I could not find one.  Was it worth it?  Absolutely.

Please link to your night photography images in the comments below. 

  • Inquire about licensing or purchasing a fine art print of the above image
  • Read more photography tips
  • Reserve your own 1-on-1 DSLR Photography Lesson with Jason today!
  • Nikon SB-600 Speedlight DSLR Photography Lesson St. Petersburg Florida

    Sunil with very useful kneepad after practicing using his Nikon SB-600 Speedlight during our photography lesson in St. PetersburgFriday wrapped up a crash course in DSLR Photography with Sunil as he took his fourth lesson and seventh and eighth hours of 1-on-1 instruction.  Our first DSLR Photography Lesson on Monday covered the typical topics I do with any person on a first lesson.  The second was on night photography.  The third was exclusively using a 50mm lens.  This final lesson was all about how to best use his Nikon SB-600 Speedlight for portrait photography.

    We met at the same spot as all the other lessons, in front of the Museum of Fine Art in downtown St. Petersburg, although on a Friday afternoon the area is much, much more lively than on any other week day.  I had Sunil mount his SB-600 to the hotshoe of his Nikon D50 and using two lenses, an 18-55mm and a 70-300mm, we practiced how to get the most out of on camera external flash.  We used the banyan trees on Beach Drive, then the covered walkway by the Ovation Building before ending up by the St. Pete waterfront.  

    It was a good week with Sunil who I got to know a little bit as I shared a lot of my photography knowledge with him.  I look forward to seeing how his photography grows.

    50mm DSLR Photography Lesson in downtown St. Petersburg with Sunil

    Sunil using his Nikkor 50mm f/1.8D as I photograph him with my 50mm f/1.8D lens!Sunil continued his DSLR Photography Lessons this week with me with a 50mm lens only lesson in downtown St. Petersburg.  I really like this type of lesson as using the smallest and lightest lens made is a very liberating feeling due to freedom of movement, a fixed focal length and the ability to produce bokeh at will.

    Despite only using our Nikkor 50mm f.1.8D lenses all afternoon, we still managed to cover quite a few photography styles.  We returned to motion blur practice once again, only this time during the bright afternoon sun.  We also mixed in a little architecture photography.  Still, the majority of the lesson was spent practicing how to compose and create shots using a very shallow DoF (depth of field/focus).  

    Tomorrow for our fourth of four lessons we will focus on using external flash for portraits.

    DSLR Night Photography Tripod Lesson in St. Petersburg with Sunil

    From the top of The Pier Sunil sets up a long exposure cityscape shot - St. Petersburg Florida DSLR Photography LessonsOn our second of four DSLR Photography Lessons I met Sunil at The Pier in downtown St. Petersburg for a night photography themed lesson covering:  long exposure cityscapes, car light trail shots, motion blur shots and abstract bokeh shots.  That made for a content packed 2-hour lesson!

    It being a Tuesday evening we had The Pier to ourselves and made exposures of the downtown skyscrapers as long as 1 minute 13 seconds.  Using both a wide angle and a telelphoto lens I showed Sunil how to get a variety of cityscape shots adjusting the exposure time to produced the desired amount of ambient light to complement the lights from the buildings.

    We also experimented a bit while on the trolley back into town with surprising results.

    For our third lesson it will be all about using a 50mm lens.

    The Pier Trolley warp through St. Petersburg

    On The Pier Trolley in St. Petersburg Florida - Nikon D300 with Tamron 17-50mm lens @ f/11 ISO 200 10 sec on Induro CT214 tripod with cable releaseThe results of this photograph were a complete surprise.  After the ten second exposure when the image popped up on the back of my DSLR I said, "wow."  I was in the middle of teaching a DSLR Photography Lesson at The Pier.  The student and I were up on the top of The Pier making long exposure night cityscape shots.  We came down to wait for the trolley and prepped to make light trail shots once we got back to Beach Drive where there were more cars.  While on the trolley I just casually stood my tripod up.  I decided to push the shutter on the cable release.  The above shot was the result.  

    Photography Tip:  make a shot when you would never think to

    If I had collapsed my tripod legs and had it and the camera leaning up against my shoulder as I normally would have when on the trolley, this shot would not exist.  If I had not thought, "what the heck, I'll just push the shutter and see what happens," there would be no shot like this.

    Now, on my own time I will return and take the trolley and on purpose try to make even better shots than this as I think the results are super cool and I am sure with a few improvements in technique and settings it can be done.  Once I do that I will post again detailing the technique I used.  I cannot wait! 

  • Read more photography tips
  • Reserve your own 1-on-1 DSLR Photography Lesson with Jason today!
  • Learn more about the lessons
  • Nikon D5100 DSLR Photography Lesson with Shaye in St. Petersburg Florida

    Shaye with her new Nikon D5100 in Vinoy Park St. Petersburg FloridaI met new student Shaye on a very sunny Florida autumn (but still hot!) afternoon for our first DSLR Photography Lesson.  She recently got a Nikon D5100, making the leap to the DSLR world.  I introduced Shaye to all the photography vocabulary and concepts I view to be the minimum to start making good photographs on purpose.  I told her not to worry though, there are only four:  aperture, ISO, WB and focus mode.  Then, if the light and subject do not change, not even all of those settings need to be adjusted that often.  It is true photography is a complex art, but the number of things one has to balance to be good at that art are not as numerous as one might think.

    We made our way out to Vinoy Park for the last quarter of the lesson and were treated to some very close swimbys by a pair of dolphins.  Despite trying to predict where they would surface next, we were unable to capture them in frame.  Two years ago I was at the exact same spot and was able to make a dolphin surfacing shot (see here).  

    I covered a lot of photography topics during our 2-hour lesson and Shaye showed good understanding of how to start putting them all together in order to be able to make a satisfactory photograph in any given shooting situation.  She has only one lens now so through our discussions during the lesson it seems the next best lens for her would be a 50mm f/1.8 lens.  I always get excited anytime someone gets new gear, even if it's not me!

    I look forward to seeing how Shaye applies the techniques I taught her today as she photographs her dogs and children.