Photography Tips

Introduction to Photoshop CS5 Basics & Keyboard Shortcuts with Ed

Grand Tetons photograph by Ed, editing by Jason - the lens correction filter in Photoshop CS5 sets things straight 

I received a phone call from Ed all the way in Jacksonville (about 3 hours away) asking about taking extended 1-on-1 Photoshop CS5 lessons.  I am not a certified Photoshop expert or anything like that so at first I wanted to make sure he was not looking to learn how to do something like someone's face and put it onto another person's body.  My Photoshop skills lie mostly in the areas that pertain to editing digital photographs, not graphic design.  After talking for a few minutes though I realized that what Ed wanted to learn I could most definitely teach.  We booked two lesson sessions, one for today and another for tomorrow.

Ed had his own photos to use during the editing lesson and I was pleasantly surprised to see the Grand Tetons.  Florida photographers of course have no local opportunities to photographs mountains of any kind.  Ed's photographs already looked good, but there is almost always something that can be done to improve any photograph, and for sure any published or portfolio photograph by a serious hobbyist or a pro has had at least some editing done to it.  I am not afraid to say that editing is often 50% responsible for the final look of a photograph.  

The example above did not need that 50% level of editing.  I showed Ed my workflow which starts with cropping (I cropped the photo even more here than I did during the lesson to better show the edits we made) and then removing any dust spots on the sensor that appear as dirt blemishes in the photo by using the healing brush (keyboard shortcut - j).  Then I taught how to use the quick select tool (w) to highlight only the mountains for a contrast adjustment.  Then the foreground grass and fence were selected for a color balance boost.  Lastly, we used unsharp mask to increase the overall sharpness of the image resulting in more defined blades of grass and details in the fence and mountains.  

Tomorrow we will move on to editing portraits and using layer masks.  

  • Reserve your own 1-on-1 DSLR Photography Lesson (shooting or editing) with Jason today!
  • Learn more about the lessons
  • Browse past lessons with all of my students
  •  

    --Professional Model DSLR Photography Lessons now available!

    DSLR Photography Lesson with Alok & his Canon 60D

    Alok with his Canon 60D at the end of our DSLR Photography Lesson in downtown St. PetersburgWith the sun setting earlier and tempertures only at hot and not broil, DSLR Photography Lessons on weekday evenings are starting earlier.  I met new student Alok at 5pm in downtown St. Petersburg.  He was no longer happy with the results from his point and shoot camera so he went right from that to a Canon 60D!  My 1-on-1 private lessons are exactly designed to help someone bridge that large gap between using a camera on auto-everything to using a DSLR with auto-nothing.  Although there is a good amount to learn at first, it does not necessarily need to take a long time to go from brand new DSLR owner to skilled photographer using manual mode.  

    Case in point, Alok showed he was quick on the uptake on how to correct overexposed images by manually adjusting shutter speed and aperture.  We started out using aperture priority mode, but in the early evening light, a dark subject (a tree) and a very pale white-gray sky was too tricky for his Canon 60D's meter to expose correctly.  The sky was coming out blown out.  So by switching to manual mode and increasing the shutter speed from a glacial 1/20th of a second to 1/100th of a second, the sky was no longer blown out, though at a bit of a tradeoff in that the tree was now darker.  Still, as a photographer, I want to make that choice myself, not leave it up to the camera to decide for me.

    Alok only has one lens now for his Canon 60D, a Sigma 18-50mm f/3.5-5.6.  This lens is a good workhorse choice, but to get the kinds of photos he told me he would like, he will definitely need a longer lens around 70-200mm.  I also advised him to invest in an external flash since he will be doing so much indoor shooting.  

  • Reserve your own 1-on-1 DSLR Photography Lesson with Jason today!
  • Learn more about the lessons
  • Browse past lessons with all of my students
  •  

    --Professional Model DSLR Photography Lessons now available! 

    Photography Tip - strong photographs come from confidence

    Photography strength, like many other things, comes from confidence - Nikon D300 with Nikkor 50mm f/1.8D lens @ f/2.2 ISO 200 1/1250thRecently I have had DSLR Photography Lesson students who have wanted to go beyond just knowing how to use the basic functions of their DSLR.  Yet, they are still at the very beginning of understanding photography and how to make images with confidence.  

    PHYSICAL CONFIDENCE

    I was surprised to find that for some people there is even a lack of confidence in holding (and using) their gear at a physical level.  From the very first photography lesson with anyone, I teach how to properly hold a DSLR.  Then I show them how to properly stand.  Then I often tell them to get rid of the flip-flops and where proper shoes (like these).  Having a confident grip on your DSLR and maintaining a strong stance are the very first things needed in order to achieve an overall confidence level.

    When I grip my Nikon D300 and pull it up to my eye and look throug the viewfinder, something clicks inside of me.  It makes me feel stronger.  Just before doing this, I was only standing somewhere.  With camera to my eye, now I am going to be looking for and making photographs.  To give an example, a few weeks ago I was at a networking event, a place I do not feel confident at all and mostly feel uncomfortable.  I enter a room filled with people I do not know and am only there because hopefully I can meet someone who needs my photography services or can refer me to someone who does.  It is my least favorite aspect of being a professional photographer, the "hustle" to book jobs.  After semi-painfully making small talk with a few people, I went off to a corner of the room and pulled out my D300.  Instantly I had purpose and confidence and felt totally comfortable.  I only took three shots of the room, but that was enough.  

    The rest of physical confidence with your gear comes from being able to make a wholesale change of settings (aperture, shutter speed, white balance, ISO, focus mode) in 5 seconds (or so, depending if your camera has the ergonomics to do it).  I can change any of those five settings without really even looking, or better stated without having to remove my eye from the viewfinder.  If you have to hunt around your DSLR body to change any of those five things, then you cannot have confidence in using your gear.  You must learn how to change any and all of those settings as quickly as you can until you can do so almost without looking.

    EXPOSURE CONFIDENCE

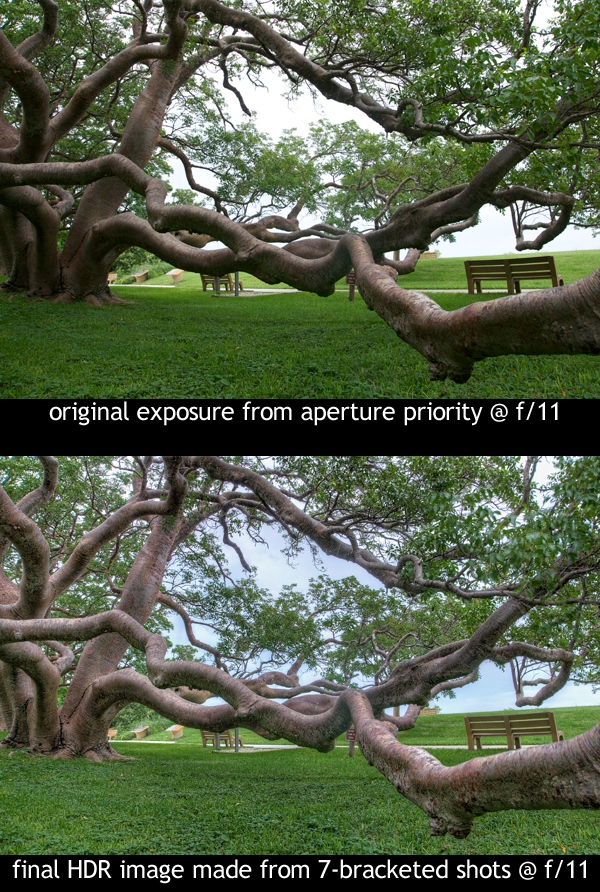
    To be able to quickly change the above five settings, one must also have exposure confidence.  This type of confidence will take much longer to achieve than physical confidence, though it need not.  What is needed to produce a good exposure can be explained in one minute.  To be able to produce consistently well exposed images may take thousands of practice shots.  Students often ask me, how do you know to start out at such and such settings.  I answer, "because I have shot in light like this many times before."  The more time spent shooting, the more experience gained, then the more your exposure confidence will grow.  If you are not confident about your settings before you push the shutter, then you will never on purpose create a great shot.  If it happens, it will only be by luck.  This does not mean that a confident photographer always produces a great exposure on the very first shot, but it does mean that within 2 more shots he/she will.  

    CREATIVE CONFIDENCE

    Once you no longer have to worry about how to hold and use your gear, and how to get a good exposure, the last area of confidence to work on is creative confidence.  It is extremely hard to be able to produce creative photographs while searching for how to change your aperture and then not even being sure what aperture you should change it to.  Creative confidence starts when you approach a shot with physical confidence, then within 2 or 3 shots get your exposure and other settings locked in so you are confident in your exposure, which now frees you to just focus on composition, posing, framing, etc.  At this point, you will be able to consistently and repeatedly produce satisfying photographs. 

  • Reserve your own 1-on-1 DSLR Photography Lesson with Jason today!
  • Learn more about the lessons
  • Read more photography tips 
  • 50mm DSLR Photography Lesson at a St. Petersburg Florida Marina

    Pam showing very good portrait orientation holding technique with her Canon 60D during our 7th photography lesson!For our seventh DSLR Photography Lesson I met Pam in the usual downtown St. Petersburg spot, but thanks to her mother-in-law, who has a sailboat docked at a nearby marina, we were able to shoot from a unique spot on the southern waterfront area.  A huge thunderstorm also passed harmlessly by at the start of the lesson, leaving us free to explore new shooting locations among the long and narrow piers of the marina.  

    This was a 50mm only lesson, and Pam kept it secret from me that she upgraded her Canon 50mm f/1.8 lens for a Canon 50mm f/1.4 lens since our last 50mm only lesson!!  When a student gets new gear for me it is almost as exciting as if I got some new gear myself!  Pam wanted a 50mm lens with better build quality, which the Canon 50mm f/1.4 provides with a metal housing and an silent focusing motor.

    A unique vantage point for photographing the new Dali Museum - Pam with her Canon 60DThe marina provided unique views of both The Pier and the new Salvador Dali Museum.  The setting sun had plenty of clouds around it producing great dusk light for us to photograph both of them in.  Pam now has all the photography gear she needs to produce the shots she wants and during our thirteenth and fourteenth hours of instruction she is beginning to understand and realize the settings she needs to change in order to correct exposure mistakes, while developing her own composition style.  

  • Reserve your own 1-on-1 DSLR Photography Lesson with Jason today!
  • Learn more about the lessons
  • Browse past lessons with all of my students
  •  

    --Professional Model DSLR Photography Lessons now available!

    The advantage of using HDR processing in photography

    Over the past few years HDR processing has becoming very popular.  A term has even been coined for photographers who first discover HDR then basically only ever make HDR images from then on, "falling into the HDR hole."  It took me a long time to come around to realizing the benefit of HDR because, frankly, all the HDR images I saw online I thought were horrid, and I still personally do not care for a majority of HDR images I see.  This is of course a heated topic in the photography community.  However, for this photography tip, I just want to demonstrate the power HDR has to produce very detailed & dynamic images.


    Many times, using aperture priority mode will result in a very good looking image.  The top photo is the result of setting my Nikon D300 to f/11 in aperture priority mode (A - Nikon, Av - Canon).  Aperture priority produced an ok looking image.  I set my focus point on the middle elbow of the lowest branch using matrix metering mode.  Thus, the priority for the sensor was exposing the tree well.  You can see pretty good detail in all the tree branches, the grass and even the leaves.  However, there is virtually no detail in the sky at all.  Using a single exposure, one has to choose whether to expose for highlights or shadows, and if the highlights are much brighter than the shadows, one of them will have to be sacrificed to a certain degree.  In this case, the sky was sacrificed in order to expose the tree better.

    HDR processing overcomes this by using a series of bracketed shots, some overexposed and some underexposed along with the base image (what aperture priority thinks is best).  For this Gumbo-limbo tree shot, I took 7-bracketed images, of which you can see the brightest (+3 exposure) and the darkest (-3 exposure).  I ommitted the other two exposures for blog post space reasons, but those would just be a little less bright and a little less dark.

    Using Photomatix Pro 3 to combine all seven of those photographs, taking the best exposed parts from each, the final HDR image is able to show the tree in even more detail than the single aperture priority exposure shot and also detail and color in the sky as well.  Therefore, when trying to photography a scene that has a high dynamic range (HDR), taking a bracketed series of shots and combining them into one final HDR image can produce results that no single exposure can.  This is the advantage of HDR processing.

    DSLR Photography Lesson Night Tripod Instruction with Pam & her Canon 60D

    The top of The Pier offers a great vantage point for a sunset to twilight DSLR Photography Lesson in St. PetersburgFor our sixth DSLR Photography Lesson I met Pam at the usual spot in downtown St. Petersburg, each of us with DSLR, tripod and cable release in tow for practicing twilight and night photography.  I finally was able to figure out how to unlock the focus point in her Canon 60D viewfinder without having to go inconviently into the menus to do so.  Pam said, "I just learned something new."  She then said how her mother told her that if she learns at least one new thing each lesson, then it's worth it.  I thought to myself, "hmm, $75 to learn how to move the focus point!"  Of course though we did practice and hopefully learn a lot more over the course of the 2-hour lesson.

    Being able to easily move the single focus point throughtout the frame in the viewfinder is especially useful when working with a tripod.  Once you frame the shot how you want it, the best place to set the focus may not be the dead center.  So instead of having to set the focus and recompose again, just being able to direct the focus point to the ideal location for a given shot in the viewfinder is a huge advantage.  Deep in the settings menus of her Canon 60D we found the ability to unlock the focus points.  Many other cameras have a dedicated button on the back to lock or unlock the focus point.  Check your manual if it is not intuitive for how to move your focus point with the D-pad on the back of your DSLR.  

    For once Pam and I also did not have to dodge any passing thunderstorms and The Pier was surprisingly free of people for a Thursday night.  We photographed in peace from dusk to nightfall using manual mode to get the exact exposure we wanted.  One time, to Pam's delight, several cars drove down the causeway to The Pier allowing her to get light streaks in her long exposure shot.  

    For our seventh lesson, we will return to using our 50mm f/1.8 lenses starting out in a bakery Pam has raved about.  Hopefully they will have some free samples!

  • Reserve your own 1-on-1 DSLR Photography Lesson with Jason today!
  • Learn more about the lessons
  • Browse past lessons with all of my students 
  •  

    --Professional Model DSLR Photography Lessons now available!

    DSLR Photography Lesson with Marcia & her Canon 7D in St. Petersburg Florida

    Marcia on a new swing in downtown St. Petersburg with her Canon 7D during our photography lessonI met new DSLR Photography Lesson student Marcia for a rare Saturday morning lesson in downtown St. Petersburg.  She has owned a DSLR for awhile, having previously shot with a Canon 30D before getting the new Canon 7D.  She is even personal friends with Scott Kelby!  Marcia has a bag full of gear:  3 lenses, a tripod, external flash, etc. but for the first lesson we concentrated on the faily standard focal range of 18mm to 200mm which was covered entirely by her Canon 18-200mm f/3.5-5.6 IS lens.  

    I taught Marcia my 4-settings method of producing the correct exposure for any given type of shot ranging from midday sunny widangle shots to being able to eliminate a distracting background to produce a good looking portrait anywhere.  Despite the strong sunshine, thunder rumbled from somewhere so we concluded the lesson under the safety of the big kapok silk-cotton tree beside the Museum of Fine Arts.  Presumably the museum put up the new swing hanging from one of the tree's large branches which makes for a nice prop for portrait practice.  Only using her external flash for for a few minutes, Marcia realized we could have an entire lesson just on it.  I said that is exactly right, as the first lesson usually covers a broad topic range, with each subsequent lesson focusing on one particular area of photography.

    I look forward to seeing Marcia's photos of her poodles and travel related images she likes to make.

  • Reserve your own 1-on-1 DSLR Photography Lesson with Jason today!
  • Learn more about the lessons
  • Browse past lessons with all of my students 
  •  

    --Professional Model DSLR Photography Lessons now available!