 Florida high school baseball action shot using aperture priority - Nikon D300 Nikkor 80-200mm @ f/4 ISO 320 1/3200I am a self-taught photographer with a careful ear for picking up photography knowledge from a variety of sources. If you browse my work you can see that you can teach yourself to make photographs that people will eventually pay you for. However, I spend a long time grinding away teaching myself, starting with making thousands of images in Japan over a 6-month period when I first got a DSLR, then for several years back here in Florida. I would not recommend this method! That is why I have been offering 1-on-1 photography lessons to teach people in 2-hours what it took me 2+ years to formulate and define. Taking a lesson or class from a competent photography teacher is a great way to jump start your shooting skills.
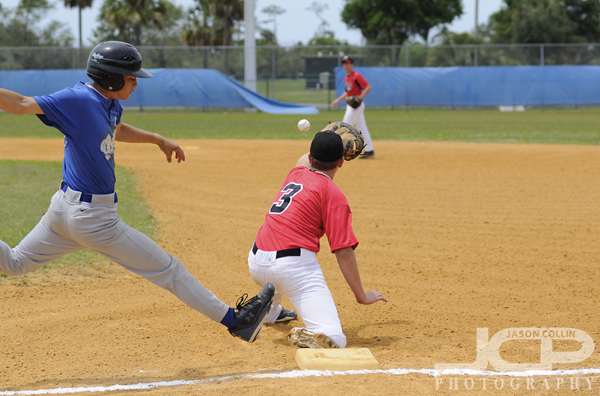
So the weekly photography tips I post on this site are part of sharing the practical photography knowledge I gained grinding through those years out in the field, and the knowledge I continue to increase by now shooting paying jobs as a full-time pro photographer.
In this post you can see action and sports shots that span this window of knowledge.
The baseball photo above was made I believe on my very first sports assignment, so you can say it is the epitome of beginner's luck! Looking at the settings I used for the shot I would definitely yell at myself for that now. I was shooting action in aperture priority, probably never the best choice, had my ISO at 320 during daylight, and the shutter speed was way faster than it needed to be.
 Horse jumping in Venice Florida - Aperture Priority - Nikon D300 Nikkor 80-200mm @ f/5.6 ISO 400 1/1600Early on in my time in Florida I also photographed horse jumping a good bit. You can see by my settings I was making progress, even though still using aperture priority mode. My ISO was still above the minimum even during daylight, but if I recall at that time I thought I needed that very fast shutter speed of 1/1600th to freeze the action, and to get a good exposure I had to increase the ISO. Clouds would come and go and settings often needed to be tweaked, but choosing aperture priority and letting the camera adjust the shutter speed on the fly was definitely not the way to go. I should have been using shutter priority mode.
 Triathlon cycling in St. Petersburg Florida - Manual Exposure - Nikon D300 Nikkor 80-200mm @ f/4 ISO 640 1/1250Now we are jumping ahead two years to when I photographed the St. Anthony's Triathlon in St. Petersburg Florida. I was now comfortable and competent shooting action & sports in any exposure mode. Why did I choose manual mode then? At this time the cyclists were coming by in consistent light (no sun going behind clouds). I was photographing them as they passed by the exact same spot on the road too, therefore there was only one set of settings that produced the best exposure. So I locked those in with manual exposure mode. Why did I use the settings I did? Well the cyclists were going really, really fast so 1/500th was not freezing them, so I used 1/1250. I used f/4 because that fast shutter speed required I let a lot of light in, but I wanted to retain some depth of field and better sharpeness, so I did not use the maximum aperture of f/2.8 of my lens. So having aperture and shutter speed restricted by the nature of the subject matter, to get the exposure I wanted I then had to increase my ISO to 640. This was not the middle of the day, but rather just shortly after sunrise. As the sun went up, I could gradually decrease the ISO I was using.
 Pelican in flight - shutter priority - Nikon D300 Nikkor 80-200mm @ f/5.6 ISO 200 1/1250In this pelican shot you can see my full progress in shooting action shots. I was using shutter priority mode, had my ISO at its lowest setting, and set the shutter speed to be plenty fast enough to freeze even the bird's wing tips. The camera was choosing the aperture for me on the fly, and getting consistent f/5.6 results allowed for very good sharpness and depth of field.
So now I would recommend using only manual or shutter priority mode for sports and actions shots. If no lighting conditions are changing, then lock things in with manual. If lighting is changing due to shifting cloud cover, or the subject moving across different foreground and/or background light, then use shutter priority mode.
Of course the minimum shutter speed to use for any action shots, or any moving subjects, is 1/500th and you must also use AF-C (Ai Servo) focus mode. Both of those are musts. As you can see from my above examples, though, other settings and parameters remain variables, and there may be multiple ways to get the same shot, but some settings combos are much better to use than others!