Photography Tips

Photography Tip - use a single focus point for moving subjects not filling the frame

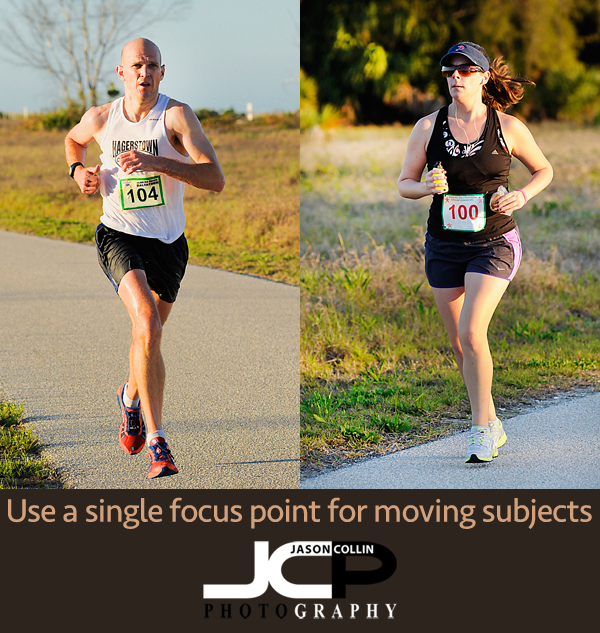
There are a number of reasons why a moving subject may appear out of focus in a photograph.  One reason could simply be because the focus point(s) were not on the subject.  For still subjects, I always use a single focus point.  For moving subjects where the subject is not largely filling the frame, even in the examples above of runners, I use a single focus point as well.  By using a single focus point (in the center) when photographing the runners I could track them as they ran past me and I knew for sure that I was getting them in focus because the only focus point available was right on them.  There was no risk of back-focusing on the background which can happen when using multiple focus points (11, 21, 51, etc).  In this case, I did not want the camera trying to pick out the subject from the background which is what happens when using multiple focus points.  I selected a single focus point, kept it center, and kept that locked onto each runner.  Of course I was using AF-C (One Shot) focus mode and a minimum shutter speed of 1/500th--the other two things needed to have any chance at freezing of moving subject in a photograph.

So if you find you are having trouble getting a moving subject in focus (or even a still subject), use a single focus point (often in the center) and put it right on the subject you want to be in focus in the frame.  

1-on-1 Nikon D5300 DSLR Photography Lesson in St. Petersburg Florida with David

Dave showing great portrait orientation shooting form with his Nikon D5300 during our photography lesson in downtown St. Petersburg FloridaI met David in downtown St. Petersburg Florida for our 1-on-1 DSLR Photography Lesson on a February Saturday morning with very changing weather.  He received the photography lesson as a gift certificate present from his wife to help him get started in the DSLR world with his newly purchased Nikon D5300.  This was my first time with this very new Nikon DSLR and I would have to say I was disappointed by its lack of dedicated buttons.  Changing the ISO and the focus mode requires going into the menus.  The build quality felt like typical Nikon quality though.  Now that I think about it more, though, no 5xxx series Nikon ever had more buttons, but still I would like to see less menu reliance on a DSLR in that price range.

The lesson began as all first lessons do with me explaining to David in detail my 5-step process for getting a well exposed and sharp shot in any shooting conditions.  After this rain started to fall, but the breezeway in the front of the Museum of Fine Arts was plenty big enough to still practice all we would have had it been sunny.  In fact it allowed us to work on natural light portrait practice a little more than we would have otherwise.  I was able to show Dave the big impact composition has on the overall look of a portrait even with the subject staying in the exact same spot.

I look forward to seeing David's photos and his progress with his DSLR.

1-on-1 Canon 5D Mark III DSLR Photography Lesson in St. Petersburg Florida with Gail

Yours truly as the model for this off camera flash strobist portrait lesson on Sunset Beach Treasure Island FloridaOn a beautiful evening in Treasure Island, Florida I met Gail for an off camera flash portrait lesson on Sunset Beach.  She had found out about my photography lessons doing some online searching and decided to come all the way over from Vero Beach on the other coast of Florida!  We had two lessons.  The first was on the beach at sunset time showing Gail my 2-strobe technique for making off camera flash portraits.  I helped Gail setup her radio triggers and showed her how I position two speedlights for a variety of shots, including the walking one above.  The second strobe is directly in front of me (not visible in photo).

A strobist portrait of my DSLR photography student Gail on Sunset Beach made during our evening lesson.Gail switched out and became the model as I showed her more shooting tips for using her Canon 5D Mark III.  The second part of the lesson was showing Gail my editing workflow and helping her use her MacBook Pro much more efficiently too!  It was very nice to meet Gail and I am flattered she came all the way from the other coast.  She did of course stay a few nights in the area and made a trip out of it as well.

Photography Tip - leave your DSLR camera on!

If my Nikon DSLR was not on and ready I would have missed this surprise chance in Vinoy Park FloridaPoint & shoot digital cameras, especially early ones, really used up batteries a lot.  So much so that people would turn them on and off between shots all the time.  I have noticed this practice continues with some of my DSLR photography students as well.  However, with a DSLR camera, there is no reason to turn it off between shots.  These cameras automatically go into a meter-off (sleep mode) that you can choose to happen in a set amount of time, and with the meter off and the backscreen off, a DSLR uses basically no battery power.  Thus, there is no reason to turn your DSLR off until you are putting it back into your camera bag at the end of shooting.

In fact, this practice of turning off the camera can lead to missing shots.  I was walking along the seawall in Vinoy Park one time and all of a sudden a dolphin surfaced right below my feet!  My Nikon was on and already set in default settings for getting a good shot in the light I was in, which allowed me to in just a split second be able to make the above dolphin photo.  Having to turn my camera on would have caused me to miss it.  Be sure and keep your DSLR on from the time you take it out of your camera bag until the time you put in back in to make sure you are always ready to capture any sudden photography opportunities.

Photography Tip - shoot at eye level to your subject

Seeing eye-to-eye with Kiki (left) and two friends. Shot from one knee at the same eye level as the dogs.One very easy way to start making photographs like a pro is to simply stop only shooting from your own eye level.  Getting down to the same eye level as your subject immediately transform a photograph, for the better.  I often see people in the dog park standing and shooting down on their dogs playing.  That will just show you what you already see when looking at your dogs, so why would you want to see a photograph of that?  Get down on one knee (or your stomach if you have a very small dog!) and suddenly you will see in photographs your dog from a very different perspective.  

In the above photo Kiki is running with two friends.  The expressions on their faces are all very clear and it looks like the dogs are looking right at the viewer of the photo in the eye.  This creates a connection to the subject of the photograph not possible if shot from me standing up over five feet in the air.

The next time you go out shooting trying taking a knee or even lying down to get to eye level and see a world from a new perspective!

Photography Tip - go minimalist with subject & background

Composed and exposed for minimalism in subject matter and background.One way to create visual appeal in a photograph is to compose for minimalism in both subject and background.  This also results in a very clean looking image.  Sometimes the lack of visuals can create a strong visual.  Nothing ruins a photograph like a busy background.  In the above photo instead of showing the sky, I chose settings that totally blew out the sky creating a pure white background.  This allows the old cable tower to be shown cleanly.  Only part of the cable tower was put in the frame to again focus the subject matter and create a minimalist look.  

The next time you go out shooting try composing for minimalism.  This can be done with any subject matter.  

Photography Tip - leave your camera out ready to shoot

Photography Tip - keep your camera on a shelf with lens cap off ready to shoot at any time!If you are not shooting much from home, maybe it is because your camera is packed away in a bag in the closet somewhere.  A very simple way to start taking more photos at home is by keeping your camera out on a shelf, or table, lens cap off, all ready to just be picked up, turned on and shoot.  Just seeing your camera and having it out will remind you, hey I should be taking some photos to keep in practice.  Another reason to keep your camera at the ready is if you are always seeing good photograph opportunities, but miss them because your camera is four steps away from shoot ready.  For example, if I know I want to make a shot of the sunrise, the night before I have my camera out and on the tripod ready so when I wake up, that is one less hurdle to getting the sunrise photos I want.