Photography Tips

Canon T4i 1-on-1 DSLR Photography Lesson in St. Petersburg Florida with Bryan

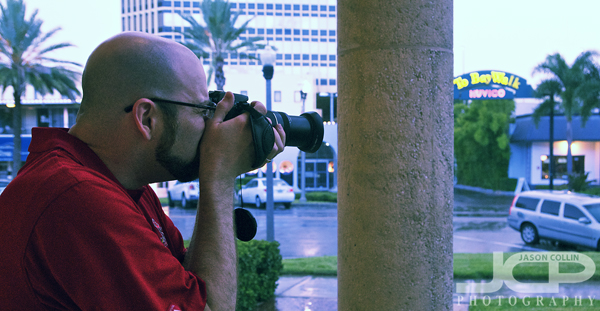
Bryan shooting with his Canon T4i from shelter as rain fell during our 1-on-1 photography lesson in St. Petersburg FloridaIt was sunny when I met Bryan in downtown St. Petersburg for our 1-on-1 DSLR Photography Lesson that he received as a present in the form of one of my photography gift certificates.  As I was talking to him about my 5-step system for shooting in manual mode, well, some rain started to fall.  We were sheltered just fine under the Museum of Fine Arts walkway and still were able to venture out briefly when the rain stopped.  

Bryan was actually already shooting in manual mode, but without a system that can be used repeatedly in any shooting conditions, he was not getting the consistent results he wanted.  So during the lesson I helped him shape his existing photography knowledge in a way that will let him take control over exposure and composition in a more creative way.  I feel Bryan will be able to teach himself and really improve his photography results in a short time.  To end the lesson, in the low overcast light we had the chance to do a little motion blur practice.

1-on-1 Nikon D40 DSLR Photography Lesson with Rhea in St. Petersburg Florida

Rhea still able to smile even during our second info packed 1-on-1 DSLR photography lesson in downtown St. Petersburg FloridaIt was already very warm at 9:30am when I met Rhea for our second 1-on-1 DSLR Photography Lesson in downtown St. Petersburg Florida.  She brought her notebook this time as we reviewed what I taught her during our first lesson a few weeks ago.  After that refresh we started wondering around Beach Drive NE where I instructed her on having to be aware of the position of the sun when shooting during the daytime in Florida.  This means of course your back to the sun, or your shadow pointing at your subject.  This will help get the best exposure results.

We finished the lesson with some practice making portraits in full shade, rather than out in direct sunlight.  This may seem against logic, but in the harsh midday sun significant shadows form under the subject's eyes and neck.  Shooting in shade allows a diffused look to the light on the subject with no strong shadows.  Of course all this can be avoided by just shooting in good light, but that is not always possible.

Photography Tip - shoot vertical subjects in portrait orientation

Photography Tip - for vertical and/or tall subjects shoot in portrait orientationWhen I first moved back to Florida some years ago now, I went to an early morning photo review with a local photography Meetup group.  I brought my print portfolio with me and the piece of feedback I received that stuck most in my mind was that I had no shots in portrait orientation.  My print portfolio was of course a very small sample of my work, but from then on whenver I went out to shoot I had in my mind think about shooting in portrait orientation.  This means holding the camera vertically, rather than the more natural horizontal (landscape orientation) position.

Since that time my photography experience has greatly increased and I have been teaching photography lessons for years.  In those lessons I see the same thing with many students, almost never shooting in portrait orientation.  One way to start to train yourself to shoot in this orientation more is to first try and photography vertical subjects in it.  

In my above photo of a flag pole, the tall nature of the subject naturally fills the frame from top to bottom when shooting in portait orientation.  I chose to make the subject off center as well with the flags blowing into the empty (negative) space.  Had I made this shot in landscape orientation, there likely would have been too much negative space resulting in the subject getting lost in the frame.

Canon M & Canon 5D Mark III DSLR Photography Lesson in St. Petersburg Florida

Lois and Isaac with their Canon cameras on a bit of a rainy photo lesson in downtown St. Petersburg FloridaOn a somewhat rainy evening last week I met Lois and Isaac for a photography lesson in downtown St. Petersburg.  They have a big international trip coming up later this year and Lois wanted to get better at using her mirrorless Canon M, a camera I had never seen before.  Isaac had the Canon 5D Mark III and knew how to use it pretty well.  So while learning the tricky Canon M's methods for shooting in manual mode with Lois, I fielded more advanced photography questions from Isaac.  

I am still not sure about micro-four-thirds and other mirrorless cameras.  Their advantage is their small size with an interchangeable lens ability.  They are not good for sports or action due to a number of reasons, but for still subjects in non-dynamic situations (i.e. where you need to often change settings) for someone who does not want to carry a lot of weight, they could be an alternative for a DSLR.  

By the end of the two hours Lois was able to use my 5-step method for getting a well exposed and sharp (still) photo with her Canon M by using its touchscreen to change the necessary settings.  This will allow her to not have to rely on the auto modes and be able to shoot in a more creative way.

Photography Tip - anchor your photo composition with a foreground subject

Use a foreground object to anchor the composition of your photographs.One way to improve photograph composition is to use an anchor in the foreground.  This foreground object will give the viewer a place to start looking and then keep their eyes on the photograph.  If the sailboat in the above shot was not there, then it would just be a loose photograph of some water and sky with nothing to grab the viewer's eye.  Having an anchor adds strength to an image.  In composing landscape shots especially, try to include an anchor in the foreground.

1-on-1 Nikon D4 DSLR Nikkor 24-70mm Photography Lesson with Stacy in St. Petersburg Florida

Out scouting portrait locations with Stacy & her Nikon D4 in St. Petersburg FloridaI met Stacy again this week in downtown St. Petersburg for our 13th 1-on-1 photography related lesson (some computer based lessons for editing & workflow).  Since last week she had used her Nikon SB-910 for the first time to photograph an indoor event organized by friends, so we began by reviewing those photographs and me reminding her that if the subjects appear to be too bright due to flash, either lower the power of the flash, or use a smaller aperture.  Changing the power on the SB-910 is not as straightforward as it has been on past Nikon speedlights, part of an overall over complicating of functions on their gear for no reason (see also how to change focus modes on current Nikon mid to pro bodies).  

After practicing how to use her speedlight more effectively, we actually went out scouting some locations in the downtown St. Pete urban area for portraits Stacy wants to make of her daughters later this year.  So I took her to my favorite brick wall location, tiled wall location and also a very gritty alley for as urban of a background as you can get!  Next lesson we will return indoors for more workflow related photography learning.

Photography Tip - which lens do I use?

These are 3 of my own lenses, how do I choose which one to shoot with?My photography students often ask me, "which lens should I use?"  To me that question does not make much sense because there is usually no question about which lens to use.  Plus, without a lot more information, the question cannot even be answered.  The real problem is that many people start by asking which lens, or which settings should I use instead of starting with, what is the subject?  That is the question that needs to be asked first and answering it makes which lens to use usually pretty obvious.

Once you determine your subject, then simply choose the lens that fits that subject within the framing you want.  If you want to photograph some friends in your living room, it does not make much sense to use a 70-200mm lens does it as you will not be able to fit everyone in the frame.  Likewise, if you want to photograph a mountain top in the distance, using a 17-50mm lens does not make much sense as you will hardly even be able to see the intended subject in the frame.  

So what your subject is, and how much of your subject you want to get in the frame, dictates which lens you should shoot with.