Photography Tips

Photography Tip - shoot slowly after you push the shutter exhale and follow through

Wait to do this until you have at least finished pushing the shutter!

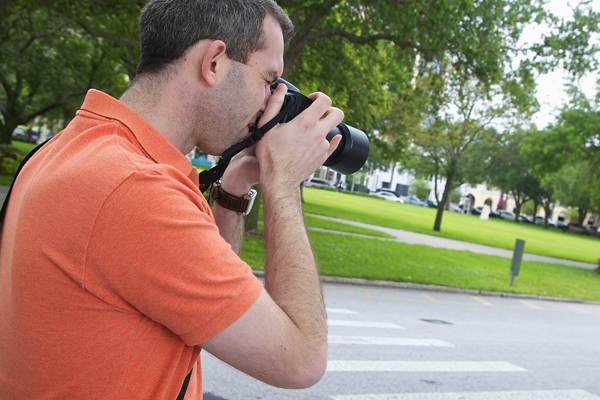
I have noticed when people are beginning to formally learn photography they can be impatient with seeing how their shot came out.  I see this behavior when they are shooting.  It seems almost before they have even finished pushing the shutter they are already looking at the back of their camera to see how bad the shot came out.  I always discourage this behavior and encourage taking your time.  Pushing the shutter on your DSLR, and thus starting the action of making a photograph, is a lot like a swinging motion.  The follow-through is important too.  

So when you push the shutter, push it and follow through by holding the shot, by exhaling, letting thoughts flow through your mind about what you just did, and then review your shot on the back of your camera.  If you are so hastily looking at your shot after you take it then you were not ready in the first place to even push the shutter.  Prepare more before pushing the shutter so you know what to expect after you do.  

Photography Tip - Camera meter is only for ambient light with external flash on

When using an external flash mounted on your DSLR's hotshoe, the camera's meter is telling you the exposure for the ambient/background light.  So if your subject is standing in the shade, then you should meter off of the background light to set your shutter speed.  The aperture setting and speedlight power will be the exposure settings for your subject.  Essentially, the camera's meter does not know you have a flash on and are going to use it to expose the foreground subject (person, etc).  In shade especially, the subject should not be metered off of for setting the shutter speed.  

So when setting up an an external flash shot with it mounted to your DSLR's hotshoe, even before the subject is in place set your shutter speed to expose the background light properly.  Now place your subject where you like and set the aperture and flash power to exposure the subject correctly, and your previously set shutter speed will take care of exposing the background properly.  Try this methodology the next time you use your external flash.  Of course, your DSLR should be set to manual mode, as well as your external flash.

1-on-1 Sony A390 DSLR Photography Lesson in St. Petersburg Florida with Josh

Josh focusing his Sony A390 DSLR during our 1-on-1 photography lesson in St. Petersburg FloridaJosh received a gift certificate from his wife for a 1-on-1 DSLR Photography Lesson which he cashed in this past Saturday.  I met him in downtown St. Petersburg, Florida on a fine spring morning.  It was my first time to get hands on with the Sony A390 DSLR.  Josh had been using it mostly on auto-modes and as happens with such exposure modes was not getting consistent results.  From the start of our 2-hour photography lesson I had him shooting in manual mode to start to take control over his images and be able to get well exposed and sharp shots in any shooting conditions.

There are many things to learn about DSLR photography, from just very practical things like how to safely and properly change lenses.  Then there is how to review images accurately in the field and also how to simply hold a DSLR in the most stable position.  I teach all these things in addition to how to use make a photograph in manual mode.  We also packed in how to control depth of field (DoF) and how to make portraits in the shade.  It was a photography knowledge filled lesson!

Night Photography Lesson with Jim in downtown St. Petersburg Florida

Jim practices handheld night photography shots using a 50mm f/1.8 lens in downtown St. Petersburg FloridaIt has been nearly two years since I first had a 1-on-1 Photography Lesson with Jim.  That one was out in Sawgrass Lake Park.  Our second lesson was very different.  We met in downtown St. Petersburg in the late evening for a specialized night photography lesson, focusing on handheld shots using a 50mm f/1.8 lens.  Jim is a great fan of theme parks and often visits them at night when all the attractions are colorfully lit up.  Downtown St. Pete makes for a passable substitute as many of the restaurants and buildings along beach drive use their fare share of vibrant LED lighting.

Once the sun went down and it was truly night, the settings used for hand holding such shots get pretty set in stone, though not without some room for tweaking.  Basically I instructed Jim to use f/1.8 ISO 800 and 1/60th most of the night.  As some buildings and signs had varying levels of brightness, he could sometimes use ISO 400 and even a few times ISO 200.  Still, without a tripod, night photography even at f/1.8 is going to require high ISOs.

I look forward to seeing what colorful and creative night theme park shots Jim makes on his next trip over to Orlando.

Photography Tip - Posing App for iOS and Android helps photographers

One of the hardest things about making a portrait is often the pose.  Now I like to make as candid of portraits as possible, but not every client has the personality for such a shoot.  Likewise, as a photographer it is not easy to memorize exactly a whole catalogue of poses, and even if you have done so, describing that in words to a client is not so easy.  

This is why I really like the Posing App (available for iOS & Android).  It is a visual way out in the field for me to show clients how to get into natural and attractive poses that will result in great portraits.  The app breaks poses down by the number of people in a shot making it easy to find a collection of poses for the number of subjects.  There is also a tips & tricks section.  Just for how to better pose hands and arms the app is worth it.  

Canon T3i 1-on-1 DSLR Photography Lesson in St. Petersburg with Jahaan

Jahaan composing a landcape shot with her Canon T3i during our 1-on-1 DSLR photography lesson in St. Petersburg FloridaEven though it is still only mid-April, my first 1-on-1 DSLR Photography Lesson with Jahaan and her Canon T3i felt like the first lesson of the summer!  Jahaan likes to make cakes and was not happy with her photographs of them.  She felt they were not preserving the memory of her baking efforts properly.  So she took a general photography lesson with me to learn how to use her Canon properly in manual mode.  She can then take those skills and not only apply them to photographing her cakes, but anything else as well.

Jahaan had heard of most common photography terms, but did not know how they worked together to make a well exposed and sharp photograph in any given shooting conditions.  Having taught hundreds of 1-on-1 photography lessons, my methodology for teaching how to do this step by step is very refined and possible to be understood by even a total beginner.  Of course having some prior photography knowledge helps!

Jahaan was quick to learning her way manually around her DSLR and using the meter and reading the histogram to see how well a shot came out in the field.  I look forward to seeing her cake photographs!

Photography Tip - use your speedlight external flash at 1/4 power manual mode

I use my speedlights at 1/4 power most of the time in manual mode.Speedlights, or external flashes, are great tools and in my view absolutely necessary for every photographer to own.  They are actually very easy to use for the most part.  Current speedlights have TTL (through the lens) modes which are basically automatic modes.  You connect the speedlight to your DSLR's hotshoe, and the camera's meter determine's the power used by the speedlight.  This sounds great, and is convenient, but the problem is often too much power is used resulting in black images.  Why?  Because speedlights need time to recycle their charges between flashes.  The more power used, the longer the time.  

This is why a majority of the time I use my speedlights at 1/4 power and always in manual mode.  At this quarter power setting the speedlight can take a small burst of shots (3+ in a row) allowing me to capture action in events, group shots, etc without having one of those frames be pure black because the flash did not fire due to a long recycle time.  

Try using your speedlight in manual mode at 1/4 power and then compensate for any exposure needs using the settings on your DSLR.  You will get more consistent results and your speedlight's batteries will last longer too!