Photography Tips

Canon T3i 1-on-1 DSLR Photography Lesson in St. Petersburg Dali Museum with Jeannie

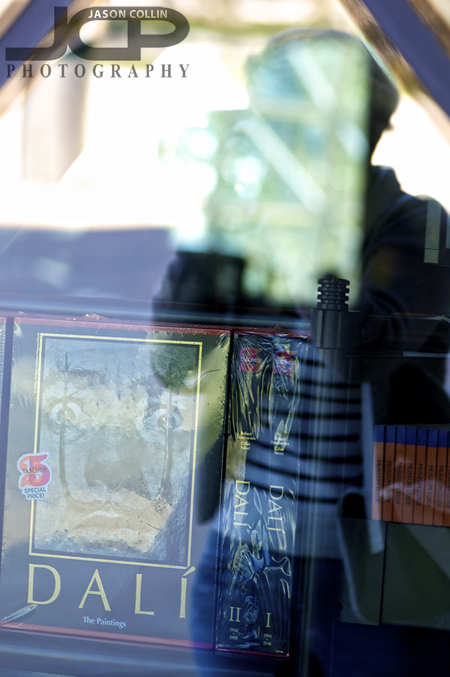
Jeannie in reflection during our photography lesson at the Dali Museum St. Petersburg FloridaAnother location change for our 1-on-1 DSLR Photography Lesson as Jeannie finished up her 4-pack of lessons at the new Dali Museum in St. Petersburg, Florida.  The museum itself makes for many architecture photography opportunities, and the grounds feature a melting clock bench, tree with ribbon messages blowing in the wind among other interesting features.  

Jeannie did get a Canon 430 EX II Speedlite since our last lesson which we used to practice candid portraits in shade, direct sunlight and diffused light.  We also went deeper into composition style and tips for framing a more flattering shot.  

Over the course of her 8-hours of 1-on-1 instruction time I showed Jeannie many of the tools necessary to make successful photographs in any given shooting conditions, be they outdoors or indoors.  I look forward to seeing Jeannie again in the future for more advanced photography lessons.

Photography Tip - make your own bokeh using Photoshop Gaussian Blur

If you have a photograph that you wish had a bokeh (out of focus) background, you can still add one in Photoshop using the Gaussian Blur filter.  This can be an easy way to add a whole new look to a photo.  In the above example of mother and daughter sunset beach portrait, I chose to have the background in detail by using a small aperture and wide focal length.  I like the shot as it is, but I was curious to see how it would look with the background out of focus (bokeh).  The following describes my digital workflow:

  • Use the Quick Select tool to select just the mother and daughter (foreground subject)
  • Choose the Inverse of the selection
  • Apply the Gaussian Blur filter 

In this case, it was a pretty simple process.  I chose to select the people rather than the sky, then do the inverse because I felt that was a simpler selection to make.  For other photographs, you may want to select the background itself if that is easier.  Then you also do not have to select the Inverse of the selection.  

Let me know in the comments below how this bokeh photography tip worked for you.

1-on-1 Canon XSi DSLR Photography Lesson in St. Petersburg Florida with Meredith

Meredith and her Canon XSi learning how to use DoF during our 1-on-1 photography lessonOn a spring Saturday morning I met Meredith with her Canon XSi for a 1-on-1 DSLR Photgraphy Lesson in the downtown St. Petersburg area.  Like many of the people that take my lessons, she had had her DSLR for quite some time, but only had been using it on various auto-modes.  I taught her my 5-step method for making the transition to shooting in manual mode and that there is a definite methodology one can follow to get a well exposed and sharp shot in any given shooting situation.  

Besides how to use the 5-settings necessary for manual shooting, I offer advice and tips on how to manage one's photography gear starting with how to safely change lenses, how to hold a DSLR properly, how many memory cards & batteries to have, etc.  I firmly believe many practices of the professional photography must be adopted even if just going out shooting casually for fun on weekends.  

Photography Tip - show your photos to people online

Digital photography is no doubt a revolution in photography.  There are many reasons for this, but one very big one is that simply more photographs exist because of the ease of making a digital photograph.  Combine this with the existence of the Internet, and in 2013 there are infinitely more photos and more people to see them than there were just 15 years ago.  Any level of photographer benefits from showing her/his photographs online, from the full-time pro, to the budding amateur, to the serious enthusiast.  


REASONS TO SHOW YOUR PHOTOS ONLINE

  • GET FEEDBACK & CRITIQUES

There is nothing like honest feedback on your images to help you improve your photography.  It is easy to fall in love with your own photographs, so often it takes another pair of eyes to point out a few things that could have imporoved the photograph.  Showing your photos online allows a photographer to get the constructive criticism needed to make it to the next photography level.

  • LEARN WHICH OF YOUR PHOTOS OTHERS LIKE

Sometimes I have a pretty good idea how popular a photo will be, however, many times I am surprised by which photo people like the most.  Showing my photos online has caused me to like or "discover" my own photos due to them being popular or liked for other reasons I did not see at first.  If not for showing these photos online and seeing what other people liked, they may have just lied in waste on my hard drive.  Also, you can ask people why they liked a particular photo more than another one and get useful feedback.

  • GET PAID!!

Just from having my photos online and discoverable by Google search, I have made money from selling prints and website usage licenses.  This is like found money to me.  The work has already been done making the photograph, and then by making just a little more effort to show that photo online, each time that is done the potential is created for selling and making money from a photograph.


Why I show my photographs on flickr -- my flickr page

~flickr was one of the original photo sharing websites.  There are tons of users on it and you can search for photos made by a specific camera and lens.  This helped me learn how to use my own gear.  I have sold several photos because people found them on my flickr page.  flickr is also very good for judging how popular a photograph is with a large audience.  There are also flickr groups you can submit your photos to for critique.  I have a pro account and recommend spending that small yearly fee as I usually sell a photo or two that covers that cost anyway.

Why I show my photographs on Google+ -- my Google+ page

~I started using Google+ because a lot of pro photographers were and when it first debuted it quickly became the hot site to show your photos.  Supposedly no one uses Google+ now, but I just heard this past week that it is still very good to post your photos to Google+ because Google gives search result preference to Google+ content.  For that reason alone I will keep using it.  Also, since it is not so populated, it makes it easy to follow the select few pro photographers I like to.

Why I show my photographs on facebook -- my facebook page

~Because everybody is on facebook!  Besides my own website, it is the most powerful online marketing tool for a photographer.  I friend my clients, put the photos from our shoots on my business facebook page and tag the clients in the photos.  This starts a network of their friends being exposed to my work, and their friends, etc, etc.  I also receive a lot of feedback on what is popular and can stay in touch with past clients.  I encourage clients to "like" my business page so they can follow my current work as well.  There is no other indirect way better for keeping in clients' mindview than the facebook timeline feed.

1-on-1 Nikon SB-700 Speedlight DSLR Photography Lesson with Lourdes in St. Petersburg Florida

Up on a parking garage in downtown St. Petersburg for our second photography lesson.For our second of four 1-on-1 DSLR Photography Lessons Lourdes had some new photography gear to debut.  To pair with her Nikon D5100 this time she had a new Nikon SB-700 Speedlight.  So to practice low light photography during the day, I took us to a parking garage in downtown St. Petersburg that offered wide open and close quarter areas.  Building on what we learned in our first lesson, this time I instructed her on how aperture and flash power mostly control the exposure on the subject, while the shutter speed controls the ambient/background light in a portrait using flash.  

This model is all about glamour!As seen in the photo above, I was standing in very low light in the parking garage in front of an open window with a very bright background.  Without using a speedlight, either I would have been a silhouette, or the outside would have had to of been pure white.  Using a speedlight essentially allows for two exposures to be made in one photograph.  This is a powerful tool and skill to have for photography.

Photography Tip - own more than one camera bag

I use this camera bag when bringing my Nikkor 80-200mm f/2.8 lens along.You might have started out with just a DSLR body and a single lens, but chances are, as time has gone on you have accumulated a lot more photography gear.  So when people ask me what camera bag should I get, I usually answer, "you should actually get two bags."  A solid photography tip is definitely have more than one camera bag.  I have only two myself, and I could definitely use a third because neither of my bags can hold all my photography gear for a typical job in a single bag.  

The Lowepro Flipside 200 has been a great bag.  I can hold a lot in its very slim profile.  As you can see it can hold one DSLR body, a 70-200mm f/2.8 lens, a second medium sized lens, a speedlight, and hidden at the very bottom of the bag in a small compartment is a 50mm lens.  It also holds spare batteries, memory cards, camera cleaning equipment and a water bottle (very important!).

My traveling light camera bag is this Lowepro Nova 160 AWWhen I do not need to bring my long Nikkor 80-200mm f/2.8 lens, then I can often get away with just using my much smaller Lowepro Nova 160 AW bag.  Despite its small size, I can still fit a DSLR body, medium sized lens, speedlight and a 50mm lens plus memory cards and extra batteries, and the all important water bottle.  

Having these two camera bags provides great flexibility in how heavy or light I travelBasically, the amount of gear dictates how many bags you need and what sizes.  If you have a lot of gear and one big bag that can hold everything, I recommend getting a smaller bag for times you only need one lens with you.  Likewise, if you just have one big bag and it makes you not want to go out shooting as much because it is too heavy to lug around all the time, a second smaller bag is a must have.

How many camera bags do you have?

Nikon D3100 1-on-1 DSLR Photography Lesson St. Petersburg Florida with Brooke

Brooke tracking a moving subject with her Nikon D3100 during our 1-on-1 DSLR Photography Lesson in St. Petersburg FloridaLast month Brooke's husband took a night photography lesson with their Nikon D3100.  Yesterday afternoon I met her for a more general 1-on-1 DSLR Photography Lesson focused on making the switch from aperture priority mode to shooting using manual exposure mode.  I think by the end of the 2-hour lesson Brooke had successfully made the switch!

Brooke had photography knowledge, but it was not organized in a way that could be counted upon to produce consistent results when shooting in various conditions.  I helped her organize that knowledge and added in key pieces of additional information using my 5-step process for getting a sharp and well exposed shot in any shooting condition.  I started by pointing out that since she was already an aperture priority shooter, switching to manual means only adding one more thing to set yourself, which of course is shutter speed.

I also offered Brooke advice on what photography gear to buy next (50mm lens) and what kind of mindset to have when going out shooting (choose a theme).