Photography Tips

DSLR Photography Lesson Furniture Product Shots 3 light setup

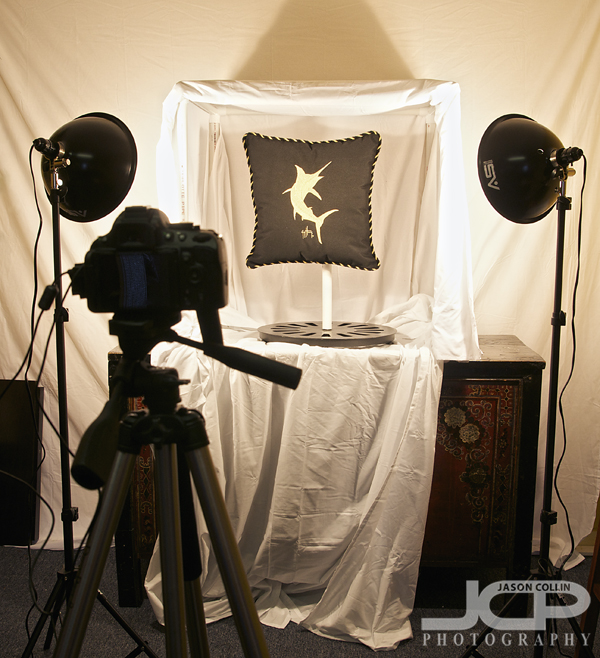
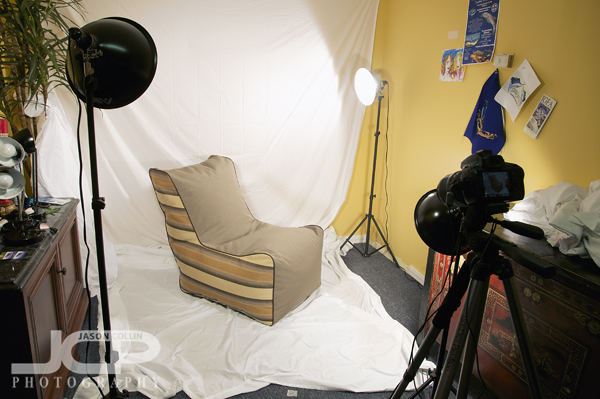
Three continuous light sources made for easy lighting setup with no undesired shadowsEach new DSLR Photography Lesson with Karin we add a little to the complexity of product shot we practice.  This time we needed a setup much larger than that for the pillows we previously photographed.  After some office space rearranging we used all three of her continuous lights for getting only the wanted shadows on a large, stuffed chair to be photographed for use in her website catalog.  This was surprisingly easy as the strobist techniques for photographing people largely apply to continuous light product photography as well.
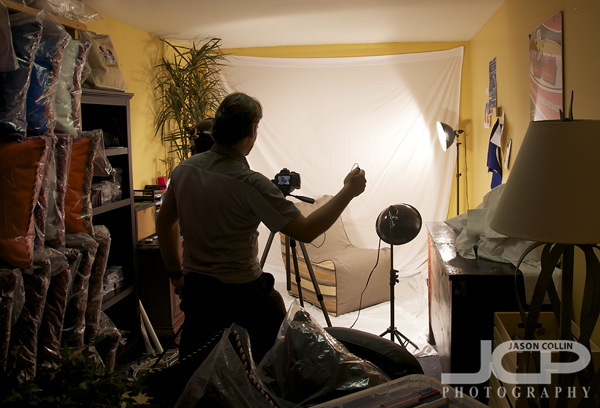
Yours truly demonstrating classic remote trigger techniqueKarin now has all the photography tools to make product photography like this very simple with no mess, no fuss.  Putting her new Nikon D5100 on a tripod, attaching the cable release and using Live View mode to see the image right on the back on the camera, plus using continuous lighting, means once we got all settings locked in and all lights positioned, the settings could be noted on paper and the light positions marked on the floor with tape so that consistent results can be produced shot after shot week after week.  This is the benefit of shooting in studio-like conditions.  

For our next lesson, we may add tethering to our setup so that the images appear instantly right in Aperture 3 for preview on Karin's MacBook.  Exciting! 
  • Reserve your own 1-on-1 DSLR Photography Lesson with Jason today!
  • Learn more about the lessons
  • Browse past lessons with all of my students 
  • DSLR Photography Lesson with Rose and her Canon 50D

    Rose with her Canon 50D Vinoy Hotel in the backgroundMany of my DSLR photography students have abruptly gone from a regular point & shoot pocket digital camera to plunging into the DSLR world.  Then the DSLR sits on a shelf somewhere for a few months due to the initial hurdle in learning how to use it.  This is the exact situation my 1-on-1 private DLSR Photography Lessons are designed to remedy.  I met Rose on a pleasant Monday morning in downtown St. Petersburg for our first lesson.  She was a beginner not even knowing basic photography terms.  By the end of the 2-hour lesson, I had her using her Canon 50D in manual mode!  

    Now, I do not expect Rose to stay in manual mode from here on out, but she took thorough notes (recommended) throughout the lesson carefully noting what aperture, ISO, WB and focus mode we used for the various photography situations we practiced.  Therefore, she does not have to rely on her memory alone the next time she wants to make a shot with bokeh or freeze a fast moving subject.  She can refer to her notes and at least have a starting point for getting the type of shot she wants.  

    Rose, also like many other students, was surprised to learn that buying the DSLR itself (and accompanying kit lens) is just the start of the expense that is actively doing photography.  She was a bit shocked to learn the price of software (she asked about full Photoshop) for editing digital photos, plus that before she heads to New York later this week she really should buy an external flash if she wants to get the best results of photographing her friends & family inside restaurants and other dimly lit places.  I always advise the best value for money solutions, but even those are often several hundred dollar options.  My top advice is learn how to use the gear you have now as best as you can, so that you can clearly see where you have outgrown that gear making it also very clear what you should purchase next.  

    I look forward to seeing Rose's photographs of New York and to helping her use her new external flash! 

  • Reserve your own 1-on-1 DSLR Photography Lesson with Jason today!
  • Learn more about the lessons
  • Browse past lessons with all of my students 
  • Photography Tip - long lens for landscapes

    Nikon D300 Nikkor 80-200mm f/2.8D @ f/8 ISO 200 1/500th - Pelicans in front of new Dali Museum St. PetersburgYou do not need to use a wide angle lens to make a landscape or panorama shot.  For the above photograph of two pelicans out on The Pier with the St. Petersburg waterfront in the distant background I used my favorite Nikkor AF ED 80-200mm f/2.8D lens at 80mm.  To create the panorama look I simply cropped the image.  Shooting at f/8 and 80mm allowed the distant background to not be totally blurred out (bokeh) while at the same time still create a unique sense of depth to the image that one cannot produce using a wide angle lens.  

    In the comments below link to your long lens landscape/panorama shots.  

    Photography Tip - selecting and cloning a clean Ferrari 458 Italia

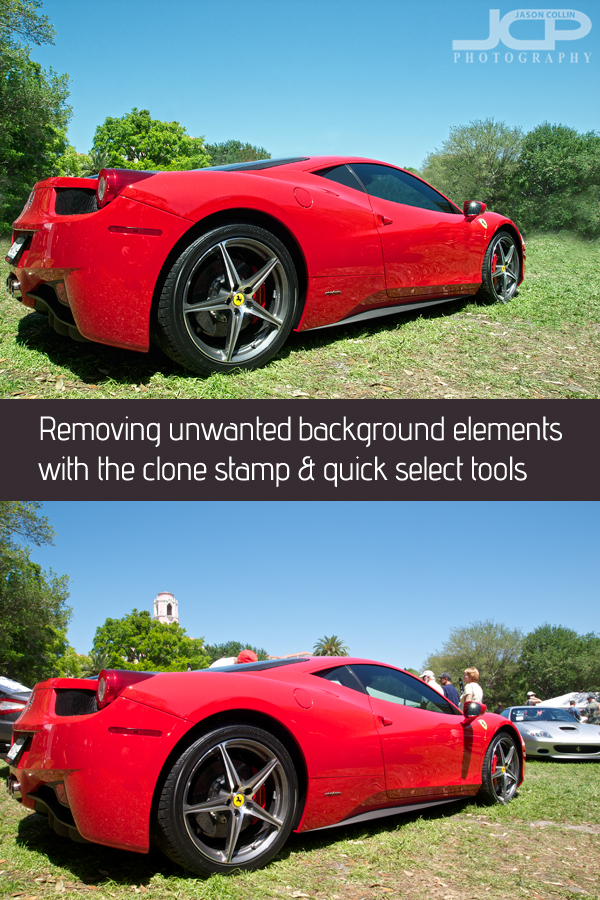
    2011 Ferrari 458 Italia at a car show in St. Petersburg Florida

    • Learn this digital photograph editing technique from Jason in a 1-on-1 lesson, reserve today!

    Car shows are great places to see a large number of awesome cars in a small space.  However, that small space and numerous other car fans walking around create a nearly impossible situation for photographing the cars in full.  Detail shots are usually what I focus on, but still I want to have at least a few full car shots as well.  Some of you may know that the Ferrari 458 Italia is my current favorite car in the world.  At a recent St. Petersburg, Florida car show I had a chance to talk with the owners of the above 458 Italia who were very nice people.  I photographed their Ferrari at length.

    I could not get a shot like I wanted to while there due to other cars being parked so close to the 458 Italia and of course because of many other people coming to peek at Ferrari's latest mid-engine super car.  So I had to settle for the best angle I could get taking into account the sun's position and just the space I had to shoot in.  Photoshop CS5 helped with the rest.

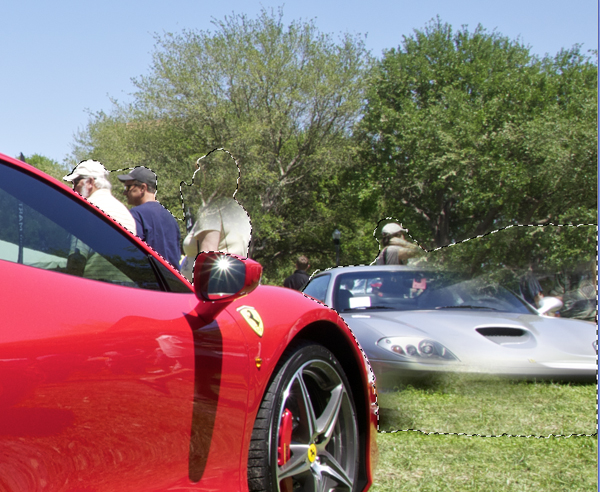
    Too clone out things from complex surroundings, quick select them then clone stamp in safetyIn the above screen shot you can see how I first used the Quick Select Tool (W) to put a protective fence around the objects I wanted to remove (silver car, people, etc).  I do this because the Clone Stamp Tool (S) is very temperamental and very hard to use along a distinct edge like the front fender of the red Ferrari and the silver Ferrari.  Basically, containing the unwanted object in a quick select field allows me to not worry about coloring outside the lines, so to speak.  You can see I selected some grass from the foreground and already started stamping it onto the silver Ferrari.  The sharp edge of the red Ferrari fender will remain perfectly intact.

    Likewise for the people above the red Ferrari.  I will clone some of the trees and stamp them on top of the people to complete the illusion that the Ferrari 458 Italia is alone in a field.  To close the quick select areas hit CMD-M (on a Mac).

    Using this quick select and cloning method will allow you to cleanly and easily remove objects from complex surroundings.

    DSLR Photography Lesson with Karin & her Nikon D5100 & home product studio

    The brand new Nikon D5100 on tripod with Karin's new light setup for her pillow product shots.I returned to Northern Pinellas County this morning for my second DSLR Photography Lesson with Karin, but the first with her brand new just arrived Nikon D5100!  This was of course my first time hands on with that Nikon as well and I came away impressed by its fit, finish & image quality.  The D5100 was not her only new gear though, she also got a cable release for it, a tripod and a 3-light studio package!  Karin wants to be able to produce great product shots for her pillows and she is not afraid to get the tools she needs to do it!  I can respect that.

    Assembling the lights was not that difficult, but it was definitely nice to have two pairs of hands to get them together.  Setting up her Nikon D5100 was no problem for me as Nikon has kept things fairly consistent across its product line for some time now.  So in just a matter of minutes we had her product shot lighting studio all setup and running!  Getting the correct white balance and other settings were super simple thanks to working with continuous lighting.  

    With the D5100 on the tripod with a cable release, and all the pillows being basically the same size, and the lights being continuous, it really is no mess no fuss to produce absolutely consistent results shot after shot with minimal effort required on the photographer's part.  Karin was very delighted with this.  

    We ended the lesson with a setting the settings hands-on quiz, so I could see if Karin can reproduce the results we got earlier when I am not there.  First I changed every setting on the camera so that Karin would have to go through the settings progression I recommend when in manual mode:  aperture, shutter speed, ISO, white balance and then finally focus mode.  She passed and is now ready to add another hat (product photographer) to the many others she already wears for her business.  I am really pleased to have been able to help her with her business in some way.

    What Karin said about today's lesson:

    "I'm very excited about what I'm learning and you are a great teacher for beginners!" 

  • Reserve your own 1-on-1 DSLR Photography Lesson with Jason today!
  • Learn more about the lessons
  • Browse past lessons with all of my students 
  • DSLR Photography Lesson with Christine & Kristen Canon 60D & XSi

    It was an all Canon lesson with Christine (Canon XSi) and Kristen (Canon 60D) in downtown St. PetersburgTwo friends, Christine and Kristen, made the drive from their distant Carrollwood and Dade City homes respectively for our DSLR Photography Lesson late Monday afternoon.  After conquering downtown St. Petersburg's difficult parking, we met as usual in front of the Museum of Fine Arts and started off with a primer on how to get your DSLR set and ready for shooting.  Though they both had Canon camera's, Kristen's Canon 60D and Christine's Canon XSi differed quite a bit in ergonomics and somewhat in menu layout.  Still, I am experienced with teaching both DSLRs so I was able to get them both onto the same page quickly, with of course a little friendly competition between them.

    They both have children so we spent a good amount of time practicing how to photograph moving subjects.  Their children were not with us during the lesson of course so I was running around randomly offering a no doubt less adorable target.  We started off in aperture priority mode (A on Nikon; Av on Canon), but once we did the moving subject practice I showed them how using manual settings have the advantage of offering a constant shutter speed insuring the action can be frozen properly, without any blurring.

    We stayed in manual mode as we finished the lesson with a bit of flash portrait practice.  They both only have the pop-up flashes on their DSLRs, but I think I convinced them to give more money to Canon and invest in an external flash since they really want to make good portraits of their kids and family.  This time I let the ladies take their turns as being the models!

    It was a fun time and I hope they are photographing their kids on a near daily basis! 

  • Reserve your own 1-on-1 DSLR Photography Lesson with Jason today!
  • Learn more about the lessons
  • Browse past lessons with all of my students 
  • Photography Tip - seeing a different reality - kapok silk-cotton tree

    The famous kapok silk-cotton tree of downtown St. Petersburg in sepiaWhy did I make this photograph?  Because of the shadows the branches were burning into the ground.  That interested me.  As it was close to mid-day the shadows were vividly dark.  They appeared to me to be separate from the tree itself, not so much shadows, but rather an alternative existence for another kapok silk-cotton tree bordering two realities.  This I saw for just a moment in between a lot of other things, like teaching a DSLR Photography Lesson and cars passing by and people jostling past on the sidewalk and the sun uncomfortably heating my skin.

    The photography tip is this:  see a different reality

    My favorite artist is Van Gogh because he saw a different reality, not in his imagination, but through his normal eyes, or was his mind imaging what he say and his eyes believed it to be the reality of others?  Regardless, I believe he literally saw the world as he painted it.  When he looked at a night sky, it was all swirly.  Thus, his paintings are now masterpieces and hold the interest of millions.  If he had painted the sky exactly as it appears to look for most people, he would not be an artist of any significance.  

    Being able to see a different reality is an extremely valuable skill to any artist, to any photographer.  I believe these different realities are not constantly around us though, they exist only for a moment.  Take the above photo for example.  If I returned to that spot a few hours later, the alternative branch shadow reality would not be there.  

    To me an interesting artist/photographer skillfully and creatively shows others the different reality he/she sees on a daily basis.