Theatre Photography in Albuquerque at the Cell Theatre
My photography of a play at Albuquerque Academy got me noticed and lead me to getting hired to photograph a full on professional play at the Cell Theatre, and not just any play, a Tony nominated play called Gary a Sequel to Titus Andronicus (get tickets). This was a much different photography experience as there were only three characters, and only two on stage at a time, rather than a dozen or more at the first play I photographed. The lighting was also better, as in brighter, though it still required high ISO settings. I was also much closer to the action on stage so I could get full closeups of the actors. Check out the play now as it goes through February 15, 2020 at the Cell Theatre!
Original student play photographed in an intimate setting
I had a very unique opportunity to photograph the rehearsal of an original student theatre performance at the Albuquerque Academy thanks to a former client who got the parents on board to have a professional photographer (me) come in to make proper, professional theatre photographs of the performances. In the audience that evening were just the director, two parents, and myself, so it was quite an intimate setting. I got caught up in the play, while being totally focused on working with the very low available light to make the best theatre photos I could. There is nothing more challenging than shooting a moving subject in low light. I had to use a very high ISO on both my Sony mirrorless cameras, but despite that I am very happy with the final image quality results. The students were as well it would seem as the photo gallery containing the 136 images I delivered had over 14,700 views in just 4 days!
Over the past few months I have started to describe ISO to my photography students like a pair of sunglasses. You have sunlight hitting your eyes. When wearing sunglasses your eyes feel all nice and comfortable even with all that sunlight. However, if you take off your sunglasses, the same amount of light is hitting your eyes, except now it hurts and you squint. There is a cost to taking off your sunglasses.
It is the same thing with ISO. There is a certain amout of light hitting your DSLR camera's sensor. If you increase the ISO setting, the same amount of light will hit the sensor, except now the camera's sensor with a higher ISO is more sensitive to that same amount of light. This is just like your eyes getting more sensitive without sunglasses. The tradeoff with no sunglasses is squinting. The tradeoff with high ISO is introducing noise, grain and artifacting into the photograph.
This is why I usually only increase ISO last when trying to get the correct exposure. Most of the time I will use the largest aperture possible with the slowest shutter speed possible. Once I hit those limits, only then do I start to increase ISO because I want to maximize image quality as much as possible.
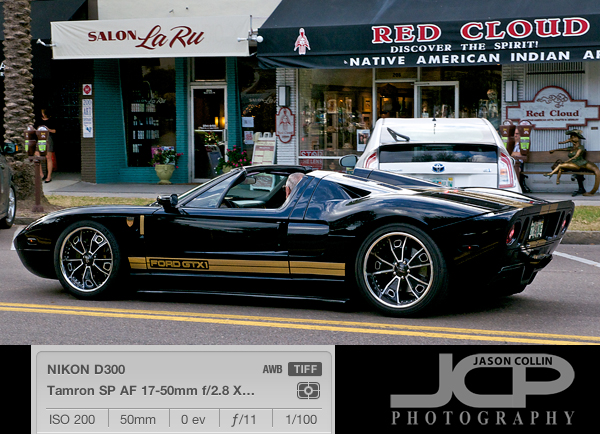
If you are shooting handheld, still subjects, with a wide angle lens like this Ford GTsupercar stuck in traffic on Beach Drive NE in St. Petersburg, Florida, my advice for when to increase your ISO to get the best exposure is as follows . . .
Only increase your ISO once:
The shutter speed is at 1/60th
The aperture is at the largest or near largest for your lens (typically f/5.6)
In the photo above, you can see in the exif data I had not yet come close to the above parameters for increasing my ISO, so I had my ISO set at 200, which is the lowest for my camera. If those settings were producing an underexposed shot, I first would have gone to 1/60th of a second. If it was still too dark, then f/8, then f/5.6, then f/4. My wide angle lens is an f/2.8 lens, but I know it probably will not be its sharpest at its largest aperture of f/2.8 so once I got to f/4 and 1/60th and was still getting an underexposed image, then I would have started to increase my ISO gradually until I got the exposure I wanted.
This is just one scenario for when to start increasing the ISO on your camera, there are many others that will no doubt be the subjects of future photography tip blog posts. However, the process for thinking when to increase your ISO is always the same, it is just that the minimum thresholds for aperture and shutter speed will not always be the same.