Photography Tips

Nikon D7000 1-on-1 DSLR Photography Lesson in St. Petersburg Florida manual shooting

Photographing downtown St. Petersburg waterfall with Nikon D7000 during 1-on-1 photography lessonFor our second of four 1-on-1 DSLR Photography Lessons I met Kathy in donwtown St. Petersburg and continued where we left off the other day on helping her shoot in manual mode with her Nikon D7000.  This time we went into the city to practice making urban and architecture shots.  It also allowed us to stay in the shade of the tall buildings and avoid the still very hot Florida October afternoon sun!

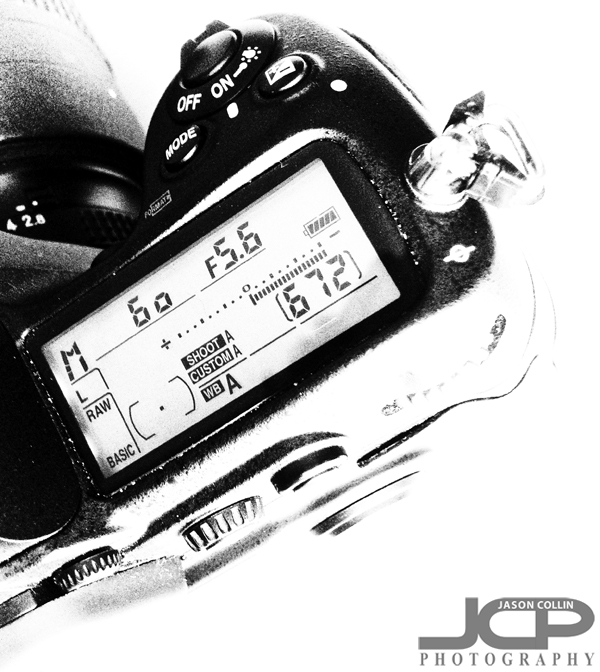
As this was our second lesson together, each time we would go to a different spot I would quiz Kathy on what settings should be changed in order to get a well exposed and sharp shot.  I wanted her to get into thinking on her own how exposure works.  Instead of just telling her that when her shot came out dark to change the shutter speed from 1/200th to 1/125th, I asked her what she thinks the new shutter speed should be.  Thus, in this way even when I am not there she will know how to adjust her shots.  The goal is not to make a perfect shot the first time, every time, but rather to be able to within one or two shots, get the exposure perfect.  This allows a photographer to make a great shot in any conditions and not try to memorize which settings for which kind of shot, which would be impossible to do anyway!

Lessons resume with Kathy next week as she practices on her own over the weekend.

Default Sunny Day DSLR Camera Settings f/11 1/320th lowest ISO

My DSLR photography students often ask me what settings should I use?  Well, that is a very hard question to answer as there are any number of factors that would determine how one would set the five settings necessary to produce a well exposed and sharp shot.  So for this photography tip I offer my default sunny day settings.  If it is a sunny day, before I leave the house I would set my DSLR to the following in general:

aperture:  f/11

shutter speed:  1/320th

ISO:  (lowest for your camera)

Of course there are factors like what lens you are using, what type of subject, etc., etc., but if you are looking to make a shot like the one above on a nice sunny, Florida day, try starting with the default settings above.

Nikon D7000 1-on-1 DSLR Photography Lesson in St. Petersburg Florida with Kathy

Kathy with her Nikon D7000 during our first DSLR Photography Lesson in St. Petersburg FloridaOn a sunny October afternoon I met Kathy for our first of four 1-on-1 DSLR Photography Lessons with her Nikon D7000 in downtown St. Petersburg, Florida.  She had a Nikon D70 for many years, but only used it on auto-mode.  Then when she got the D7000 a few months ago, she was using that on auto-mode also so during our lessons I will help her leave auto-mode behind for good.  In fact, within thiry minutes of our lesson today I had her shooting in manual mode for both still and moving subjects.

The Nikon D7000 has two convenient dials for quickly changing aperture and shutter speed, and a top LCD for quickly checking all important settings (aperture, shutter speed, ISO, WB, focus mode) at a glance.  I advised Kathy to not hunt all around the camera for checking settings, but instead simply just refer to that convenient top LCD display each and every time.  

I was also able to help clear up a misconception many of my students have concerning focus and focus mode.  Many come to me thinking they have to manually focus shots in manual exposure mode, or that auto-focus is only used for certain kinds of shots.  Of course focus mode has no effect on exposure and auto-focus is pretty much always used.  Manual exposure mode is very useful, manual focus mode is hardly ever used anymore.  

I look forward to my next lesson with Kathy which is already set for tomorrow, same time, same location!

1-on-1 Nikon D5100 DSLR Photography Lesson with Rasha in St. Petersburg Florida

Rasha with her Nikon D5100 during our 1-on-1 photography lesson in St. Petersburg FloridaOn a way hotter than it should have been October morning, I met Rasha with her Nikon D5100 for our first 1-on-1 DSLR Photography Lesson in downtown St. Petersburg.  She has had the Nikon for a little while, but was only using it in auto-mode.  She inquired about my lessons because she wanted to be able to get more out of her DSLR, which is exactly what my photography lessons are designed to help people do!

She has a pair of lenses covering the standard focal lengths of 18-200mm.  I began the lesson by showing her how to safely and properly change lenses, something that may not sound so important, but actually is for keeping the inside of your DSLR clean and the sensor spot free.  We started out shooting in aperture priority mode, but once we switched to shooting moving subjects in constant light, I showed Rasha how using manual mode is much more advantageous for locking in the exposure and allowing the photographer to just focus on getting the best framing.  We practiced on cars driving down 5th Ave N in front of the Vinoy Hotel.  

We concluded the first lesson in the shade of North Straub Park where I demonstrated how it is actually much, much better to make a portrait of someone in shade rather than in harsh mid-day sunlight.  Her portrait of me in the shade produced natural skin tones and light in the eyes.  Moving into direct sun made my skin look reflectively pale and my eyes were dark pools hidden by shadow from the overhead sun.  

I look forward to continuing to help Rasha improve her manual photography skills in our next lesson!

St. Petersburg Florida Night Photography Lessons for tripod & 50mm lens

WANT TO LEARN HOW TO USE YOUR DSLR AT NIGHT?
  • 1-on-1 photo lessons help you learn quickly
  • Every lesson is designed for your exact level
  • Learn to shoot at night in real conditions
  • Free social media sized digital portrait made of you by Jason
  • Lesson locations in St. Petersburg (others may require a fee)
  • 2-hour lessons available on weeknights starting at 6pm
CALL: 813-240-5357 E-mail: CONTACT FORM FACEBOOK


2-HOUR LESSONS on NIGHT PHOTOGRAPHY

As the sun starts to set earlier, weekday evenings offer a fantastic opportunity to learn how to make photographs at night. 

Jason offers two types of night photography lessons:  using a tripod for long exposures & using a 50mm lens for low light. 

The 2-hour lessons are offered in the downtown St. Petersburg area on weeknights beginning from 6pm~ and feature 1-on-1 night photography instruction with Jason.  A DSLR is required along with either a tripod or a 50mm f/1.8 lens

Tripod rental is available. 

The lessons are open to any skill level, even total beginners!

TRIPOD LESSONS

Tripod night photography lessons will focus on how to make long exposures of the beautiful downtown St. Petersburg waterfront.  Using manual settings and bulb mode you will learn how to pull light out of the sky that the human eye cannot see.  Also, you can learn how to make light trail shots as cars streak past to create cool, urban shots.

50MM LENS LESSONS

You can use a 50mm f/1.8 (or f/1.4) lens at night without a flash to produce cool images featuring light bokeh, motion blur from passing cars and even night portraits!


 Lessons start at: 


Jason has taught over 300 one-on-one DSLR lessons!  - see blog


Jason has taught lessons to students with these DSLRs and more!

Nikon D4 Nikon D600 Nikon D700 Nikon D300s Nikon D7000 Nikon D90 Nikon D5100 Nikon D5000 Nikon D3000 Nikon D3100 Nikon D40

Canon 5D Mark III Canon 5D Mark II Canon 7D Canon 60D  Canon 50D Canon T4i Canon T3i Canon XSi Canon XTi Canon XT

Pentax K-R Pentax K-7

Sony A230 Sony A33

Olympus E-510

Jason also teaches how to edit digital photos on your own laptop - reserve now!


Daytime DSLR Photography Lessons also available on any subject more info

1/60th sec minimum shutter speed for handholding still shots - photography tip

Handholding 1/60th of a second is the minimum I feel safe with and only when using a focal length 50mm or shorter -photo made with an iPhone 5When a shot comes out blurry, the usual culprit is shutter speed.  Therefore, it is critical to make sure you are using a minimum shutter speed that you can handhold reliably.  For me, that is 1/60th of a second.  There are many conditions that apply to this, but basically if you are using an 18-50mm lens, photographing a still subject, not using a tripod and not using a flash, then the minimum shutter speed you should set on your DSLR is 1/60th of a second.  This is also why shooting in manual mode is a great help as you will purposefully set your shutter speed to what you know is the minimum (1/60th).  If you shoot in aperture priority mode, the camera may set a shutter speed below that resulting in a blurry shot.

  • 1/60th of a second minimum for any still subject shot

Some people may be able to reliably handhold a slower shutter speed, and yes sometimes I do attempt it myself, but I know that for sure 1/60th with a focal length 50mm or under and a still subject will produce a sharp image.  So if your still subject photographs are coming out blurry, set your shutter speed to 1/60th minimum, use good shooting technique and you will be able to produce a sharp photograph.  

Nikon D7000 1-on-1 DSLR Photography Lesson in St. Petersburg Florida with Mari

Mari photographing the famous banyan trees in downtown St. Petersburg during our photography lesson.Since our first 1-on-1 DSLR Photography Lesson from just a week ago, Mari has done some significant investing in her photography gear.  Gone is her Canon G10 replaced with a brand new Nikon D7000 and lens I use myself, a Tamron 17-50mm f/2.8.  Right away it was apparent to Mari how much easier using a true DSLR is.  I contend myself that point and shoot cameras are by far more complicated to use than an advanced DSLR (i.e. top LCD screen, two finger dials, all major settings have dedicated button).  Now instead of hunting through menus and having to "game" her old camera just to change aperture, on her Nikon D7000 it requires a mere flick of the forefinger.  It is likewise for all the other four major settings.

So with this new gear I began showing Mari how to manually adjust all settings for shooting in shade, bright sunlight, backlit subject and some tips on how to creatively compose common scenes and landmarks.  As always, I advised her to not put the horizon in the center, as that is how we see it with our own eyes.  Putting the horizon in the upper or lower third of the frame is almost always more appealing looking to a viewer and makes for a much more interesting photograph.  

Mari invested in a 4-pack of lessons (thanks Mari!) to help her get started in the DSLR world so I will be seeing her again soon to continue introducing her to new shooting techniques.