new Dali Museum

Photo Tip - put a major subject focal point in a third and a third

Many of my hundreds of photography students start out always centering the subject in the frame during our first lessons.  That is understandable as they are busy learning my 5-step process for making a well exposed and sharp photograph in any given shooting situation.  Once the technical apsects of photography take up less of the process of making a photo, then one can begin to focus on being creative, and the first step in that is composition.  

The rule of thirds is a good way to start getting more appealing composition, but I like to think in two dimensions with the rule of thirds as well.  By that I mean putting a major feature of my subject in a vertical thid and a horizontal third.  In the above example of a model at the Dali Museum, the upper third and left third interset right by the model's face.  Then the lower third and left third intersect by her hand and the melting clock.  There is still a good amount of negative space in the frame, but that is put to the far upper and left parts of the photo.  I would not want a lot of negative space on both sides of the subject (as in if I had centered her with no focal points other than along the midpoint of the photograph).

So the next time you go out shooting, especially a portrait, try putting a major subject focal point at a third and a third in the frame.

The final version of the photo putting a major focal point at a third and a third

Crown Jaguar F-Type Client Event at Dali Museum St Petersburg Florida Photography

Guests arrive to pose in front of the new Jaguar F-Type at the Dali Museum in St. Petersburg event photography - Nikon D300 tripod mounted with cable release Tamron 17-50mm @ f/5.6 ISO 200 1/100th - Strobist: SB-800 & SB-600 both in brolly

The Dali Museum in St. Petersburg was host to an event put on by Crown Jaguar for guests to come and see some of its cars, including the stunning new Jaguar F-Type Coupe (see above).   This was my second time working for Crown, as I photographed the Audi A3 premiere event back in April too.  This time they hired me to photograph all the guests as they arrived in front of a F-Type.  This was my first time doing this kind of arrival portrait photography actually.  The shooting began just before sunset so early arriving guests got a colorful background like in the above portrait.  Soon night came and the background became just a few distant lights.

My setup for making guest arrival portraits a speedlight in each broody and my camera tripod mounted so I got the exact same framing and background for each shot - photo made by iPhone 6

This was my setup for all the portraits.  My camera was on a tripod so every shot was in the same framing.  I advised people to stand in front of the front wheel of the Jaguar F-Type Coupe to further insure similar photo results.  I had two speedlights each in a brolly and kept the one to frame left constant, but as night fell moved the one to frame right to also light the car more.  Unfortunately, the provided lighting for the car was not very bright at all.  I compensated for that by moving one speedlight and tweaking a few camera settings.  I ended up pleased with the results of night portraits using just two speedlights with a large background object (the car).  

Some guests at the Crown Jaguar F-Type Dali Museum event arrived in costume - Nikon D300 Tamron 17-50mm @ f/5.6 ISO 400 1/60th - tripod mounted with cable release - Strobist: SB-800 & SB-600 both in brolly

Some guests wore costumes as Halloween was just three days away.  It was interesting to look up and see who might appear before my lense each shot.  Many people joked asking if this photo was their opportunity to win the car or something like that.  I only ever replied simply, "umm, no."  

From dusk to night shooting guests arriving in front of the Jaguar F-Type at the Dali Museum St. Petersburg Event Photography - Nikon D300 tripod mounted with cable release Tamron 17-50mm @ f/5.6 ISO 200 1/30th - Strobist: SB-800 & SB-600 both in brolly

The Jaguar F-Type Coupe received universal praise for its looks by everyone.  As of the time of shooting, Crown Jaguar did have this particular F-Type for sale!  

The Jaguar F-Type coupe made for a stunning backdrop for portraits at the Crown Jaguar Dali Museum in St. Petersburg - event photography - Nikon D300 tripod mounted with cable release Tamron 17-50mm @ f/5.6 ISO 320 1/60th - Strobist: SB-800 & SB-600 both in brolly

It was a fun and challenging evening of photography, my favorite kind, and I got to stare at a beautiful car the whole time too.  Two Crown Jaguar employees helped make sure each guest would receive their print of the photos I made by writing down the photo number as I shot, thank you ladies!

Canon T3i 1-on-1 DSLR Photography Lesson in St. Petersburg Dali Museum with Jeannie

Jeannie in reflection during our photography lesson at the Dali Museum St. Petersburg FloridaAnother location change for our 1-on-1 DSLR Photography Lesson as Jeannie finished up her 4-pack of lessons at the new Dali Museum in St. Petersburg, Florida.  The museum itself makes for many architecture photography opportunities, and the grounds feature a melting clock bench, tree with ribbon messages blowing in the wind among other interesting features.  

Jeannie did get a Canon 430 EX II Speedlite since our last lesson which we used to practice candid portraits in shade, direct sunlight and diffused light.  We also went deeper into composition style and tips for framing a more flattering shot.  

Over the course of her 8-hours of 1-on-1 instruction time I showed Jeannie many of the tools necessary to make successful photographs in any given shooting conditions, be they outdoors or indoors.  I look forward to seeing Jeannie again in the future for more advanced photography lessons.

Canon 60D 1-on-1 DSLR Photography Lesson in St. Petersburg Florida at Dali Museum with Julie

Julie with her new Canon 430 EX II Speedlight & her Canon 60D during our photography lesson at the Dali MuseumI chose the new Dali Museum as the location for the fourth of four 1-on-1 DSLR Photography Lessons with Julie, who since our last lesson got a new external flash, the Canon 430 EX II Speedlite.  I was glad to hear that Julie has been regularly practicing her photography and even had a chance to make maternity portraits of two of her friends.  She told me that photographing people is hard!  I cannot disagree, but I also think photographing people is the most interesting and one of the best ways to really push yourself as a photographer.  

We started this morning's lesson with more 50mm lens practice using the great tree in the rear ground of the museum.  The tree has ribbons all tied to it with messages (see third photo from the top here).  Julie really liked the tree.  It makes for a very interesting subject both from an abstract shooting standpoint and also as a prop when making a portrait.

Then Julie attached her 430 EX II to her 60D and we went over to the Mahaffey Theater where I showed her how the angle of the light from the flash effects how portraits turn out.  Even in those outdoor conditions, although in the shade, it was very apparent that being able to bounce the light off of a side or rear wall produced the best results, as compared to pointing the flash directly at the subject.  

Julie is interested in learning off camera flash so I look forward to seeing her for another four lessons over the summer.  I will be looking forward to it!

Model Portfolio Shoot at the new Dali Museum St. Petersburg Florida with Abby

Model Portfolio Shoot - Abby with New Dali Museum background - Nikon D300 Tamron 17-50mm @ f/4 ISO 640 1/60th Strobist: SB-800 Speedlight to frame left & SB-600 Speedlight behind model

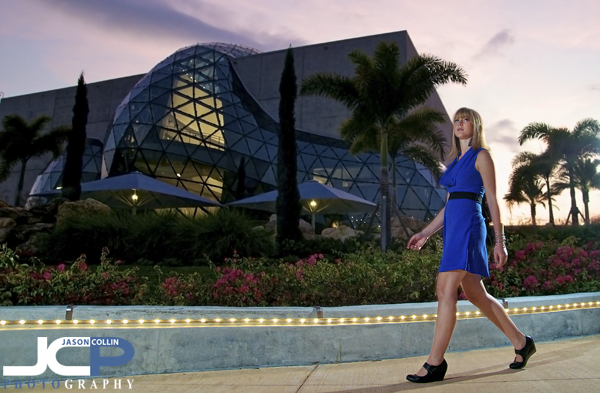
I was first in contact with model Abby back in October when she was in the process of moving to and getting settled in St. Petersburg.  We were able to schedule a model portfolio shoot this week on a beautiful Florida winter evening using the new Dali Museum as a backdrop, a location I had been wanting to use for awhile.  

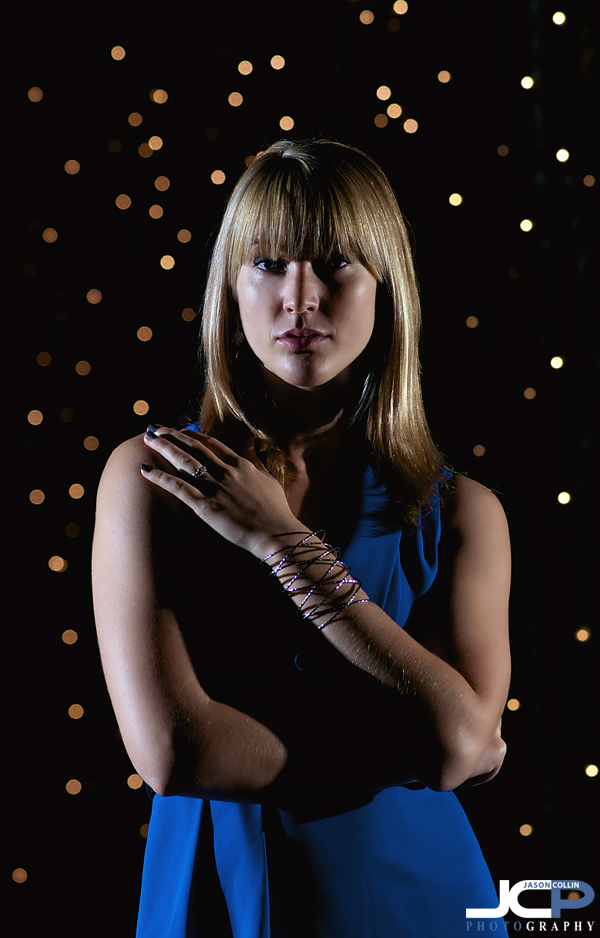
Abby surrounded by bokeh using "sandwich lighting" - Nikon D300 Nikkor 105mm VR Micro @ f/5.6 ISO 200 1/60th Strobist: SB-800 to frame left & SB-600 to frame right both @ 1/4 powerNot only did I get to try out a new location for this shoot, but also some new strobist techniques, like what I am calling the "sandwich lighting" technique seen in the photograph above.  I placed one speedlight on each side of Abby with no front or backlight intending to create dramatic and defining shadows.  The bokeh is a result of lights strung on trees.  

Abby was a tireless jumper! - Nikon D300 Nikkor 80-200mm @ f/5 ISO 200 1/200th Strobist: SB-800 to frame left & SB-600 to frame right about 45 degrees eachWhen I first mentioned my thoughts for this shoot with Abby, I said I wanted to make some of the images dynamic, involving motion in some way.  She was all for a jumping shot and I did not realize while shooting just how many times she jumped until I started the editing process at home and saw over 20 shots to choose from!  Abby's vertical leap is very impressive.  This was a fun shot to make.

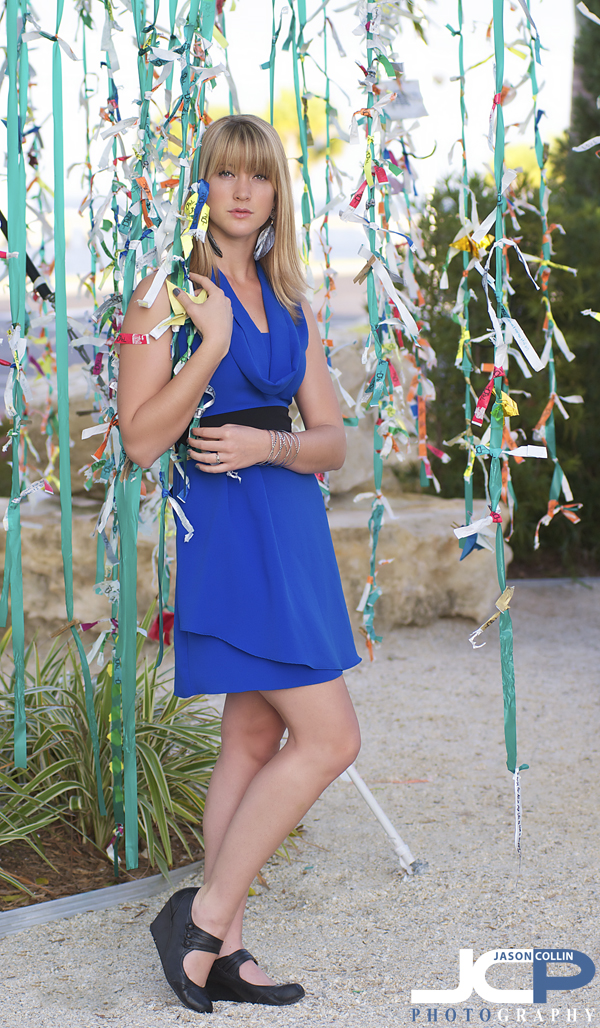
Abby among the ribbons of the wishing tree at the Dali Museum - Nikon D300 Nikkor 80-200mm @ f/4 ISO 200 1/200th natural lightWe started out the shoot with some natural light shots around what I call the "wishing tree" behind the Dali Museum where visitors tie their entrance bracelts to long green ribbons, often with wishes or messages written on them.  

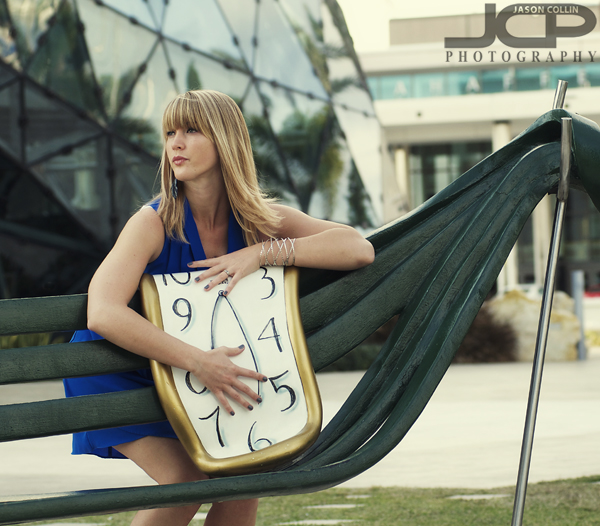
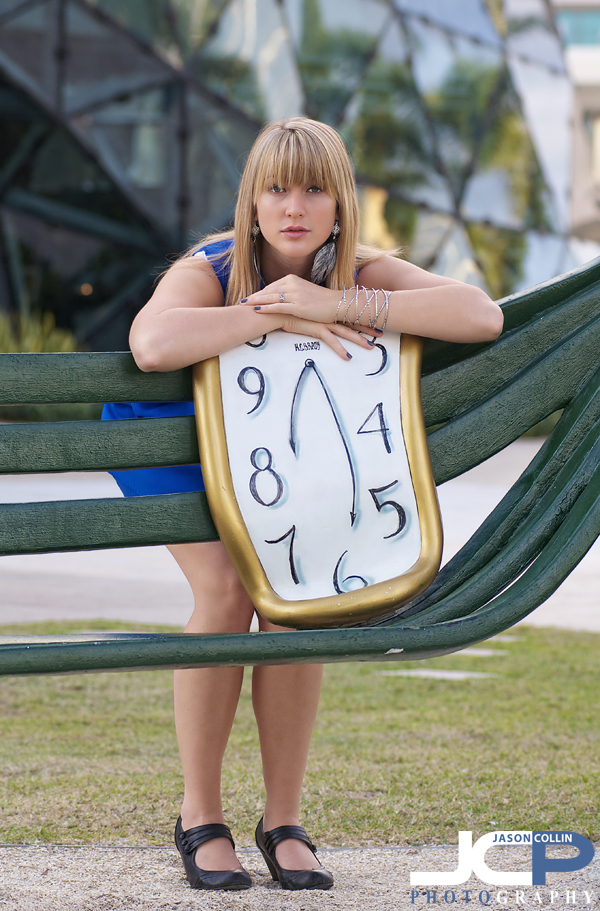
A famous Dali melting clock on a bench with model Abby - Nikon D300 Nikkor 80-200mm @ f/4 ISO 200 1/200th natural lightAnyone familiar with Dali's work will recognize the melting clock image.  This is part of a bench in the very nice grounds surrounding the museum.  I had Abby start by lying down on the bench, but I found myself liking this pose much more as overall I was looking to make less traditional model looking images.

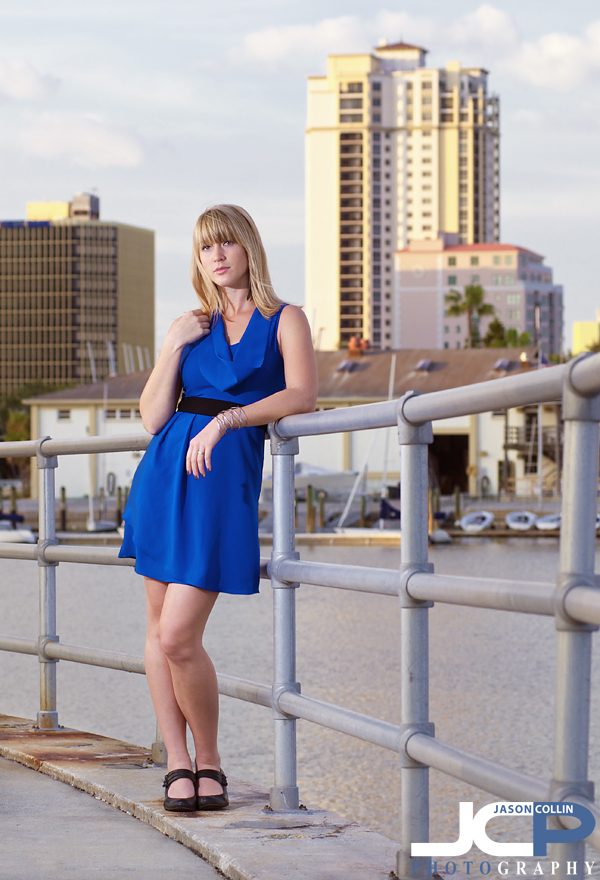
A view of downtown St. Petersburg behind model Abby - Nikon D300 Nikkor 80-200mm @ f/5.6 ISO 200 1/200th Strobist: SB-800 just to camera left & SB-600 to model's rightOver the course of the shoot Abby and I found out that we have some very rare things in common, including our college majors, having visited Thailand and that our parents currently live in the same small area of Florida.  Along with Abby's ability to come up with numerous, great poses, this made the shoot one of my most enjoyable ever.

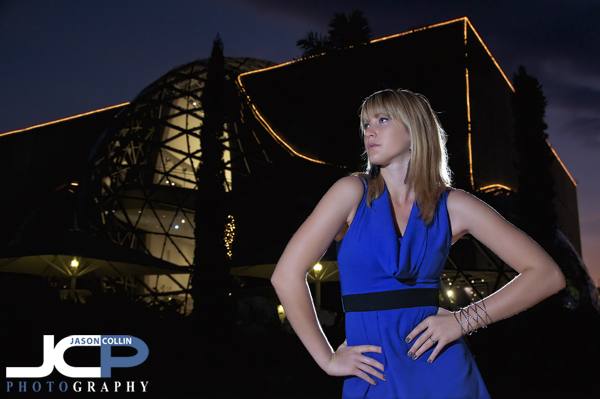
 Dali lights up at night in this model portfolio shot - Nikon D300 Tamron 17-50mm @ f/4 ISO 400 1/20th Strobist: SB-800 to left of camera & SB-600 behind modelWe started the shoot at the ideal time allowing us to begin with natural light shots, moving toward twilight shots before ending with some night shots making use of the lights of the Dali Museum for the background.

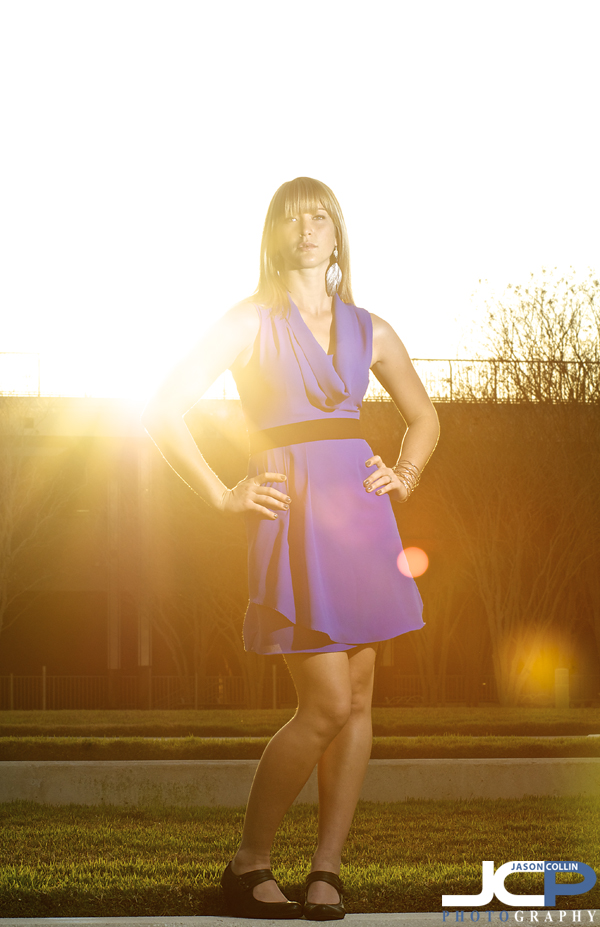
Lens flare on purpose modeling portfolio image - Nikon D300 Nikkor 80-200mm @ f/11 ISO 200 1/200th Strobist: SB-800 to frame left & SB-600 to frame rightIt was very nice to meet and work with Abby and I would recommend her for anyone who needs a model for a project as she is professional, very easy to work with and of course beautiful.  You can see more of her work on Model Mahem.
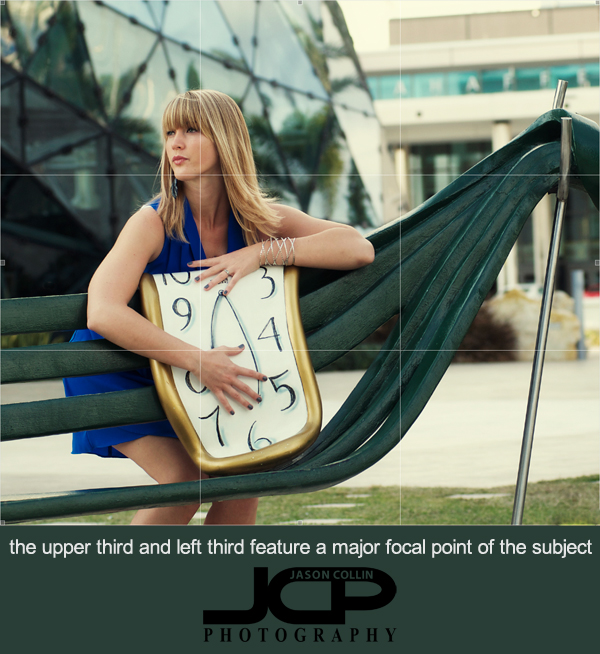
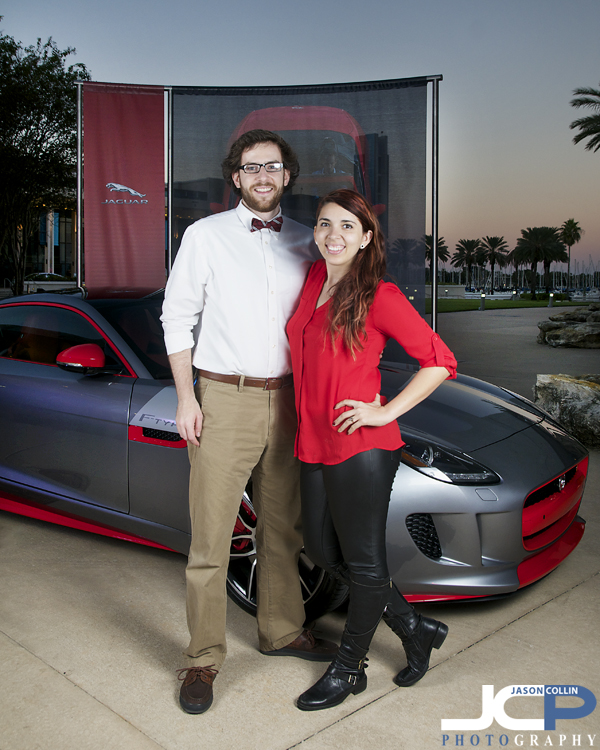
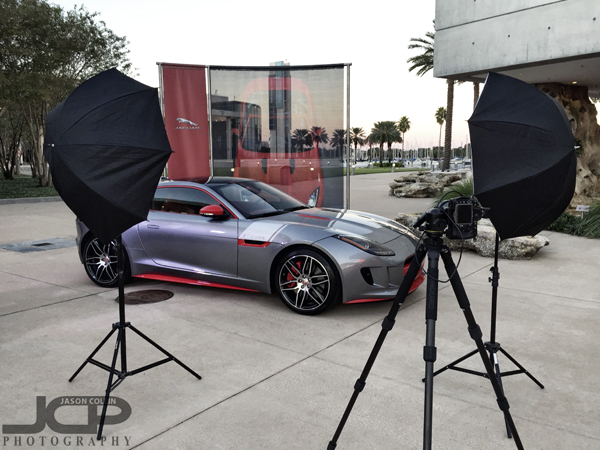
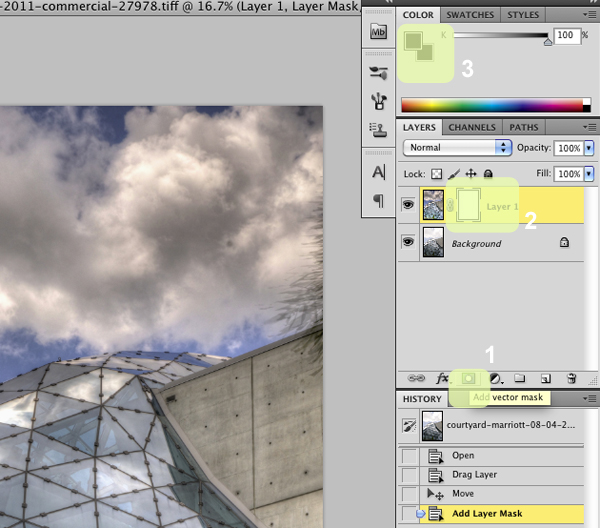
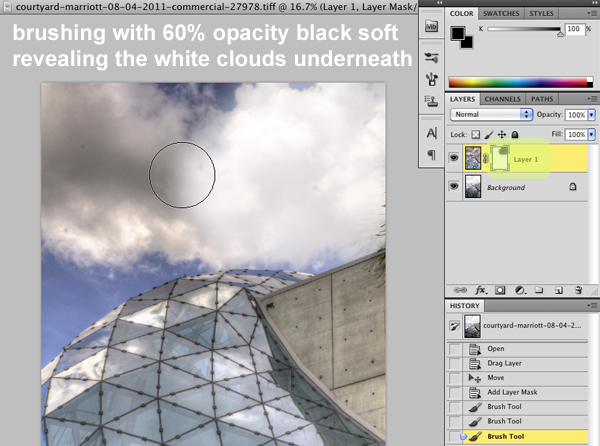
How to fix black clouds in HDR images using layer mask

HDR photography and images are very popular right now.  I, myself, have participated in a local exhibition featuring only HDR images.  The thing is, I do not care for 90% of HDR photography I see.  There is a large debate about processing HDR images to look more real or more hyper real.  I am not referencing that debate here.  For me, a simple reason why I do not find a vast majority of HDR images appealing is because they suffer from horrible shadow effects as demonstrated in the black clouds in the center image above.  As you can see with the single exposure photo, the sky looks good, but there is no detail inside the glass.  The 7-bracket HDR image reveals what is under the glass and adds better color, but at the expense of the clouds.  Therefore, the best final results come from blending the single exposure photo with the 7-bracket HDR image.

1. click on add layer mask (sorry, shows vector) 2. click on layer 1 3. paint with a black brushBlending two images together is not a difficult time consuming process using Photoshop.  The screenshots in this post are using CS5, but other versions should basically be the same.

First, open the single exposure photo and 7-bracket HDR image in Photoshop.  Drag the 7-bracket HDR image on top of the single exposure photo.  Once you do this you will only see the 7-bracket HDR image.  The single exposure photo is completely hidden underneath.  Our goal is to reveal only the parts of the single exposure photo we want, in this case, the clouds and sky.

After you have dragged the 7-bracket HDR image on top of the single exposure photo, follow the three steps highlighted in the screenshot above: 

  1. Click on "Add layer mask"
  2. Click on "Layer 1"
  3. Select the Brush tool: soft brush setting, black, 60% opacity (or similar, just not 100%) 

Now using the Brush tool at the settings described above, slowly brush the areas you want to reveal.  The 7-bracket HDR image starts to disappear revealing the single exposure photo below.  In the above screenshot you can see that I already revealed the nice white clouds on the right side.  Here is an extra tip:  I also used the Brush tool on the concrete wall of the building that looked too black & dirty to reveal the cleaner wall from the single exposure photo.  If you make a mistake and reveal something you did not want to, set the Brush color to white and the top image will return.

Here again are the before and after results.  By using a layer mask you can create a dynamic hdr image and still maintain the clean look of clouds, walls, etc in the image.  This vector mask technique is great for other photography tricks too.  Want to change the background on a portrait?  You can do that following this same process! (see results here)

Try the vector mask process on some of your images and be sure to post links to the results in the comments below. 

  • Read more photography tips
  • Reserve your own 1-on-1 DSLR Photography Lesson with Jason today!
  • Learn more about the lessons
  • Social Media Photo Set Portraits at New Dali Museum

    I met Angela at my new favorite photography spot in all of St. Petersburg -- the new Dali Museum for a Social Media Photo Set portrait session.  This special photo package is for those who like professional images representing themselves on Social Media sites like Facebook, Twitter and Linkedin as well as photos cropped to fit perfectly on their iPhone or other digitial device.  For me, I cannot understand why people would want to represent themselves with some crummy camera phone photo they took themselves by holding the phone in front of them.  I offer the Social Media Photo Set to help people look more professional, more attractive and more themselves online.  

    We used the great tree behind the Dali Museum that has long ribbons tied with messages for the majority of shots.  The melting time bench is another great prop to use for portraits as well.  I look forward to seeing how Angela uses her photos in Social Media!