wide angle lens correction

Introduction to Photoshop CS5 Basics & Keyboard Shortcuts with Ed

Grand Tetons photograph by Ed, editing by Jason - the lens correction filter in Photoshop CS5 sets things straight 

I received a phone call from Ed all the way in Jacksonville (about 3 hours away) asking about taking extended 1-on-1 Photoshop CS5 lessons.  I am not a certified Photoshop expert or anything like that so at first I wanted to make sure he was not looking to learn how to do something like someone's face and put it onto another person's body.  My Photoshop skills lie mostly in the areas that pertain to editing digital photographs, not graphic design.  After talking for a few minutes though I realized that what Ed wanted to learn I could most definitely teach.  We booked two lesson sessions, one for today and another for tomorrow.

Ed had his own photos to use during the editing lesson and I was pleasantly surprised to see the Grand Tetons.  Florida photographers of course have no local opportunities to photographs mountains of any kind.  Ed's photographs already looked good, but there is almost always something that can be done to improve any photograph, and for sure any published or portfolio photograph by a serious hobbyist or a pro has had at least some editing done to it.  I am not afraid to say that editing is often 50% responsible for the final look of a photograph.  

The example above did not need that 50% level of editing.  I showed Ed my workflow which starts with cropping (I cropped the photo even more here than I did during the lesson to better show the edits we made) and then removing any dust spots on the sensor that appear as dirt blemishes in the photo by using the healing brush (keyboard shortcut - j).  Then I taught how to use the quick select tool (w) to highlight only the mountains for a contrast adjustment.  Then the foreground grass and fence were selected for a color balance boost.  Lastly, we used unsharp mask to increase the overall sharpness of the image resulting in more defined blades of grass and details in the fence and mountains.  

Tomorrow we will move on to editing portraits and using layer masks.  

  • Reserve your own 1-on-1 DSLR Photography Lesson (shooting or editing) with Jason today!
  • Learn more about the lessons
  • Browse past lessons with all of my students
  •  

    --Professional Model DSLR Photography Lessons now available!

    Photography Tip - correct lens distortion & straighten up edges

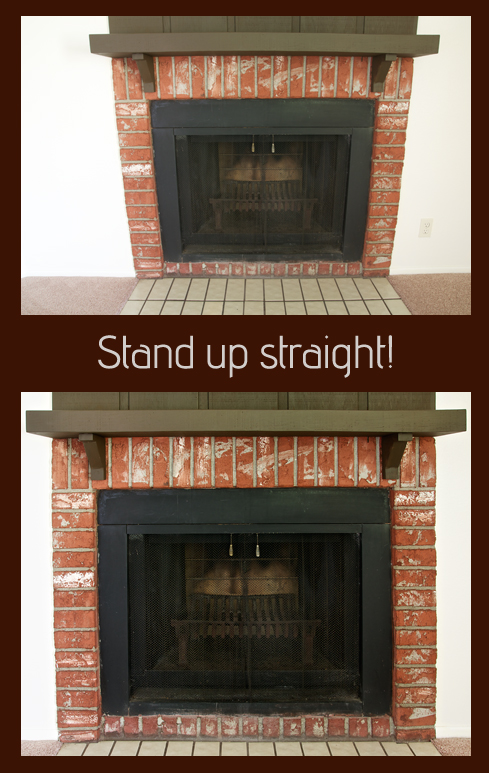
    Using Photoshop CS5 the fireplace was made to appear normal, not distorted by the wide angle lens.

    Wide angle lenses cause distortion.  Depending on the subject of the photograph, the distortion can be very apparent or very hard to notice.  If there are tall straight lines in the photo, especially at the edges of the frame, then the distortion will be very easy to see.  If the photo is free of geometric shapes, then the distortion will not be obvious.  Wide angle lens distortion is very easy to see when photographing buildings or other rectangular shaped objects, like the fireplace above.  It was shot at 17mm causing the walls to pinch inward and the mantle to appear to have a bulge in the center.  Here is how I used Photoshop CS5's lens correction filter to straighten it up:

    Click on the image for a larger version - Photoshop CS5's lens correction window with grid onIn Photoshop CS5, the keyboard shortcut for launching the lens correction filter is SHIFT-CMD-R.  Or, you can just go into the Filters menu and select it there.  The auto correction by choosing camera and lens model does not work for me, so I always go into the custom tab.  For the Tamron 17-50mm f/2.8 lens I used for wide angle shooting, I always have to Put the Geometric Distortion slider into positive territory, as I did here (+7).  Then what I do from there depends on the individual shot, but I mostly adjust the Vertical and Horizontal Perspective sliders as needed.  I turn the Show Grid option on and adjust those sliders as needed until a horizontal/vertical line in the photo becomes parallel with a horizontal/vertical grid line.  I also toggle Preview on and off to see the differences made.  Click OK and Photoshop does the rest!  

    Lens Correction Workflow:

    • SHIFT-CMD-R in CS5 to launch the lens correction filter
    • Toggle on Preview and Show Grid
    • Slide Remove Distortion to positive side as needed
    • Adjust Vertical/Horizontal Perspective sliders as needed following grid lines for guidance

    Practice yourself!

    Show us your practice results with a link in the comments below.  If you correct one of your own images send me a 600px wide version of the original and corrected one and and I will feature it in this post.