gaussian blur

Photography Tip - make your own bokeh using Photoshop Gaussian Blur

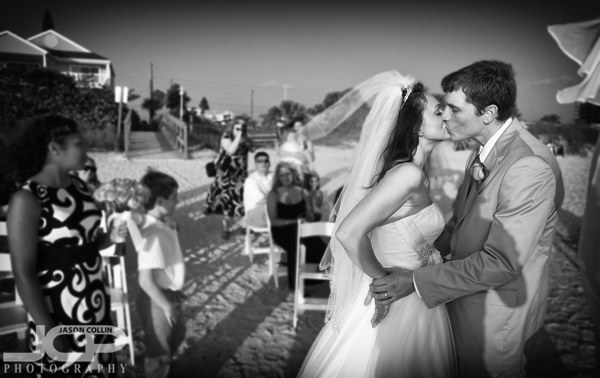
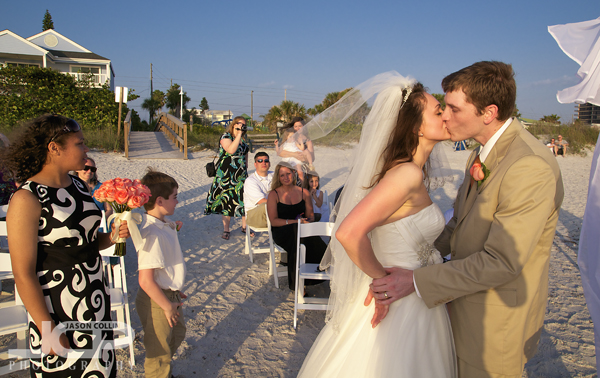
If you have a photograph that you wish had a bokeh (out of focus) background, you can still add one in Photoshop using the Gaussian Blur filter.  This can be an easy way to add a whole new look to a photo.  In the above example of mother and daughter sunset beach portrait, I chose to have the background in detail by using a small aperture and wide focal length.  I like the shot as it is, but I was curious to see how it would look with the background out of focus (bokeh).  The following describes my digital workflow:

  • Use the Quick Select tool to select just the mother and daughter (foreground subject)
  • Choose the Inverse of the selection
  • Apply the Gaussian Blur filter 

In this case, it was a pretty simple process.  I chose to select the people rather than the sky, then do the inverse because I felt that was a simpler selection to make.  For other photographs, you may want to select the background itself if that is easier.  Then you also do not have to select the Inverse of the selection.  

Let me know in the comments below how this bokeh photography tip worked for you.

Lexus LFA #406 in St. Petersburg Florida Grand Prix Gala

Lexus LFA #406 in St. Petersburg Florida - Nikon D300 Tamron 17-50mm @ f/8 ISO 200 7-exposure HDR - see editing workflow for this shot belowI first saw this white Lexus LFA #406 at the Cars & Couture Tampa event last year, but it was roped off making it impossible to get any kind of usuable shot at that event.  Lucky for me it was shown again at the 2013 St. Petersburg Grand Prix Gala this time with no ropes.  Still, it was in the middle of a building lobby surrounded by people so to get usable shots I liked I had to be pretty creative with editing.  

Lexus LFA #406 St. Petersburg Florida car photography with added motion blur HDR image - Nikon D300 Tamron 17-50mm @ f/8 ISO 200 7-exposure HDRUsually I have an idea of where I want to end up before I start editing a shot, or even before I push the shutter out in the field making the photograph in the first place.  This time I did not anticipate liking B&W better, nor adding digital blur (both Guassian and motion) to the shots.

Lexus LFA #406 at the St. Petersburg Florida Grand Prix Gala 2013 - Nikon D300 Tamron 17-50mm @ f/8 ISO 200 7-exposure HDREvery shot was made from a 7-exposure HDR image and required a lot of color correction.  Shooting in RAW and auto white balance normally produces a very color accurate shot once in Aperture 3.  Not so this time as even after Aperture did its thinking on processing the RAW image it remained very yellow.  I heard people with point and shoot cameras complaining how yellow their shots were coming out too.  Standing in the space I did not notice that much warm lighting so I was surprised the RAW shot needed as much work as it did.  Below I show in four abbreviated steps my digital editing workflow starting with a single RAW file and ending with the final look I chose for the shot.  In all this initial workflow took about 45-minutes to finalize.  It was then faster to apply it to the other two images in this post since I knew what I wanted. 

Selective Focus Wedding Kiss Black & White

Nikon D300 Tamron 17-50mm f/2.8 @ f/8 ISO 200 1/500th strobist: SB-600 hotshoe mounted TTL

What I wanted to make the focus of this image, was the kiss.  Yet I did not want to do this simply by cropping way in on the bride and groom.  My original idea was to just use a holga filter on the image, but I did not like the grain for this shot.  I wanted more of an ethereal look to the shot, rather than historic.  I also wanted to isolate the couple from the distracting background.  The way to achieve this look did not come to me all at once.  I tried one thing, which led to another, which ultimately lead to the final image you see above.

Here is the step-by-step editing workflow I followed: 

  • import RAW file into Aperture 3
  • increase the vibrancy slider
  • send image into Color Efex Pro 3, apply polarization, pro contrast, & remove color cast filters
  • send 16-bit TIFF version into Photoshop CS5 to remove blemishes & sharpen with unsharp mask (save & close)
  • via Aperture try holga filter in Silver Efex Pro 3 (do not like result)
  • send 16-bit TIFF back into PS CS5 and magic wand select the couple, reverse selection, apply gaussian blur to the selection (save & close)
  • via Aperture use Silver Efex Pro 3 to apply high structure filter, add vignette, burn bottom edge (finished!) 

It took me a good bit of time, like over 15 minutes, but I really like working on experimental processing projects like this, when I have the time.  The original (well, only did first three bullets to it) is below.  What do you think?  Which do you prefer, original or selective focus black & white, both or neither?  Why?

the "original" image