snoot

Cannabis as Art Commercial Marijuana Product Photography in Albuquerque New Mexico

Cannabis as Art Commercial Marijuana Product Photography in Albuquerque New Mexico

Adapting on location to get professional product shots of cannabis in ABQ

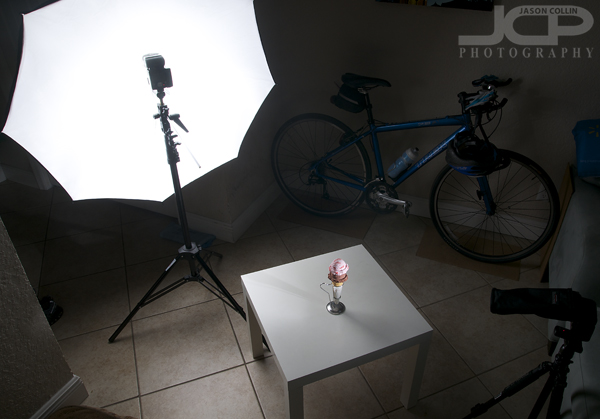
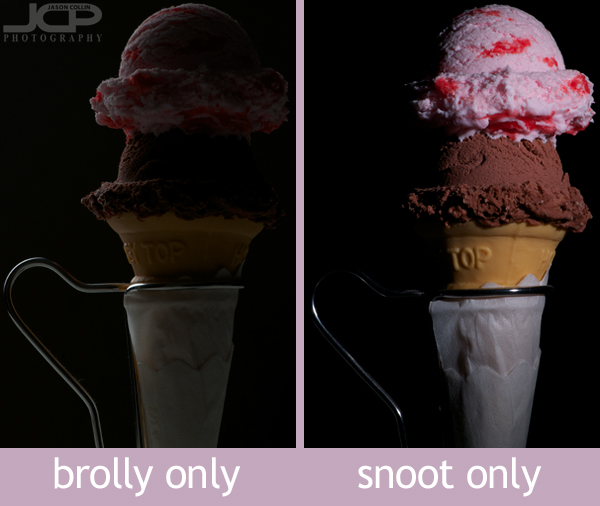
You might be surprised how often I have no idea what type of photography situation I will be getting into upon arriving at a client’s location. That’s one of the things that makes a pro photographer a pro, is being able to get good results in any conditions, changing conditions, and challenging conditions. Such was the case with Ironfist Cannabis, where we started out shooting right where the cannabis plants themselves were growing, but had to pivot to trimming the tops off and using a studio background and off camera lighting setup to get the results you see here. This also taught me that I cannot again shoot indoors on location at such a place as the odor from the plants lingers to this day still in some of my photo gear! Thank you to Javier for helping with the shoot on site. This was also the first chance to use my new snoot to really focus the light only on part of the plants. You can see the simple but effective setup below in a BTS shot.

Read More

Creative Professional Headshot in Wesley Chapel Florida Home Studio with Austin and son

Creative business headshot made in Wesley Chapel home studio - Nikon D300 Nikkor 80-200mm @ f/7.1 ISO 200 1/250th - Strobist: SB-800 in a snoot to frame rightIt was a bit of a long time in the making setting up this creative headshot shoot with Austin in my home photography study currently in the Wesley Chapel area.  We first discussed it in April.  Often times as a professional photographer persistent following up is required if a client does not have immediate availablity.  

A wardrobe and background change for this creative headshot in Wesley Chapel Florida - Nikon D300 Nikkor 80-200mm @ f/8 ISO 200 1/250th - Strobist: SB-800 & SB600 to frame left & rightAustin wanted a more creative look to his headshots, and liked some of the ones I did in the past with just one speedlight creating a lot of deep shadows and a black background.  After a wardrobe change I added a second speedlight and placed each one more on the side of him, rather than front and back.  That created the lighting look in the shot above with the white background.

Austin brought his son with him, so after the headshots I suggested we make a quick father & son portrait in my Wesley Chapel home photography studioHe had brought his son with him, so after Austin's two headshots were finished, I asked if he would like to get a quick portrait with his son while all the lighting was still setup.  His son joined him and I sent the portrait above as a free bonus along with his two headshots.  

Brolly & snoot ice cream sundae strobist lighting setup

Would you eat this ice cream? Nikon D300 with Nikkor AF-S 105mm VR micro f/2.8G lens @ f/16 ISO 200 1/250th Strobist: Nikon SB-800 Speedlight in 42" brolly @ 1/4 power behind to left & Nikon SB-600 Speedlight @ 1/8th power in Honl snoot to frame right triggered using Yongnuo remotesThis ice cream sundae is one of my favorite possessions.  It looks good enough to eat right?  However, it is made by a famous company in Japan that produces realistic food models for display in front of restaurants.  It is common, almost required, for a restaurant to put many of its dishes on display in front of the restaurant to entice passersby to come eat there.  I had been waiting for an opportunity to photograph it, so I finally decided to use it as a subject for a demonstration on what each light does in a two-light strobist setup.  The above shot is the completely lit final image.  I got the idea to show how adding lights changes a shot from this video of a photographer setting up $60,000 worth of lights to get a shot of a Lamborghini Aventador.  I cannot recommend watching the video enough as it is outstanding.  This post does not compare at all to that video, but it is something you can practice in your living room assuming you do not have access to $60k of lights and/or a Lamborghini.  

This is the off-camera-flash setup I used right in my (cramped) living room space.  My trusty new 42" brolly is on the left with a Nikon SB-800 Speedlight shootoing into it.  In the lower right corner you can see a Nikon SB-600 Speedlight with a Honl snoot attached.  The SB-800 was @ 1/4 power and the SB-600 @ 1/8th power.  I set my shutter speed to 1/250th (the fastest I can sync with the Yongnuo radio triggers) in order to produce a black background (read more about how to make a black background).  I had to carefully position the lights so neither bounced light off the wall behind the ice cream, which from where I shot was the wall space next to the rear wheel of the bicycle.  In a studio or larger space this shot would be much easier to setup.

From the angle I was shooting at you can see that the brolly though the largest light source does not add much light to the subject.  If I had just used the snoot, the handle and back part of the ice cream would remain too dark.  The top image in this post shows what both lights combined can produce.  

Try making a shot like this at home with using multiple light sources and see the effect adding, moving or removing a light source has on how your subject looks.  Be sure and post a link to your results in the commments below. 

  • Read more photography tips
  • Reserve your own 1-on-1 DSLR Photography Lesson with Jason today!
  • Learn more about the lessons