manual mode

DSLR Photography Tip - adjust shutter speed first to fix exposure

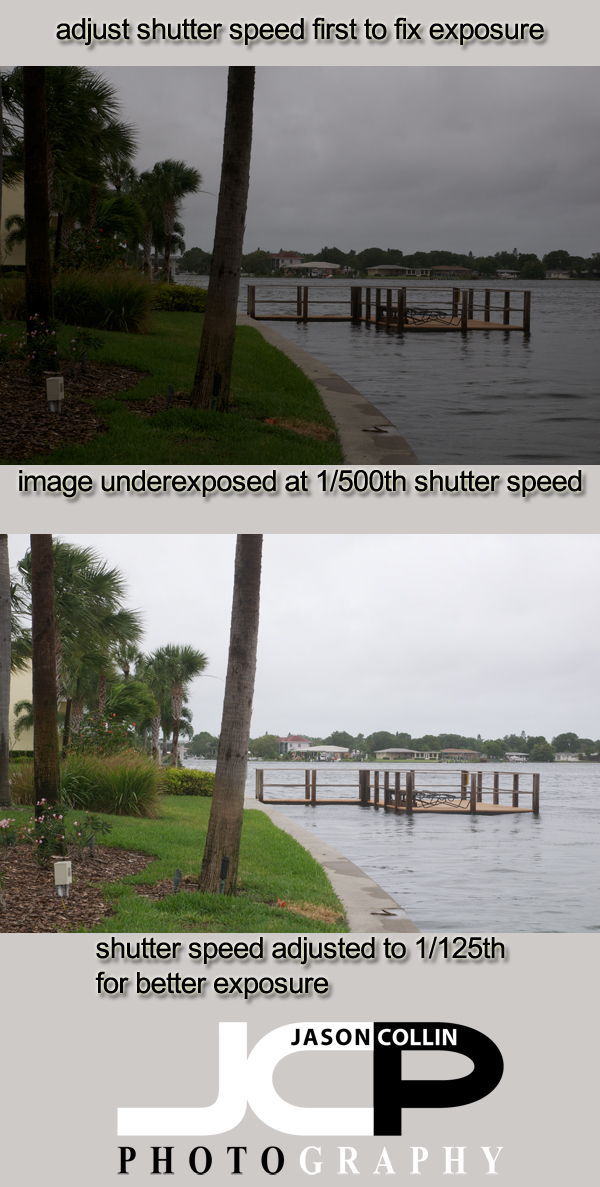
If you are photographing a still subject, you should be shooting in manual mode with your DSLR (if you do not know how, I offer 1-on-1 photography lessons that will).  Therefore, you have an aperture you want to shoot at in order to get the best DoF for your subject.  So if your initial shot does not have the exposure you want (underexposed or overexposed), then you should adjust shutter speed first in order to fix the exposure, not aperture or ISO.

In my example photographs above, both images are straight out of the camera at the exact same settings, save for the shutter speeds.  At 1/500th the image is underexposed, which is not surprising since at default daylight settings I only recommend 1/320th as a max shutter speed and today is very overcast with a tropical storm passing by (note the dock is almost underwater!).

I did not change my aperture as I want to maintain the DoF f/11 offers, and I did not adjust the ISO as I kept that set at the lowest in order to maintain the best image quality.  On pretty much every DSLR, even if it has only one dial on the camera body, in manual mode that dial defaults to shutter speed for a reason...because you change shutter speed the most often.  In the photo of the dock, I adjusted the shutter speed from 1/500th to 1/125th to get the exposure I wanted, leaving all other settings the same.

So remember when shooting still subjects in manual mode, adjust the shutter speed first in order to fix any exposure problems.

Photography Tip - use your speedlight external flash at 1/4 power manual mode

I use my speedlights at 1/4 power most of the time in manual mode.Speedlights, or external flashes, are great tools and in my view absolutely necessary for every photographer to own.  They are actually very easy to use for the most part.  Current speedlights have TTL (through the lens) modes which are basically automatic modes.  You connect the speedlight to your DSLR's hotshoe, and the camera's meter determine's the power used by the speedlight.  This sounds great, and is convenient, but the problem is often too much power is used resulting in black images.  Why?  Because speedlights need time to recycle their charges between flashes.  The more power used, the longer the time.  

This is why a majority of the time I use my speedlights at 1/4 power and always in manual mode.  At this quarter power setting the speedlight can take a small burst of shots (3+ in a row) allowing me to capture action in events, group shots, etc without having one of those frames be pure black because the flash did not fire due to a long recycle time.  

Try using your speedlight in manual mode at 1/4 power and then compensate for any exposure needs using the settings on your DSLR.  You will get more consistent results and your speedlight's batteries will last longer too!

Manual Mode shooting tip - read the meter first then the histogram after the shot

If you are hesitant to use manual mode on your DSLR because of concern over getting the exposure right, you DSLR has the tools you need to help you!  Before you push the shutter you can use your camera's meter to get an idea of what it thinks the exposure should be.  Then after the shot read the histogram to see how the exposure really came out.  After using these two tools you can then adjust your exposure settings (aperture, shutter speed, ISO) to get the results you want.

Shooting in manual exposure mode is greatly simplified if you use the meter before pressing the shutter, then read the histogram after pressing the shutter.  Try it out and let me know in the comments below how it worked for you!

DSLR Photography Lesson Portrait Practice with Natasha & Canon XT

Natasha atop a parking garage in downtown St. Petersburg with her Canon XT for portrait practiceFor our second of four DSLR photography lessons, I once again meet Natasha in downtown St. Petersburg.  For this second lesson we focused on low light portraits.  We started off in a covered area along 2nd Ave that I have used for other lessons.  For all my portrait work I use manual exposure mode.  However, I had Natasha start out using aperture priority because I wanted her to see what type of exposures the camera is capable of choosing on its own.  Using several different apertures and even adjusting the ISO did not yield an exposure I thought was the best possible.  This is when I had Natasha switch to manual mode.

Aperture priority mode did provide us with useful information.  Noting the shutter speeds it chose, I was able to advise Natasha on what shutter speed to actually set in manual mode to yield a more properly exposed portrait.  For example, if the camera was choosing 1/160th in aperture priority mode with a slightly dark exposure, in manual mode a slower shutter speed like 1/100th would be set to better expose the subject matter.  

Natasha does not yet have an external flash, so we used the popup flash on her Canon XT.  Using some special composition techniques, and a well placed wall, I was able to show her how to kind of bounce the light even from her popup flash so as to not directly blast the subject straight on, which usually results in a not very natural skin tone.

I am enjoying these single focused, high detail lessons.  Lesson three will be soon! 

  • Reserve your own 1-on-1 DSLR Photography Lesson with Jason today!
  • Learn more about the lessons
  • Browse past lessons with all of my students